Showing posts with label flash bulbs. Show all posts

Thursday, 5 September 2013

Contina IIa

Zeiss Ikon's Contina camera was a long lived and varied series of cameras.  The series started as the Ikonta 35 which was a post-war version of the 120 format Ikonta adapted to take 35 mm film.  This camera became two series of cameras - the Contessa and the Contina; the first Contessas and Continas were folding cameras. The Contessa version was more up-market than the Contina version. I have already written about one of the Contessa line - the Contessa LKE. The Contessa line have better lenses (Tessars) and coupled light meters and rangefinders. The Contina range have cheaper lenses (Novar, Novicar and Pantar) and the light meters, where present, are uncoupled. I have also written about the Contina line elsewhere - the Contina Ic.

lens: Novicar
focal length:  45mm
apertures: f2.8 to f22
focus range: 1m to infinity
lens fitting: fixed
shutter: Prontor-SVS
speeds: 1 second to 1/300 seconds
flash: PC connector
film size: 35mm

Contina IIa - front view, meter window closed
To make identifying and placing Contina cameras as difficult as possible, the Contina series split into two lines of cameras simultaneously.  The original Contina folding camera  became the Contina II folding camera with a light meter and then a series of derivatives. That original Contina folding camera, at the same time, became the Contina I rigid camera - no light meter or rangefinder - and then a series of derivatives.
Front view - meter window open

So, at any one time after 1953 there were two different Continas available, both just designated Contina. I have been referring to Contina I, Contina II, Contina Ic, Contina IIa but I don't think those were names offered by Zeiss Ikon, rather us collectors use them to make sense of the mish-mash of models.

Daniel Jiménez has produced a 'family tree' of the Contina series which he has given me permission to use here:

Copyright Daniel Jiménez
Daniel has a useful camera blog which can be found in an English version here. He also has a much larger Spanish version here.

This camera - is a Contina IIa. It is derived from the Contina II which was a folding camera but this version does not fold - that is, it is rigid. It is a compact and solid camera measuring 120 x 65 x 85 mm and weighs 567g. It offers a built-in but uncoupled light meter and an EV enabled shutter. It was not a cheap camera - it cost £43/15/1 in 1957 (in old money, or £43.76 in new money) which, given the average male wage in 1957 was £9.00 means this camera cost the equivalent of £2,500 in 2013 values. The version with a Novar lens only cost £36/12/7.

The top plate of the camera has a number of  items on it. On the left is a small rewind knob. I prefer these to the small folding cranks that became ubiquitous in the 1960s. When you first turn the rewind knob, it raises itself by one cm. This is above the height of the centre of the top plate and makes it easier to hold and turn.

rear and top view
Next to the rewind knob is an accessory shoe. At the time that this camera was made (1956/58) this was more likely to be used for a separate rangefinder than a flashgun. There are no electrical contacts in the accessory shoe so it is a cold shoe.

Next to the accessory shoe is the light meter window and the light meter control knob. Visible in the window is a needle connected to the light meter. The brighter the light, the more this needle moves towards the rear of the camera. Also in this window is a white circle which moves in response to the user moving the control knob. When the white circle is over the needle, the correct exposure can be read off the scale around the control knob. This is mostly in EV values - more later. In the centre of the control knob is the setting for the film speed. This camera was made in 1956/8 and uses the film speed standards in place at that time. A few years later (1960), the American Standards Association (ASA) revisited their film speed standard to produce the later ASA standard now known as ISO. The German DIN system remained unchanged so on this camera 21 DIN = 40 ASA rather than the later standard of 21 DIN = 100 ASA (ISO) - I always use the DIN standard with old cameras to make sure I do not get it wrong.

On the far right of the top plate is the film advance lever. This moves through about 200 degrees to advance the film and cock the shutter. The lever is all metal and only curves a very slight amount which I find makes it uncomfortable to use. In the centre of the film advance lever should be the frame counter. I can make no comment about this as a prior owner has removed it. Looking at the state of the metal that is left, I suspect a very amateurish attempt at a repair.

The front of the camera has four items - meter window, viewfinder window, shutter housing and flash PC connector. The meter window contains a two cm by one cm lens covering a selenium photoelectric cell.  This does not need any batteries, which I always reckon to be a good thing.  Most camera electrics from the 1960s to 1980s use mercury cells which are now illegal in just about every country there is. This window has a hinged cover - to open it, you lightly press the right-hand end (as the camera is to your eye). Selenium meters get a poor press as the photoelectric cell will deteriorate with time. However, if the cell is kept in the dark it only deteriorates very slowly, so this cell being covered, it has not yet (in 57 years) deteriorated enough to worry about. This is a single scale meter - an earlier version of the Contina IIa had a dual scale meter with a small window in the hinged cover.

Next to the meter window is the viewfinder window. This has quite a small eyepiece and a plain view with no bright lines. I find I cannot use it while wearing my glasses.  The Contina Ic, which I also own, has a much larger eyepiece - this was made just a few years later in the early 1960s.

In the centre of the front is a square chrome bezel containing the shutter.  This is a Prontor-SVS from Gauthier. This works on the EV system.  The light meter gives you an EV value from between  three and eighteen and you transfer this number to the shutter - you have to press a small tab on the shutter housing to get the EV ring to turn. Each EV number gives you a small range of shutter speed and aperture settings.  If you turn the EV setting ring without pressing the small tab, different speed/aperture combinations will present themselves to the mark at the top of the housing. For very low light levels, the shutter speeds are in green - you cannot set these, but you can read them.  To use them, turn the control ring on the shutter housing to B and read off a speed next to the aperture you want to use.  You then need to time the exposure yourself - the speeds are from four seconds to sixty seconds and you can count this quite accurately without a watch.

The lens is a Novicar lens (a Novar lens was also available) which I have found to be excellent if stopped down to f5.6 or f8. It is threaded for 27mm filters.  Maximum aperture is f2.8 and its focal length is 45 mm. Focusing is from about three feet to infinity (one metre to infinity). The throw of the focusing is only about 120 degrees, so very accurate focusing is not possible, but with no rangefinder, this camera was always going to rely on depth of field.

On the lower right of the shutter bezel (looking at the camera) is the flash PC (Prontor-Compur) connector.  This is the only means of connecting a flashgun. On the side of the shutter housing there is a selector for M or X - Magnesium or Xenon  - flash. M is for flash bulbs and X for electronic flash. With M, the flash is fired slightly before the shutter opens to allow the burning of the flash bulb to reach its maximum while the shutter is fully open. With X, the flash is fired as the shutter blades are fully open as electronic flash does not require time to reach its maximum intensity. This selector also has a V setting. This means Vorlaufwerk and is German for self timer. Moving the selector to this position causes an eight second delay between pressing the shutter release and the shutter firing. It is never a good idea to try this facility on an old camera as it might well cause the shutter to stop working permanently.
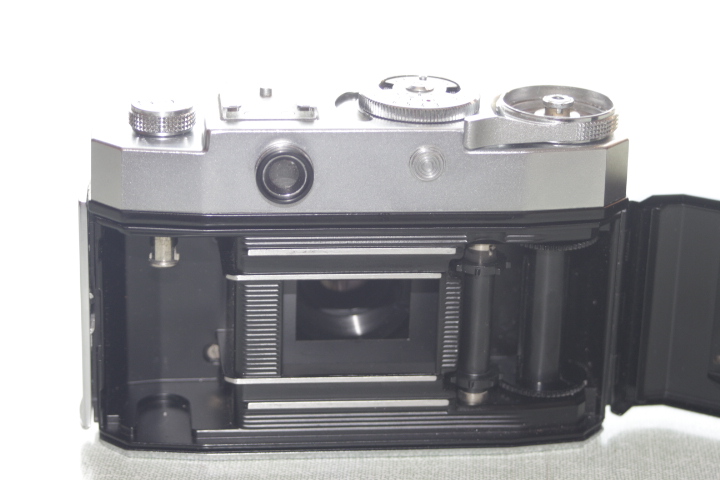
Rear/internal view

The back opens by pulling down a small catch on the lower right-hand edge. The back is hinged and there is a single light seal - a piece of velvet right by the hinge. The back itself has the pressure plate and a tensioning roller that goes by the take-up spool. Around the film mask are two machined film guides - showing as bright lines in the photograph above. The pawl for the rewind mechanism can be raised to enable fitting a film cassette and then lowered to secure the cassette.

24-December 2013


I have now finished my test roll of film - Agfa Vista+ 200 ISO from Poundland (yes, £1.00 per roll!). As expected, the camera works well. The only awkward thing was setting the EV values on the shutter as the mechanism is rather stiff.  I definitely would not want it too loose but it would be nice for it to be a bit easier to alter. The frame counter is missing on this camera - I assume due to a botched repair by the previous owner. It does not affect the camera's functionality at all and got me the camera at a bargain price. Below are a selection of pictures from the test film.

Pottergate Arch, Lincoln


Fountain in Lincoln Arboretum


Rockabilly Buskers, Lincoln


Lincoln Shoppers getting ready for Xmas


Foreign Buskers, Lincoln


Tuesday, 25 June 2013

Exa 500

This is my fourth Ihagee camera and my third Exa.  The original Exa was a cut-down low-cost version of the Exakta and then the Exa line developed in its own right.

Exa 500 - front view

The Exa 500 is the end of the line for Exa cameras  and was developed after Ihagee was subsumed into VEB Pentacon, the state camera manufacturer.  The lineage from the Exakta is apparent in the shape.  This camera still has the rhomboidal shape introduced with the original 127 format Exakta in 1933.  It also still has the shutter release on the left, although the film advance is now on the right.  Another change is the fixed pentaprism viewfinder, so I cannot use the delightful waist level finder with this camera.

The immediate predecessor of this camera was the Exa II.  The body of the Exa IIa and this Exa 500 are identical although there are some internal differences.

Exa 500 - top view showing rhomboidal shape
The Exa 500 has a vertical cloth focal plane shutter which travels from bottom to top.  This shutter provides speeds from 1/2 to 1/500 seconds plus B.  This means it is twice as fast as the Exa II.  There are two flash settings: 1/60 for electronic flash and 1/15 for flash bulbs. This camera follows the Exa standard and flash synch is achieved by aligning a dot on the speed dial with either a zigzag icon or a bulb icon.  On the front of the body is a single PC connector.

This camera also has a shutter lock beside the viewfinder - cover the red dot to shoot, uncover to store the camera.  The only other real change between the Exa II and the Exa 500 is that the Exa 500 has an instant return mirror so the viewfinder does not go blank when you fire a shot.

Like other Exakta/Exa cameras, the film take-up spool is removable and can be replaced with an empty film cassette.  Doing this obviates the need to rewind the film but it does cost you one frame of film.  There is no internal knife to cut the film like the Exaktas have so this must be done after opening the back.  The only real advantage of this is the possibility of developing half a roll of film but I cannot imaging that many people have ever bothered.

The film advance is on the right as is normal in non-Ihagee cameras.  It has quite a short stroke of just over 90 degrees (compared to the Exakta Varex II where the advance travels about 300 degrees).

The back of these cameras come away from the camera body in one piece with the base.  This is supposed to make it easier to load film but I find this method harder.
Exa 500 - inside and the separated back  and take-up spool

Exa cameras were supplied with a variety of lenses depending on how much the customer wanted to pay.  This camera has a Meyer-Optik Domiplan. This is a triplet design so not as good as the Tessar option, but the Domiplan performs well enough when stopped down.  The lens is a semi-automatic lens - the diaphragm closes when the shutter release is pressed but stays open for composition and focussing.

The Domiplan achieves this automation by a hinged lug that protrudes over the shutter release - the photographer presses this lug which in turn presses the shutter release.

This mechanism in the Domiplan lens has a weak link that is prone to seizing but this particular lens performs OK.  My other Domiplan lens needed the mechanism cleaning with naphtha before it would work satisfactorily.

This camera would also work with my Exa fit Carl Zeiss Jena Tessar (we need to specify Carl Zeiss Jena in contradiction to Carl Zeiss Opton, the new (at the time) Carl Zeiss operation in West Germany.  East German Carl Zeiss Jena lenses are generally better than Carl Zeiss Opton lenses).

In use, this camera is much as you would expect.  The shutter speed selector is rather loose and I was not sure I was actually selecting any speed, but I tried exposures at various shutter speeds and they have all come out well exposed so the shutter speed selector must be doing its job.

There is a red flag in the viewfinder to tell you that you need to advance the film before taking the next shot.  In previous Exa cameras this was not necessary as the mirror would only return to the viewing position when you had wound on.  In this model, the mirror is an instant return mirror and it would seem that the makers thought users might get confused with such sophistication, hence the red flag.

The camera is light-proof (not a given with old cameras) and the shutter is moving smoothly.

Here are some sample photographs from my test film:


Monday, 10 June 2013

Ihagee Exakta Varex IIb

This is one of Ihagee's 'serious' cameras.  It is very similar to the two Exas I already own but has more facilities and is built to a higher standard.  It is the usual Exakta/Exa rhomboidal shape.  On my two Exa cameras, the back and base come away as one to allow film loading.  The Varex IIb is more traditional with a hinged back.  This back, however, is also removable if you want.

lens: none
focal length:  n/a
apertures: n/a
focus range: n/a
lens fitting: Exakta double bayonet
shutter: horizontal cloth focal plane
speeds: 12 seconds to 1/1000 seconds
flash: three PC connectors, no accessory shoe
film size:  35mm
Exakta Varex IIb with lens and viewfinder added


The camera is heavy, weighing 581g without lens or viewfinder.  It is left-handed.  The film advance is on the left as is the shutter release and one of the two (yes, two) shutter speed selectors.

This camera came without a lens and has both (yes, both) the Exakta bayonet mounts so this camera will take any Exakta fit lens.  Strictly, this is a Varex IIa type bayonet as it has slots at the inner bayonet flanges (not sure why).
Exakta Varex IIb as I bought it

The reason for having two bayonet mounts on one camera is that the original mount restricted the width of attached lenses.  When Ihagee developed telephoto lenses, there was too much vignetting of the image to be usable. The new bayonet mount has a wider diameter and so allows wider lenses to be fitted.  (note: I am using the word 'wider' in a mechanical sense, not in its other, optical, sense.)

The shutter release is beside the lens mount to allow the use of automatic lenses.  In the Exakta system, the lens has a secondary shutter release which fits over the camera's shutter release.  When you press the lens' secondary release, the lens diaphragm closes and the primary release is pressed, actuating the shutter.

The shutter is a horizontal cloth focal plane shutter.  On this particular specimen, the shutter is faulty.  The mechanism sounds dry (there is a faint but clear squeal when the shutter actuates), the second curtain is significantly wrinkled and, at the slower speeds, the second curtain doesn't quite close.  At 1/1000, it works fine.

This is the only camera I have seen that has two speed selectors.  On the left is a small conventional selector that covers speeds from 1/30 to 1/1000 plus B and T.  This works in a fairly conventional manner - lift, turn to the required speed and release.


slow speed selector
fast speed selector
On the right of the camera is another speed selector which covers speeds from 1/8 to 12 seconds.  These figures are in black.  This selector also provides a delay of up to six seconds (using the figures in red).  When using the delay, you also get mirror lock up so reduced vibration can be achieved when using the macro attachment - a facility that no other of my SLRs has until my Canon EOS of 1995.  In the centre of the slow speed selector there is a film speed reminder dial.  As this camera is totally manual, this dial does nothing except remind you what film you have loaded into the camera.

Another quirky thing about Exakta cameras is the film advance lever.  This moves through over 300 degrees which is more than you can do in one motion.  I am actually finding this ok but I start the motion with my left thumb for the first half of the travel and then my left index finger takes over.  Around the film advance lever there is a frame counter.  This counts up from zero - so tells you how many frames you have shot.  It is also quirky as the frame count changes when you press the shutter release rather than when you advance the film.


Exakta cameras have exchangeable viewfinders.  When I bought this camera, there was no viewfinder with it, just a rectangular hole in the top plate.  I have two viewfinders for my Exa cameras and these fit this camera so I have a choice of an eye-level finder and a waist level finder.

Hole in the top plate for fitting the viewfinder
Moving to the front of the camera, there is little to note.  As I have mentioned, there is a double bayonet mount and a shutter release.  There are also three (yes, three) PC connectors for a flash gun.  Ihagee seem to have tried to be as idiosyncratic as possible with their cameras.  Rather than go down the route used by Prontor and Compur (hence PC) and have a switch to select between bulb and electronic flash, Ihagee have provided separate connectors , one for electronic flash and two for flash bulbs.

In fact, the three PC connectors can be used in various ways to allow different shutter speeds.  Using the X connector and a shutter speed of 1/60 allows use of electronic flash.  Using the FP (Focal Plane) connector allows shutter speeds up to 1/1000 seconds which is an incredibly fast shutter speed for flash.  The manual gives guide numbers for different bulbs and shutter speeds - the fast speeds being achieved because the flashbulbs suitable for the FP connector have a flash duration of around 1/40 second and so are burning throughout the expossure.  The F (Fast) connector allows small fast flashbulbs to be used with a shutter speed of 1/30.  The X (Electronic) connector can also be used with a shutter speed of 1/8 with any flashbulb.  I am not sure how much advantage is given to the photographer with the above choices, but I almost never use flash and have never used flashbulbs, so I am likely to be missing the point.

Underneath the camera are four knobs.  The smallest of these unscrews to allow the use of an internal knife to cut the film when an empty cassette is used in place of the take-up spool.  Next to this is the rewind knob with a small folding crank.  At the other end of the camera is a knob which is pulled away from the camera to release the catch on the back.  Between these two knobs is the tripod boss which is the standard 1/4 Whitworth tread.
Base of camera

The outside of the back has two small chrome rectangles and one large chrome rectangle.  These are the fitting for internal components, the small rectangles help to keep the film flat and the large rectangle is part of the fitting of the pressure plate.


Rear of camera

The camera in use:

I am trying out this camera (despite having a faulty shutter) with a roll of out-of-date and no longer made film - Kodak Plus X.  I have never used this film before but it had a very good reputation.  This film is monochrome and is rated at 125 ASA/22 DIN.  I don't know why but it seemed appropriate to try this camera with a vintage monochrome film.

The camera set-up I am using is the Varex IIb body, Carl Zeiss Jena Tessar (50mm and f2.8) and a waist-level viewfinder with a plain focussing screen.  [This lens should not be confused with a Carl Zeiss Opton Tessar from West Germany.  The Carl Zeiss Jena lens is the real thing.]

There are many options available for this camera for both lens and finder.  I have the Carl Zeiss Jena Tessar and two Meyer-Optik Domiplan lenses available and the waist-level finder and a pentaprism eye-level finder.  I am enjoying the waist-level finder but must admit to struggling a bit with the reverse action when I move the camera.

First aspect of the waist-level finder is the fact that the image is reversed left-to-right.  If you want to move the image to the right, you need to move the camera to the left.

It is also easy to get verticals at an angle.  Again, you have to move the camera the 'wrong' way to correct this.

This finder has a plain focussing screen which makes focussing a bit harder.  For me, this is not a significant problem as I usually use hyperfocal focussing.  On the rare occasions when I rely on critical focussing, there is a hinged magnifier available which is more than I shall ever need.  If not, other focussing screens are available with micro-prisms and split-image centres.

I have been carrying this camera around for about an hour this afternoon and I can confirm that this is a heavy camera.  There are strap lugs with split rings available to connect a strap.  A nice touch is the presence of triangular leather patches behind the split rings to stop the rings and strap ends from scratching the camera body.  While I have a number of straps available, I have not fitted one to this camera.

Contrary to my usual practice, I am using a shutter-priority exposure system, adjusting the aperture to vary the exposure.  The reason I am doing this is because this ('faulty') shutter seems to perform best at 1/125 seconds so I am keeping it set at this speed.

What I am finding, which delights me, is that I am seeing the image in the wauist-level finder as a picture rather than as a view.  This is making composition not so much easier (see my comments about image reversal) but clearer and more precise.  So far I much prefer it.

I am also finding the left-hand operation surprisingly easy.  I am no longer pressing the slow speed selector hoping to fire the shutter.  The film advance with its 300 degree travel is also surprisingly easy to use left handed.

As I have already said, I usually use hyperfocal focussing but if I did not I think I would find right-handed focussing cumbersome.

My first film being completed, I need to develop the film and scan it.  Then I shall post some sample pictures here.

Film is now developed and scanned.  Here are some example pictures, clearly showing the problem with the shutter is one of them.  The rest are not too bad (if you ignore my poor scanning ability!).


Tuesday, 14 May 2013

Voigtlander Vito I


Voigtlander Vito
I have used as a title for this article 'Vito I' but the camera is actually the Vito - Voigtlander were not aware of the forthcoming Vito range at this point.  I already have an article on the Vito II here and much in that article applies here as well.  The two cameras are very similar as you might expect.  The lens serial number says the lens was made in 1945 which is also the probable date of manufacture - one of the first cameras to be made in war-ravished Germany.

lens: Skopar
focal length: 50mm
apertures: 3.5 to 16
focus range: 1 metre to infinity
lens fitting: fixed
shutter: Prontor II
speeds:  1/5 to 1/200
flash: synchronised for bulbs
film size:  35mm

The camera is a folder and nicely compact when closed.  It measures 120mm by 70mm by 40mm closed and 120mm by 70mm by 80mm when open.  Closed, it nicely fits in a trouser or jacket pocket.  The only distinguishing mark on the closed camera is an ornate 'V' on the lens door and a fairly indistinct 'Voigtlander' is embossed on the leatherette on the back together with the model name 'Vito'.  There is also the country of origin embossed on the back which is 'Germany'.  As Germany is the English name for the country this indicates that it is an official import.  Strangely, for an official import, the focussing scale is in metres rather than feet, suggesting that Voigtlander were not fully geared up for export in 1945.
Vito top view

The top plate is very uncluttered.  There is a knurled ring at either end.  The right-hand ring is the film advance and the left-hand ring the rewind.  In the centre of the top plate is a very small, reverse Galilean viewfinder.  The eyepiece is only 5mm by 2.5mm.  The image seen is roughly 0.5 times life size.  This is very small compared to more modern viewfinders but it is more than adequate.  There is also a frame counter which counts up from one.  There is no accessory shoe (flash shoe) although one was available as an extra and fitted over the viewfinder.

On the rear of the top plate is a lever.  In the normal position (down) the film advance will only advance one frame.  When raised, the film can be advanced as far as you want and can be rewound.  The toothed wheel which is exposed by raising the this lever can be used to set the frame number to one.

The underside of the camera contains three items.  Close to the centre is a 3/8 Whitworth tripod boss.  A 1/4 Whitworth insert would have been available for the more usual tripod size.  There is also a button to release the lens door.  This is spring loaded and partially opens the door.  This door never sprung open under its own steam and from new they needed the user to fully open the door once it was released.

The third item on the base is two 'feet'.  These are little more than pins.  A third foot is on the lens door giving three feet altogether which allow the camera to sit stably on a flat surface.  This is primarily intended to allow group portraits using the self-timer.

When the door is opened, the lens comes forward on its bellows and locks in place.  The shutter release is on the top edge of the door together with a threaded socket for a standard cable release.
Vito - lens door open

The lens is a Skopar f3.5, 50mm lens.  This is the original version of the famous Color-Skopar and is not calculated for colour film.  However, it is intended for panchromatic film so should perform well with colour film.  See the test pictures below for details.  This lens focusses from one metre to infinity and has Voigtlander's usual two Happy Snapper settings - a circle for the hyperfocal distance at f5.6 (approximately five metres to infinity at f5.6 or 2.5 metres to infinity at f16) and a triangle which gives a focus range of 2.5 metres to five metres at f5.6 (ideal for groups).  This lens has no blue/purple tinge and so cannot have been coated as was normal post-WWII and so will be liable to flare.

The shutter is a Prontor II (which is the same as a Klio on a Zeiss Ikon camera) which is a pre-war design and was soon to be updated to the Prontor S.  This Prontor II has a PC connector and so must be synchronised for flash - I would suspect for fast flash bulbs (F: sync) but there is no indication of this on the shutter housing (my Vito II has a Pronto shutter and this is specifically marked F:).  Shutter speeds are 1/5, 1/10, 1/25, 1/50, 1/100 and 1/200 which is more than adequate.  The bezel of the shutter housing bears the shutter name - Prontor II - Gauthier's maker logo and Voigtlander's script name.
Vito - lens and shutter

There is a self-timer lever which we are always told not to use on old cameras to prevent damage to the shutter.  It barely works on this camera, taking 16 seconds to actuate the shutter and then needing a little help from my finger over the last two or three seconds.

This shutter needs cocking before use - the cocking lever moves from left to right and up to cock the shutter.

Apertures available are f3.5 to f16.  As there are no click-stops, you can set an intermediate value if you want to.  The only other item of note on the shutter assembly is a stellate lever.  I am not entirely sure what this is for but I suspect it was to do with the hinged yellow filter that the early Vitos were fitted with.  The shutter bezel has three screws in it that are also part of the filter assembly.  When production had used up the store of pre-war parts, the bezel no longer had these three screws.

Inside is where this camera gets interesting.  The design dates from 1939 and the camera was intended to use unperforated 35mm film.  As the film was unperforated, there are no sprockets in the camera.  Instead, the camera judges the film framing with a feeler roller as in an up-market 120 camera. I have been led to believe  by the Interweb that this camera was designed to use Kodak's 828 film which is unperforated 35 mm film with backing paper like 120 film. As the film came on a spool with backing paper (again, as with 120 film) there are springs fitted to the film chambers to keep the film tight on the spools. Actually, looking at the camera, there is no reason why the camera should not have used unperforated 35 mm film in a reloadable cassette - Leica and Zeiss Ikon made such cassettes for their 35 mm cameras. I have never seen a 1939 Vito - this would tells us immediately whether the camera used 828 film or a loadable cassette as 828 film would require a red window on the back of the camera to allow the user to see at least the first frame number. There is no red window on my 1945 Vito - was there one on the 1939 version? When production restarted in 1945, Voigtlander decided to modify the camera for modern perforated 35mm film (135 format).  The only real change is that the film gate (the rectangular opening that lets the light hit the film in the correct place) is reduced to 24mm by 36mm (originally it had been 30mm by 40mm).

The film take up chamber will take the standard spool from a 35mm cassette as a take-up spool or an empty cassette can be fitted which means that when the film is finished you can open the back and cut the film with the exposed part already in a cassette.

These pictures were taken with this camera on Agfa Vista plus 200 ISO colour negative film (details here): (the black wedge would seem to be a scanning artifact.  The frames all overlap about 1-2 mm and this overlap is also wedge shaped)

Cowslip close-up (from one metre away)

Lincoln Broadgate

Lincoln High Street

Lincoln Pottergate

Wednesday, 1 May 2013

Bencini Comet 44

Comet 44, front view

This is a later development of the Comet line.  I also have a Comet S which is a half-frame camera.  This Comet is a full-frame camera.  It is a well designed and well made cheap camera.  In that respect it compares well with the Japanese Meisupii and Halina ranges which are not that well made. This is a 127 camera which takes square pictures 4 x 4 cm (hence the '44' in the name?).

The main body is made from cast aluminium alloy with an anodised finish.  Internally, there are some aluminium plates as well.  The back, which is also aluminium, comes away entirely to load the film.

The lens is marked as Bencini Acromatic 5.5 cm, f8.  The lens is actually a simple single meniscus lens.  In this camera, the lens is loose because someone has attempted to dismantle the camera.  Unfortunately, it is not possible to tighten the lens without a special tool which I do not have.

The shutter is a simple shutter with two speeds - 1/100 and 1/50 - and includes flash synchronisation.  The flash sync. mechanism is rather crude and is unlikely to work with electronic flash.

On the top plate on the left is the spool release to allow the insertion of a new roll of film - this is pulled up while putting the film in or taking the used spool out.  It is spring loaded to keep the film securely in place.
Comet 44, top view

Next to the spool release is an accessory shoe with a large chrome spring.  Next to this is the shutter release.  This is nicely placed for the index finger.  The last item on the top plate is a knurled chrome knob to advance the film.  This also pulls up to allow the insertion of an empty spool and removal of the finished film.

In the centre of the top is a bright yellow viewfinder.  That is, it looks yellow until you use it but looking through it, it is purple.  As is usual with roll film cameras, there is a red window on the back to allow you to see the frame numbers when you are winding the film on.

Friday, 12 April 2013

Praktica TL3

Praktica TL3, front view

lens: Meyer-Optik Görlitz Domiplan
focal length:  50 mm
apertures:  f2.8 to f22
focus range: 0.75m to infinity
lens fitting: 42 mm thread
shutter: metal vertical focal plane
speeds: to 1/1000
flash: bulb or electronic
film size: 35 mm

This is a standard looking camera from between 1984 and 1986.  It is a fairly heavy (very heavy by modern standards) and large enough to hold in two hands.  The ergonomics - the layout of the controls - is, again, normal for the time.  It is my second Praktica, the other being an MTL5B.

This camera takes 42mm thread lenses (also known as Pentax thread) which means that lenses are readily available.  It is specifically designed to work with automatic lenses (those with a pin to stop down the lens) - when the shutter is fired, a cam presses the pin and closes the aperture.  This is not essential, though, and the camera works fine with fully manual lenses.  I have shot half my test film with my Soviet Helios-44 lens from my Zenit E.  So long as you remember to manually stop the lens down for both metering and picture taking there is no problem.

This is a fully mechanical camera and no battery is required for its operation.  It does, however, use a battery for the metering system.  This should be a mercury battery giving 1.3 volts but these are no longer available.  I am using an alkaline 1.5 volt alternative which 'should' cause the camera to underexpose but I have checked the results of the built-in meter with my Ikophot meter and they are in complete agreement.

This is an SLR camera and so both metering and focussing are conducted through the lens (known as TTL, for the uninitiated).  With an automatic lens fitted, metering is done by selecting either the shutter speed or aperture, holding down the metering lever beside the shutter release and the adjusting either the aperture or the shutter speed until the needle in the viewfinder is as close to the circle as possible (i.e. it is a match-needle meter).  With the supplied lens, this is within 1/2 stop of 'perfect', with the Helios-44 it is to the nearest whole stop.

The meter can be set to a range of film speeds from 12 ASA/12 DIN to 1600 ASA/33 DIN.  It is settable in 1 DIN stages which equates to 1/3 stop.

top and rear view
The shutter is a vertical metal focal plane shutter.  It has a good range of speeds - up to 1/1000 seconds which is plenty fast enough for my photography.  There are two flash synchronisation speeds: 1/30 for bulbs and a separate position on the speed selector dial for electronic flash, which the manual says is 'about 1/125.  Both bulbs and electronic flash can synchronise at slower speeds.

Electronic flash can synchronise at 1/125 seconds (quite a high sync speed for the time) because this camera has a vertical shutter with three metal blades.  In the manual, Praktica tout this as a modern invention but Zeiss Ikon used a vertical metal shutter in the Contax I in 1932

The shutter release is not my favourite part of this camera.  It is placed on the front of the camera rather than on the top plate which I always find awkward.  Secondly, the shutter release has to be pressed flush with the housing.  This might be just my camera but a little less travel would be good.

The film winder is a lever which travels through 180 degrees but the first 20 or so degrees do nothing.

On top of the prism is an accessory shoe which has 'hot' contacts for a flash gun.  This is the only way of connecting a flash gun as there is no PC connector.  The only other control on the top plate is the film rewind crank.  As was normal for the time, this is an annoyingly small folding crank.  In the early 1960s several manufacturers introduced a large rewind crank on the base plate and it is a pity this did not become the standard.

Pressing the shutter release, you experience a significant resistance and then there is a loud and tactile 'clunk'.  I had thought my Zenit E had a heavy action but this is much worse.  I am hoping that most of this is the mirror slapping up and not the shutter.

The supplied lens is a Meyer Optik Domiplan f2.8 50mm lens.  This is a triplet lens and a cheap option.  I have yet to see the results of this lens but I have a 50mm Domiplan on my Exa IIa and that lens is fine.  Available apertures are from f2.8 to f22 in 1/2 stop clicks.

Focussing is from 0.75m to infinity and the focussing scale is in feet as well as metres.  The action is fairly stiff and changing the focus from near to far will result in the lens unscrewing rather than focussing.  Hopefully, this is lack of use and will sort itself out with use rather than being down to physical damage.

30 April 2013:

I now have the results of my test film.  It is not good.  There is a large light leak from the hinge end of the back.   I have just removed the remains of the foam light seal and replaced it with a new piece of foam.  Two frames out of the thirty six on the roll came out with no light damage.  So, light damage apart, I am quite impressed - the Domiplan lens works fine even though it is only a triplet

Lincoln Cornhill


Waterside North, Lincoln
Triton Road, Lincoln

Sunday, 20 January 2013

Exa IIa

Exa IIA front view


lens: Meyer Domiplan
focal length:  50mm
apertures: 2.8 to 22 in 1/2 stops
focus range: 0.75m to infinity
lens fitting: Exakta bayonet
shutter: vertical cloth focal plane
speeds: 2, 4, 8, 30, 60, 125, 250
flash: bulb or electronic
film size: 35 mm


Externally, this is very like the Exa Ia and exactly like the Exa 500; it has the usual Exakta trapezoidal shape.  The layout on the front fascia is the same - shutter release on the left at the top, PC connector on the right at the top.  The lens fitting is the standard Exakta double bayonet (an internal bayonet for short focal length lenses and a larger external bayonet for longer focal length lenses).

A PDF manual is available on my Google Drive

There are differences, however.  The IIa has a fixed pentaprism and eye-level viewfinder with a Fresnal focussing screen with a split-image centre.  The shutter is now a vertically running cloth focal plane shutter rather than the strange mirror shutter of the Ia.  Along with the more standard shutter comes a larger range of shutter speeds  - eight speeds with the fastest  now being 1/250 seconds.

The removable back/base is exactly the same as is the shutter lock on the left of the viewfinder.   Another change is that the rewind knob is now a fold-out crank.

Exa IIa, rear view
With a vertical focal plane shutter, it should have been possible to increase the flash synchronisation  speeds but they are rather slow - 1/15 for bulbs or 1/30 for electronic flash.  The fact that bulb flash needs a slowest synch speed suggests that the only synch available is as the first shutter curtain ends its travel, bulb synch relying on the shutter being still fully open when the flash bulb reaches full intensity.

The Exa IIa came with a Meyer Domiplan lens rather than the Carl Zeiss Tessar that was standard with the Exa Ia.  I have yet to see the results from this lens but it has the reputation of delivering good results when stopped down.

This lens, like the Tessar, automatically stops down the aperture when the shutter release is pressed.  Exa lenses manage this by means of a lug on the lens barrel that covers the shutter release on the camera body.  The shutter is activated by pressing this lug which in turn presses the shutter release.

On the Domiplan lens, this lug is hinged and so presses the shutter release through an arc.  Because the release is not pressed straight in it can cause internal damage to the release mechanism.  This is made worse if the lug does not exactly line up with the shutter release so that it presses on one side of the release button.
shutter release lugs - Domiplan on left, Tessar on right

There is a further fault with the Domiplan.  As mentioned above, the release lug is hinged and this hinge dries out with time.  When the lubricant has dried out, the lug will not always return to its rest position after a photograph is taken.  This means that the aperture does not re-open to f2.8, leaving the viewfinder dark.  In use, this is easily remedied by flicking the lug with the shooting finger but it is annoying, nonetheless.  I have applied clock oil to this hinge and it is showing signs of freeing itself up.

4 February 2013:

Having run a test film through this camera, it is difficult to assess the camera's performance.  All the pictures ended up bright green.  This could not have  been down to the camera - it is an SLR and I would have seen the green through the viewfinder.

There are three possible causes for this green - defective development, defective film or defective scanning.  The staff in the lab assure me that mine is the only film to have come out green and so they do not think it was their development.

Defective scanning is a possibility but I would think it to be an automated process and if they have not changed any settings then the scanning process should not produce any colour cast.

The third possibility is a defective film.  The film I used was Agfaphoto Vista + 200 ISO, made under contract in Japan by, I think, Fuji-film.  Reputable makes of film should be reliable but in any factory process it is possible for the occasional item to escape the quality assurance system.

I am thinking that the reason for the green cast in my test film is the middle one - a defective scan - looking at the negatives, there is evidence of all three colours on the perforated rebate of the film (these are the frame numbers in magenta (the negative of green) and test lines in red and green (the negatives of cyan and yellow)) so it looks like at least part of the film has the requisite colour layers in the emulsion and the development has developed these correctly.  When I have time, I will scan the film myself to check the scan quality.

In addition to the green colour there are other problems which are definitely down to the camera.  At the bottom of each picture is a very over-exposed strip - this equates to the top of the film in the camera.  As the shutter travels vertically from bottom to top, this is most likely caused by the second shutter curtain hesitating slightly at the end of its travel.  This might cure itself with use which is quite common with 'stiff' mechanisms in old cameras.  I also need to be aware that I used this camera in sub-zero temperatures.  The lubricant in the shutter will be thicker at these temperatures and the shutter might well work better in warmer weather.

In general, looking at the negatives, the film has been exposed appropriately with good, but not excessive image density.

Some of the negatives are blank but this is down to operator error.  The shutter release is in the 'wrong' place.  Years of practise have taught me to be careful with the placing of my right hand when holding the camera.  With Exas I need to be careful with the placing of my left hand instead.  I also need to learn to use the shutter lock when not actually shooting.

This is my second Exa camera and my third roll of film on Exas.  That is enough to know that I like using Exa cameras with their various idiosyncrasies.  See further down for well exposed pictures from my second roll of film.

Witham by market Square

Lindum Terrace, Lincoln

Steep Hill, Lincoln

 I now have a test film with correct colours.  Nothing to complain about there,