Showing posts with label 35mm. Show all posts

Tuesday, 6 May 2014

Zeiss Ikon Ikonta 35


This is a folding camera from Zeiss Ikon based on the medium format Ikonta series. This camera gave rise to two lines of cameras in the mid-50s - the Contina and the Contessa cameras. I have two of these,  an early Ikonta 35 late 1940s to very early 1950s and a slightly updated version.  First I am going to describe the early/original version and then briefly the changes on the updated version.
Ikonta 35 ready for use
lens: Novar
focal length:  45 mm
apertures: f/3.5 to f/22
focus range: 0.8 m to infinity
lens fitting: fixed
shutter: Prontor S
speeds: 1, 1/2, 1/5, 1/10, 1/25, 1/50, 1/100, 1/300
flash: PC connector
film size: 35 mm

It measures 120 mm by 75 mm by 40 mm (closed), 80 mm (open) and weighs 440 g.

Ikonta 35 with its carry case
The lens door opens downwards which leaves plenty of room at the sides for the fingers of both hands. On my Ikonta 520 (120 film camera) - and my Nettar folders - the lens door is released by pressing a button on the top and the lens door snaps open on springs and pulls the lens forward to its operating position. On this camera, you slide a button on the top of the lens door and pull the door down by hand. When the door is fully open you have to give it a firm press to click it into place.
Ikonta 35 - folded

The lens is a Novar made by Rodenstock, which is a triplet.  During WWII, bombing of Dresden destroyed Carl Zeiss's lens factory and after German partition West German Zeiss set up new lens making facilities in Oberkochen. It was a long time before they could make enough lenses and so used lenses by Rodenstock and Schneider. Novar lenses are usual excellent if stopped down to f/8 or so - which is what I generally do for all lenses - so I am expecting this lens to be a good performer. Its maximum aperture is f/3.5 which is not spectacular  but plenty wide enough for most practical purposes. The focal length is 4.5 cm - this dates the lens as usual practice in the first half of the 20th century was to quote focal length in cm and in the second half of the 20th century to quote in mm - so, the last of pre-war stock or very early post-war production. The serial number of the camera is followed by an asterisk which I am told probably means the camera was partially made from pre-WWII components so I expect the lens is a pre-WWII lens - the last of Zeiss Ikon's stock? 45 mm is 'normal' for 35 mm film so this lens will render scenes much as human eyes see them.

--------------------------------------------------------------------------------------------------------------------------------
Blog copyright by John Margetts, 2014
---------------------------------------------------------------------------------------------------------------------------------

Ikonta 35 - right hand view
The shutter is a Prontor S - pre-war Zeiss Ikon used their own Klio name for Prontor II and Prontor S shutters - they seem to have abandoned this after the war.  The S signifies the shutter is synchronised for flash but there is no means of selecting between X or M synch (this was introduced on later Prontor S shutters  - see below - and was standard on the Prontor SV and Prontor SVS shutters). At this age, the shutter needs to be cocked by hand. This is different on this camera to any other shutter that I have come across. You pull the cocking lever anti-clockwise and the lever pulls a second lever across - the first level returning to its rest position.

Ikonta 35 - left hand view
The Prontor S shutter has a top speed or 1/300 which I generally find to be fast enough. My usual films are either 100 ISO or 200 ISO and this allows me to use f/8 or f/11 in good light year round. The shutter has a self-timer (Vorlaufwerk) which we are always told not to use on old cameras. On this camera, the self-timer is very hesitant and took over a minute to fire the shutter - design time is eight seconds! As is usual with old cameras, the slow shutter speeds are way off and unusable - 1/5 seconds is about 5 seconds. On the other hand, I use these old cameras hand-held and so my longest exposure will be 1/50. the slow speeds and fast speeds use different mechanisms within the shutter - 1/50, 1/100 and 1/300 are in the right general area, judging by ear and I shall be surprised if they are not usable. Half a stop either way is well within the latitude of film.

The shutter release is a strange affair. It is not the lever provided by the shutter makers, nor is it a body release. It is a secondary lever attached to the shutter barrel at the top. It is marginally better than the primary release but not as good as the body releases that Zeiss Ikon were using in the late 1930s. Actually, it is very similar in position and action to the shutter release on the Tenax I of 1939 (both cameras designed by Hubert Nerwin). There is also the ubiquitous cable release socket.

The adjuster for the aperture is non-standard as well. It is a toothed wheel on the left side of the shutter housing which is not obvious without the manual (I do not have the manual) and took me a few moments to work out.

Ikonta 35 - top plate
The top plate is very uncluttered. In the centre is a raised part housing the (very small) viewfinder. It measures 9 mm by  6 mm (the same as on my Voigtlander 35mm folders of the same date) and is the weakest part of the camera. This is a reverse Galilean finder ('reverse' because it is like looking through a telescope from the wrong end giving a reduced size view).

On the left-hand end is a reminder for film type - daylight colour, artificial light colour and monochrome. On the right-hand end is a tripod boss. This is the only time I have seen a tripod boss on the top of a camera and means that the camera would be upside down when fitted to a tripod. It would be just about possible to fire the shutter with the release lever but I suspect that anyone who put this camera on a tripod would have used a cable release. The MK II Ikonta 35 had the tripod boss on the lens door - a very big improvement! At either end of the top plate is a rectangular strap lug.

Ikonta 35 - bottom plate
The bottom plate has the film advance on left-hand end - this  is a knob. On the right-hand end is the rewind knob and in the centre of the base plate is a frame counter. In the centre of the film advance knob is a button to allow the take-up spool to turn backwards for rewinding the film.

Ikonta 35 in use.


I have run a roll of film through this camera now.  It is a nice camera to use (I know 'nice' is not a good word to use here) with no design problems getting in the way.  Using it is very similar to using a folding Voigtlander Vito camera.  The shutter release falls naturally (for a right-handed person) under the index finger of the right hand and the ring finger on the left hand can easily turn the film advance.

My main problem with using this camera was, as with all cameras of this age, the small viewfinder. I have developed a technique now of deciding the framing of the picture without looking through the viewfinder, taking my glasses off and positioning dominant parts of the picture without the view being in focus.  This actually works quite well.

The camera has a fault with the film advance mechanism - possibly two related faults. Sometimes when I try to advance the film, the advance knob will not turn. To get this to turn, I have to put my thumb over the lens (to prevent any light getting in), cock the shutter and release it a second time.  This was necessary four times in a 24 exposure roll of film. This suggests that the double exposure prevention mechanism fails to release the film advance on the first firing of the shutter. The second fault is that sometimes the film will advance two frames instead of stopping at one frame - this happened a couple of times wasting two frames. Apart from these two intermittent faults the camera behaved perfectly. There are no light leaks either from the back or from the bellows, exposure is fine as is focus.


New improved version.


Before sharing the results of the test film, I am going to briefly discuss the changes made between the original design as described above and the next version.

There are a couple of minor changes between the original version and the next version. The most obvious is the addition of an accessory shoe above the viewfinder, on the top plate. This is a 'cold shoe'  - there are no electrical contacts for a flash gun yet.

The other change is the use of a more modern Prontor S shutter. On the original Ikonta 35, the Prontor S shutter was synched for flash but there was no means of selecting the synch delay. There was also a self-timer lever. This updated version of the Ikonta 35 has an improved Prontor S that offers either X, M or F flash synch. For X synch you set the selector lever to X (or red) - the flash will fire as soon as the shutter is open. For M or F synch, it is more complicated. First, you set the flash synch selector to yellow. This will give you synch for F flash bulbs (the flash is fired 5 milliseconds before the shutter is fully open to allow the brightness to build up). For M synch, you set the flash synch selector to yellow and the self-timer to M which will fire the flash 20 milliseconds before the shutter is fully open, again to allow the brightness to build up. To use the self-timer actually as a self-timer, the flash synch selector must be set to X/red

There are also a couple of very minor changes - the shutter assembly no longer has a cable release socket so Zeiss Ikon has added one at the top on the other side to the shutter release lever. The release lever is now about twice the diameter of the original one. The last change is that the focal length of the lens is now quoted as 45 mm rather than 4.5 cm.

There are also changes to the leather case. It is now an every ready type case which has a secondary film advance on the underside that meshes with the film advance on the camera. this means the camera can now be used without removing it from its case. There is also a tripod boss on the underside of the case which means it is no longer necessary to have the camera upside-down to attach it to a tripod.

The photographs ( from the original version):


St John the Baptist, Lincoln

Orthodox church, Lincoln

St Mary's Church, Frampton, Lincolnshire

St Peter & St Paul, Kirton, Lincolnshire

St Peter & St Paul, Kirton

St Peter & St Paul, Kirton

St John the Baptist, Lincoln


St Mary le Wigford, Lincoln

St Benedict, Lincoln

St Benedict, Lincoln

St Mary's, Frampton

Gravestone, St Mary's, Frampton

St Mary's

St Mary's

St Peter & St Paul, Kirton


Saturday, 30 November 2013

Balda Baldina


This is a very nice folding camera from 1930s Germany.  It is one of the first cameras to use Kodak's 35 film cassette - this was made soon after Leitz made the Leica (1925) and Zeiss Ikon the Contax (1932).  It follows Kodak's lead in producing a folding camera unlike Leitz and Zeiss Ikon who both made rigid 35mm cameras.  The camera is fairly small - it measures 120mm x 82mm x 35mm when closed and 120mm x 82mm x 85mm when open.  It is almost exactly the same size as Voigtlander's later Vito and Vito II cameras but a bit heavier. The covering seems to be leather rather than leatherette.  This is my second Balda camera - the other being a Baldessa from 1965.

lens: Schneider Radionar
focal length: 5 cm
apertures: 3.5, 4.5, 5.6, 8, 11, 16
focus range: 1 metre to infinity
lens fitting: fixed
shutter: compur leaf
speeds: 1, 1/2, 1/5, 1/10, 1/25, 1/50, 1/100, 1/300
flash: no connector
film size: 35mm
Balda Baldina - front view

This camera had been stored somewhere not particularly dry before I bought it and the finish showed the results. The leather was very dry and dull, much of the nickel-plated steel has rusted and the moving parts were all very stiff.  I attacked the leather with Bestbeloved's leather restorer and it is now a bit more subtle and has a nice sheen. Moving parts have had a drop of oil/naphtha mix (I mix 2 parts clock oil with one part naphtha to produce a freely running oil. This flows into hinges and axles easily - and when the naphtha evaporates the part is left with a very small amount of oil) and now move easily. I have yet to deal with the rust but will do so when I have finished the test film. I shall rub down just the rust and then treat it with Loctite Rust Remedy. This leaves a durable black finish which I shall leave as-is. The last thing to note, condition wise, is the presence of 'Zeiss Bumps'. Zeiss Ikon cameras are notorious for these and this is the first time I have seen them on a non-Zeiss Ikon camera. they are caused by the manufacturer using a different material for rivets than he used for the body. A chemical reaction will then be set up in the presence of damp resulting in the build-up of corrosion products between the metal of the body and the leather covering. These 'Zeiss Bumps' occur on the lens door and in the leather by the take-up spool.

Zeiss Ikon and Voigtlander used die-cast aluminium for their camera bodies which made for strength and lightness with the added advantage that they were corrosion resistant.  This camera seems to be made from steel.

The outside is a mixture of leather and nickel plating and where the nickel has worn, the camera is rather rusty. My Zeiss Ikon Nettars from the same decade were leatherette and paint and where the paint has worn you can see the aluminium.

--------------------------------------------------------------------------------------------------------------------------------
Blog copyright by John Margetts, 2014
---------------------------------------------------------------------------------------------------------------------------------

top view
Balda's use of steel and nickel plating would have made the camera cheaper to make.  I assume that this also meant that the camera was cheaper to buy but it would not have been cheap. With a Compur shutter, it would have been aimed at a serious amateur photographer.

The camera is quite well appointed.  It has a 'proper' viewfinder rather than the metal frames that Zeiss Ikon's Nettars and Ikontas had.  This is small (as was usual even on expensive cameras) and is a reverse Galilean finder (that means it is like a telescope backwards as it makes things small). This viewfinder has a remarkable addition - a parallax adjuster. When you have set the focus on the lens, you put the same distance setting on the viewfinder and the viewfinder moves up or down accordingly. For infinity, the viewfinder is fully up and as you dial in nearer distances, the viewfinder lowers itself. Apart from this camera, I have only ever seen this on expensive rangefinder cameras.

On the top plate along with the viewfinder is the film rewind key and the frame counter. This last is beneath a hinged cover and counts from zero to 36.  This is a count-up counter, the user setting the counter to zero when loading a film into the camera.

Beside the viewfinder is a small button. Pressing this will release the hinged lens cover and the lens will spring forward automatically - it does so with a reassuring 'snap'.  The shutter leaves are between the lens elements so focusing is only front-cell focusing (i.e. only the front piece of glass moves when focusing, not the whole lens. This causes a slight degradation of the image with close-up work. For landscapes it makes not a jot of difference).

base view
The film advance is on the bottom of this camera - possibly to circumvent other manufacturer's patents, certainly not because it makes it easier to use. Advancing the film is not as straightforward as turning the knob (no lever advances at this early date).  Leitz, Kodak and Zeiss Ikon had 35 mm cameras on the market when this camera was designed and each had patented every aspect of camera design they could.  They also pursued patent infringement vigorously. The outcome of this is that manufacturers trying to bring new models to market had to find workarounds to avoid being sued. In this case, the film advance is locked until you press a button on the base of the camera. This must be released as soon as you start turning the film advance knob or you will advance more than one frame. To make this as hard as possible, you first have to push in the safety lever, then press the small button and then turn the advance knob.

Also on the bottom of the camera is a tripod boss.  This is the original 3/8 Whitworth thread rather than the more modern 1/4 Whitworth.  This is to one end of the camera - it seems to have taken camera manufacturers a long time to work out the point of balance of a camera.

Balda Baldina - folded
Inside is pretty much as you would expect even from a modern 35 mm camera - a sign that this layout was well designed from the start and not patented.

The hinged back has effective light baffles and so there is no need for foam light seals - nothing to go gooey and messy with age and nothing to start leaking light. In the centre of the back is the pressure plate to keep the film flat against the film gate. To one end is a nickel-plated spring to keep the film in place on the sprockets. Loading film is easy. There is a spring on the take-up spool under which the end of the film goes. No particular shape of film leader is required but the modern standard leader works fine.

When open, the door hinges on the left, leaving plenty of room for the right hand to have a firm hold. Many folding cameras hinge on the right leaving a restricted space for gripping.  Voigtlander's Perkeo and Vito cameras hinge on the right.

When holding the camera for use, the shutter cocking lever  must be moved upwards (this is a Compur shutter, a Gauthier shutter (Prontor) would need the lever moving downwards). The shutter release provided by Compur is hidden by the folding struts and cannot be reached. To overcome this, Balda have added an angled extension which can be reached by the middle finger of the right hand. There is also a socket for a standard cable release.
position of extension lever


Adjusting the shutter speed is easy - this is a rim-set shutter and you turn the outer ring until the required speed is aligned with the index mark. Altering the aperture is not so easy. The control is close to the door and between the folding struts. This is quite do-able but requires looking at the camera from the front.

I have finished the test film which raised a couple of things.  Firstly, firing the shutter. The extension lever that Balda have added to the Compur shutter release travels a long way before it fires the shutter. I found this rather awkward and difficult to hold the camera steady while doing so. Secondly, rewinding the film.  I have no instruction book for this camera and I have to work things out for myself. I assumed that the button that released the film advance mechanism would also release the rewind mechanism. Wrong! My attempt to rewind the film resulted in me pulling all the film out of the cassette. This meant a trip to Snappy Snaps to ask them to remove the film in their darkroom which they did. I now know that to rewind the film you have to lift the film advance knob and leave that other button alone. Oh well - this is all a part of the fun of collecting old cameras. Tomorrow, I shall collect the developed film and post a selection here.

OK. The test film is back - and none the worse for me trying to rewind it the wrong way - kudos to the staff at Snappy Snaps.  I am impressed with this camera. It was made in 1935 (plus or minus a month or two) and has worked flawlessly. The lens shows no sign of having been coated, which would have been very unusual in 1935, but is not particularly susceptible to flare. There is some flare visible in some of the pictures, but I have a habit of shooting into the light which would have been virtually unheard of in 1935 for the very reason that is causes flare.  The lens focuses well and produces high contrast colour pictures. The lens will have been colour-corrected to some extent as that is necessary for using panchromatic black-and-white film and the lens clearly has no problems with modern colour films.

There are marks on some of the negatives - basically, there are scratches which show up on the prints as black marks. I am putting this down to the damage caused when I attempted to rewind the film. It only affects a few of the negatives, most of them being fine.

The pictures:
Shooting to the south on a sunny day (that is, into the sun), hence the flare.

Shooting to the south again, but on a dull day - a small amount of flare.


Shooting to the north on a misty day. No flare but some mist visible in the upper parts of the picture.


Shooting to the south on a sunny morning - no flare as such.


Shooting to the east on a sunny day.


Shooting in a heavily shaded alley - good contrast and colours.

Thursday, 5 September 2013

Contina IIa

Zeiss Ikon's Contina camera was a long lived and varied series of cameras.  The series started as the Ikonta 35 which was a post-war version of the 120 format Ikonta adapted to take 35 mm film.  This camera became two series of cameras - the Contessa and the Contina; the first Contessas and Continas were folding cameras. The Contessa version was more up-market than the Contina version. I have already written about one of the Contessa line - the Contessa LKE. The Contessa line have better lenses (Tessars) and coupled light meters and rangefinders. The Contina range have cheaper lenses (Novar, Novicar and Pantar) and the light meters, where present, are uncoupled. I have also written about the Contina line elsewhere - the Contina Ic.

lens: Novicar
focal length:  45mm
apertures: f2.8 to f22
focus range: 1m to infinity
lens fitting: fixed
shutter: Prontor-SVS
speeds: 1 second to 1/300 seconds
flash: PC connector
film size: 35mm

Contina IIa - front view, meter window closed
To make identifying and placing Contina cameras as difficult as possible, the Contina series split into two lines of cameras simultaneously.  The original Contina folding camera  became the Contina II folding camera with a light meter and then a series of derivatives. That original Contina folding camera, at the same time, became the Contina I rigid camera - no light meter or rangefinder - and then a series of derivatives.
Front view - meter window open

So, at any one time after 1953 there were two different Continas available, both just designated Contina. I have been referring to Contina I, Contina II, Contina Ic, Contina IIa but I don't think those were names offered by Zeiss Ikon, rather us collectors use them to make sense of the mish-mash of models.

Daniel Jiménez has produced a 'family tree' of the Contina series which he has given me permission to use here:

Copyright Daniel Jiménez
Daniel has a useful camera blog which can be found in an English version here. He also has a much larger Spanish version here.

This camera - is a Contina IIa. It is derived from the Contina II which was a folding camera but this version does not fold - that is, it is rigid. It is a compact and solid camera measuring 120 x 65 x 85 mm and weighs 567g. It offers a built-in but uncoupled light meter and an EV enabled shutter. It was not a cheap camera - it cost £43/15/1 in 1957 (in old money, or £43.76 in new money) which, given the average male wage in 1957 was £9.00 means this camera cost the equivalent of £2,500 in 2013 values. The version with a Novar lens only cost £36/12/7.

The top plate of the camera has a number of  items on it. On the left is a small rewind knob. I prefer these to the small folding cranks that became ubiquitous in the 1960s. When you first turn the rewind knob, it raises itself by one cm. This is above the height of the centre of the top plate and makes it easier to hold and turn.

rear and top view
Next to the rewind knob is an accessory shoe. At the time that this camera was made (1956/58) this was more likely to be used for a separate rangefinder than a flashgun. There are no electrical contacts in the accessory shoe so it is a cold shoe.

Next to the accessory shoe is the light meter window and the light meter control knob. Visible in the window is a needle connected to the light meter. The brighter the light, the more this needle moves towards the rear of the camera. Also in this window is a white circle which moves in response to the user moving the control knob. When the white circle is over the needle, the correct exposure can be read off the scale around the control knob. This is mostly in EV values - more later. In the centre of the control knob is the setting for the film speed. This camera was made in 1956/8 and uses the film speed standards in place at that time. A few years later (1960), the American Standards Association (ASA) revisited their film speed standard to produce the later ASA standard now known as ISO. The German DIN system remained unchanged so on this camera 21 DIN = 40 ASA rather than the later standard of 21 DIN = 100 ASA (ISO) - I always use the DIN standard with old cameras to make sure I do not get it wrong.

On the far right of the top plate is the film advance lever. This moves through about 200 degrees to advance the film and cock the shutter. The lever is all metal and only curves a very slight amount which I find makes it uncomfortable to use. In the centre of the film advance lever should be the frame counter. I can make no comment about this as a prior owner has removed it. Looking at the state of the metal that is left, I suspect a very amateurish attempt at a repair.

The front of the camera has four items - meter window, viewfinder window, shutter housing and flash PC connector. The meter window contains a two cm by one cm lens covering a selenium photoelectric cell.  This does not need any batteries, which I always reckon to be a good thing.  Most camera electrics from the 1960s to 1980s use mercury cells which are now illegal in just about every country there is. This window has a hinged cover - to open it, you lightly press the right-hand end (as the camera is to your eye). Selenium meters get a poor press as the photoelectric cell will deteriorate with time. However, if the cell is kept in the dark it only deteriorates very slowly, so this cell being covered, it has not yet (in 57 years) deteriorated enough to worry about. This is a single scale meter - an earlier version of the Contina IIa had a dual scale meter with a small window in the hinged cover.

Next to the meter window is the viewfinder window. This has quite a small eyepiece and a plain view with no bright lines. I find I cannot use it while wearing my glasses.  The Contina Ic, which I also own, has a much larger eyepiece - this was made just a few years later in the early 1960s.

In the centre of the front is a square chrome bezel containing the shutter.  This is a Prontor-SVS from Gauthier. This works on the EV system.  The light meter gives you an EV value from between  three and eighteen and you transfer this number to the shutter - you have to press a small tab on the shutter housing to get the EV ring to turn. Each EV number gives you a small range of shutter speed and aperture settings.  If you turn the EV setting ring without pressing the small tab, different speed/aperture combinations will present themselves to the mark at the top of the housing. For very low light levels, the shutter speeds are in green - you cannot set these, but you can read them.  To use them, turn the control ring on the shutter housing to B and read off a speed next to the aperture you want to use.  You then need to time the exposure yourself - the speeds are from four seconds to sixty seconds and you can count this quite accurately without a watch.

The lens is a Novicar lens (a Novar lens was also available) which I have found to be excellent if stopped down to f5.6 or f8. It is threaded for 27mm filters.  Maximum aperture is f2.8 and its focal length is 45 mm. Focusing is from about three feet to infinity (one metre to infinity). The throw of the focusing is only about 120 degrees, so very accurate focusing is not possible, but with no rangefinder, this camera was always going to rely on depth of field.

On the lower right of the shutter bezel (looking at the camera) is the flash PC (Prontor-Compur) connector.  This is the only means of connecting a flashgun. On the side of the shutter housing there is a selector for M or X - Magnesium or Xenon  - flash. M is for flash bulbs and X for electronic flash. With M, the flash is fired slightly before the shutter opens to allow the burning of the flash bulb to reach its maximum while the shutter is fully open. With X, the flash is fired as the shutter blades are fully open as electronic flash does not require time to reach its maximum intensity. This selector also has a V setting. This means Vorlaufwerk and is German for self timer. Moving the selector to this position causes an eight second delay between pressing the shutter release and the shutter firing. It is never a good idea to try this facility on an old camera as it might well cause the shutter to stop working permanently.

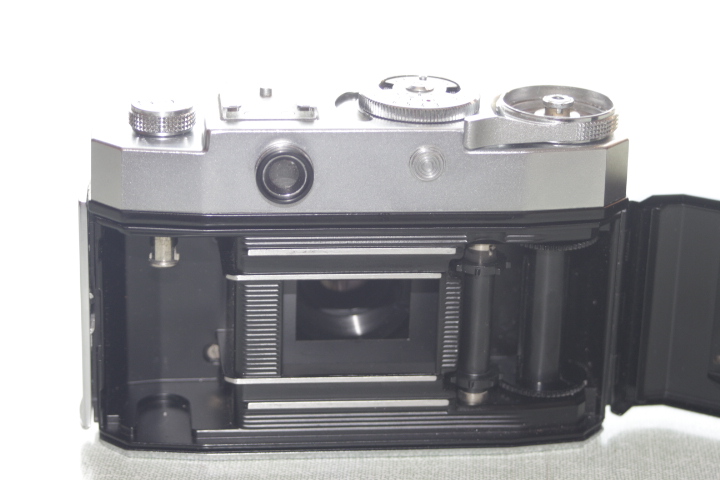
Rear/internal view

The back opens by pulling down a small catch on the lower right-hand edge. The back is hinged and there is a single light seal - a piece of velvet right by the hinge. The back itself has the pressure plate and a tensioning roller that goes by the take-up spool. Around the film mask are two machined film guides - showing as bright lines in the photograph above. The pawl for the rewind mechanism can be raised to enable fitting a film cassette and then lowered to secure the cassette.

24-December 2013


I have now finished my test roll of film - Agfa Vista+ 200 ISO from Poundland (yes, £1.00 per roll!). As expected, the camera works well. The only awkward thing was setting the EV values on the shutter as the mechanism is rather stiff.  I definitely would not want it too loose but it would be nice for it to be a bit easier to alter. The frame counter is missing on this camera - I assume due to a botched repair by the previous owner. It does not affect the camera's functionality at all and got me the camera at a bargain price. Below are a selection of pictures from the test film.

Pottergate Arch, Lincoln


Fountain in Lincoln Arboretum


Rockabilly Buskers, Lincoln


Lincoln Shoppers getting ready for Xmas


Foreign Buskers, Lincoln


Tuesday, 27 August 2013

Pentax Spotmatic SP 1000

The Spotmatics were the first autoexposure SLR - or, at least, the first successful autoexposure SLR. They built on Pentax's earlier success with the manual SLRs. Despite the name, the exposure system was not a spot system but was a centre weighted system. 


Asahi Pentax SP1000
lens: none supplied
focal length:  n/a
apertures: n/a
focus range: n/a
lens fitting: M42 thread (AKA Pentax fit), automatic
shutter: horizontal cloth focal plane
speeds: 1/2 to 1/1000
flash: PC connector
film size: 35mm

The SP1000 (and SP500, which was introduced at the same time) built on the design of the original Spotmatic. For anyone who is used to SLR cameras from the 1960s and 70s there are no surprises here, partly because this camera helped to define the genre. They were made between 1973 and 1976.

So - a general description. The camera measures 143 by 92 by 88 mm and weighs 610 g (body alone). This is heavy by modern standards - particularly compared to Pentax's later K-mount ME series. I have no objection to weight in a camera if only because weight helps with stability and results in less camera shake.

The layout of the camera is pretty much standard. On the left is a fold-away rewind crank. Around this is an aide memoire for the type of film in use. This gives the options of Empty, Panchro(matic), daylight colour and tungsten colour. The Empty setting is particularly useful as I often have more than one film camera on the go and on occasion open a camera only to find a part-used film inside.  Panchro refers to black-and-white film (which is usually panchromatic). The two colour options are for outside and inside use respectively and refer to the white balance of the film.
Pentax SP1000 - top plate

In the centre of the top plate is the lump of the pentaprism with the viewfinder behind. Traditionally, this is where the accessory shoe is put but the SP1000 has no accessory shoe as standard. Those who needed one could buy one as an optional extra which fitted into a groove around the viewfinder surround.

To the right of the pentaprism is the speed selector. For shutter speeds this simply turns to click-stops and it is quite possible to move directly from 1/1000 to B. 1/60 is marked with a red X to indicate that this is the electronic flash synch speed. The shutter speed dial also doubles as the film speed dial. To alter the film speed, it is necessary to lift the dial and turn. Film speeds are from 20 ASA to 1600 ASA. No DIN scale is available but the selector moves in 1/3 stop click-stops each of which is equal to one degree DIN. (For my younger readers, ASA = ISO [very nearly!])

To the right of the selector dial is the film advance lever. This is metal and is slightly curved to allow the user's thumb to access it. I prefer this to Pentax's later style of a plastic tipped lever that stands proud of the body.

The centre of the film advance contains the frame counter. This automatically resets to -2 when the back is opened. When you advance the new film to get rid of the fogged portion on loading, the counter will point to zero.

Between the selector dial and film advance and slightly forward of them is the shutter release button. This is threaded for a standard cable release.
Pentax SP1000 - inside view

The front of the camera has three items (the back is entirely clean). These are the meter switch and two PC (Prontor-Compur) flash connectors. The meter switch switches on the TTL (Through The Lens) meter and stops down the diaphragm. This is basically a shutter priority system.  The user sets the required shutter speed and then turns the aperture ring until the needle in the viewfinder is centred. When you switch off the meter (and you need to remember to or you will rapidly flatten the battery) the diaphragm should then open again to allow you to finesse the composition. On my specimen, this did not happen initially, I assume from the lack of use as it will eventually open itself. I have soaked the linkage with naptha and worked the switch repeatedly and it now works.  The diaphragm stop-down system operated by the shutter release works fine as this is a completely separate system.

The two PC flash connectors are marked for FP and X. FP is for fast flash bulbs and will synch at any shutter speed. X is for electronic flash and will only synch at 1/60 or slower.

This is an old-fashioned camera and it is fairly heavy (610g) - much more so than a Pentax ME Super (445g) or OM10 (450g). Weight is not necessarily a bad thing as it enhances stability. It is much easier to hold a heavy camera steady than it is a very light one. The down side is when you are carrying the camera all day especially when hung around your neck.

The focusing screen is a Fresnel screen with a microprism ring in the centre.  The microprisms break-up the image when it is out of focus. Best focus is achieved when the microprisms disappear. There is no split-image centre here as many SLRs have but the camera is easy to focus without it.

When you press the shutter release, the action is quite light - no heavy 'clunk' as with my Zenit or Praktica cameras, although it is still noisy compared to my leaf shuttered rangefinders.

Sample pictures.

Very impressed - both with the camera and with the Helios-44M lens.  I had no battery for this test, so exposures were manually sorted with my Ikophot meter.

Thimbleby, Lincolnshire

Choir screen, Lincoln cathedral

New carving, Lincoln cathedral

Lincolnshire wolds