This blog consists of descriptions of my various vintage cameras and my experiences in using them.
I welcome your comments and additional information.
I am also happy for people to write their own reviews of their old cameras for inclusion in this blog.
My most recent acquisition is this Soviet Kiev 4. It is a straight copy of the Zeiss Ikon Contax III (with only very slight changes).
Kiev 4 - front view
At the end of WWII, the Soviet army had Zeiss Ikon rebuild their production line for the Contax and then, once the line was working properly, they shipped the production line to Kiev in Ukraine. They also renamed the camera Kiev. This camera is a Kiev 4 and is a copy of the Contax III - there was also a Kiev 4a which was a copy of the Contax II. The difference between the 4 and 4a is the presence of a light meter in the Kiev 4.
The Soviet Union produced cameras both for the home market and for export. Those intended for home consumption had their logos and indicators in Cyrillic while those for export used the Latin alphabet. My camera has the logo in both Cyrillic and Latin but other writing is all in Cyrillic, indicating that the camera was not intended for export (сделано в CCCP = Made in USSR )
The camera has a very Zeiss Ikon look about it and the body is broadly similar to the Pentacon F and Contaflex - both German derivatives of the Contax, the Pentacon F being East German and the Contaflex being West German (younger readers should consult their history books!).
The camera is heavy - 768g with the standard Jupiter 8 lens - and the controls reveal the camera's design date (1936). the film advance is a knob (usual in the 1930s, very old fashioned in 1969 when my camera was made) as is the film rewind. The viewfinder is very small, hard to use while wearing glasses and (because it is bare metal) likely to scratch modern plastic spectacle lenses. The last anochronistic item is the tripod boss which is 3/8 inch Whitworth. Standard for consumer cameras had been 1/4 inch for some tine (currently 1/4" UNC rather than 1/4" Whitworth but the two are close enough to be interchangeable).
The knob on the right hand end of the top plate has three functions
in the centre is the shutter release, threaded for a standard cable release.
around the shutter release is a knurled ring to wind on the film and reset the shutter.
The shutter speed selector - operated by lifting and turning the film advance ring.
The manual says that the shutter speed can be selected either before or advancing the the film but that it is better done after advancing then film.
Kiev 4 - top plate
Next to the right hand knob is a window showing the frame numbers. This is nice and large and shows 12 numbers with a red dot indicating the current frame. This counts up from zero and goes to 36. It is reset manually by a toothed wheel on the back edge of the top plate.
Being a rangefinder camera, there is no pentaprism hump but where you might expect to see one there is a light meter. This has a selenium sensor and so has no need for a battery. One drawback of selenium meters is that they can lose sensitivity with continued exposure to light. To prevent this from happening, there is a cover to the meter window on the front of the camera. thesis opened by pushing the cover slightly to the right when it will spring open.
On the top of the meter is the meter window. This has a central lozenge and -2 and -4 marks. The meter is used by turning the control knob on the left until the meter needle is centred on the central lozenge. The -2 and -4 marks are used in low light conditions - they are each one stop away from the central position. If there is insufficient light to get the meter needle to the lozenge, you line it up with the -2 or -4 and then multiply the indicated exposure by either one stop or two stops.
Also on the top of the meter is the accessory shoe. There are no electrical contacts here so this is a cold shoe. It was intended that this accessory shoe would hold an auxiliary viewfinder when longer focal length lenses were used. In the centre of the accessory shoe is the legend сделано в CCCP (made in USSR) and the serial number 6968008 which indicates that the camera was made in 1969 (the first two digits of the serial number being the year of manufacture).
Kiev 4 - accessory shoe
On the left end of the top plate is another multi-function knob.
The outer knurled ring adjusts the light meter.
The inner ring which is adjusted by two studs to set the film speed.
The centre is a pull up knob for rewinding the film.
The film speeds are indicated in гост which translates as GOST. This is basically the same as ASA (or ISO). The Gost scale is awkward as it does not have the usual ASA numbers. There is 65, 130, 250 and 500. Using 'western' film, ASA 100, 200 or 400 film requires guessing the position of the film speed selector. If this scale was in DIN, it would be 20 DIN (65 Gost), 23 DIN (125 Gost), 26 DIN (225 Gost), 29 DIN (500 Gost) which is probably the reason for the choices - the camera having been designed in Germany where DIN is usual.
The front of the camera is dominated (as always) by the lens mount. This is the Contax bayonet mount (not to be confused with the Contax/Yashica mount of SLR cameras). There are actually two bayonet mounts here. The 50mm Jupiter 8 lens fits into the mount and latches onto three lugs inside the mount. There is a second, larger, bayonet mount around the distance scale which is for longer focal length lenses.
Kiev 4 - lens mount
This lens mount is connected to the rangefinder and either rotates to focus the lens when the rangefinder wheel is turned (more later) or turns the rangefinder mechanism when the lens is turned. When the lens is focused on infinity it locks inlace. When locked, the lens cannot be focused. It can be unlocked in two ways.
there is a small pointed stud near the upper left of the lens mount which can be moved away from the lens to unlock it.
there is a lever by the rangefinder wheel which you depress as you turn the wheel.
On the right of the lens mount (right as in when using the camera) is a delay action lever. This rotates through just over 90 degrees to wind-up the action. It is activated by sliding a small button which is usually hidden beneath the lever. On the other side of the lens, just below the viewfinder window, is a PC socket for connecting a flash gun.
The rangefinder shares the same eyepiece as the viewfinder. To give as much accuracy as possible to the rangefinder , the two windows on the front are kept as far apart as possible (9 cm centre to centre). This is much further apart than on the Leica which was the main competitor when this camera was designed in 1936 and also than the FED and Zorki copies of the Leica.
Kiev 4 - rangefinder wheel
Just to the right of the light meter and slightly below it is the rangefinder wheel mentioned above. I find this very hard to use as when my index finger is on the wheel ready to turn it, my middle finger naturally falls over the rangefinder window, rendering it inoperable. For me, it is much easier to focus by turning the lens. The rangefinder spot is easy to see and is slightly yellow for maximum contrast. This yellowing is achieved by 'silvering' the internals of the rangefinder with gold.
For those who do not know, a rangefinder works by producing two different images in the viewfinder.
As you change focus, one of the images moves. To achieve accurate focus, you make sure your subject is in the centre of the viewfinder and turn the rangefinder wheel or lens until the two images are superimposed on each other. With practice, this is quick, easy and accurate.
Kiev 4 - rear view
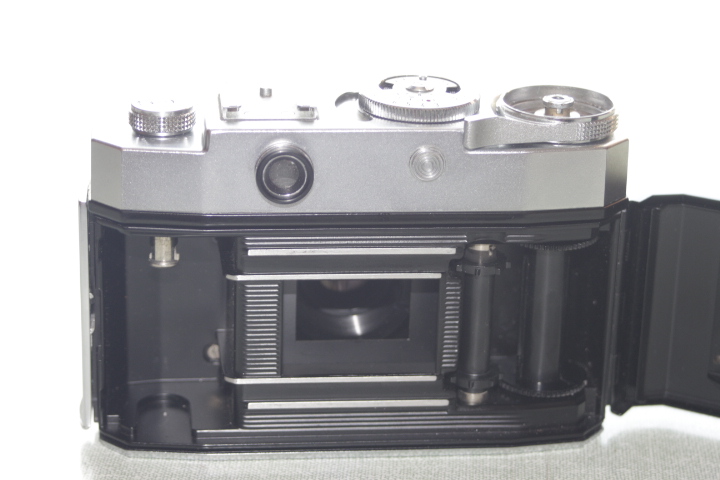
To open the camera, it is necessary to remove the back and base as one unit. At home, working on a table, this is slightly easier than a hinged back. In the field, it is a nightmare. You need to find somewhere to put the back/base while manipulating the film. To make matters worse, the take-up spool is loose and liable to fall out.
The reason for the loose take-up spool is that it can be replaced with an empty cassette, removing the need to rewind the film when finished. This gives a faster reload time - good for studio work but not good elsewhere. I think, in general, this camera was designed with the studio in mind.
Kiev 4 - back/base removed
To release the back/base there are two folding lugs to turn half a turn. Inside the camera is as you would expect a 35 mm camera to be. Until, that is, you look at the shutter. Instead of the rubberised cloth usual until the 1980s, it consists of brass slats which move vertically and are held on cloth ribbons. this works the same as a cloth shutter as distinct from the modern metal shutters. Speeds provided are impressive - up to 1/1250 seconds and down to 1/2 second. The speed range is the modern one of 1/125, 1/250, 1/500 etc.
T
Kiev 4 - detail of brass shutter
The lens supplied is the Jupiter-8M. This is a Soviet copy of the Carl Zeiss Sonnar lens. This lens has six elements in three groups. How well it performs remains to be seen. Someone has attempted to dismantle my lens (never a good sign) evidenced by the aperture adjustment ring being out of kilter. Hopefully, that is as far as they got - none of the internal black paint is scratched which his a good sign. Ro-orienting the aperture ring was simply done.
Jupiter-8M lens - front bezel
The aperture has nine blades which gives a good shape to the aperture. What is curiose is that the aperture blades are curved (see photo) producing a clearly less than circular disc. I will try to produce some booked shots with my test film to see if this makes much difference.
detail of lens showing curved aperture blades
The Jupiter 8 M is a 50 mm lens with a maximum aperture of f/2 and a minimum aperture of f/22 - quite a useable range. f/22 is about the limit in 35 mm photography before diffraction softening starts to be a nuisance. The aperture ring has click stops but can still be set between these values The finish on this lens is shiny chrome with a black lens bezel. - contrasting with the matt chrome on the camera body. Test film is developed and here are the results. I am quite impressed. Soviet execution of German design is as good as it always is. There are no light leaks - always a bugbear of old cameras, neither in the seals around the base/back nor in the sutler blinds - an advantage, I would think, of using brass rather than cloth. Exposure is even indicating that the shutter blinds are both moving smoothly. There is no lens flare - although these test pictures were mostly taken in rather overcast conditions. The rangefinder test (see below) shows both that the rangefinder is accurate at close distances and that the lens produces sharp images. The picture of the iron shutter shows the one draw back of a rangefinder camera (or any viewfinder camera, come to that). I had the shutter central in the viewfinder but it is distinctly off-set in the image - parallax problem. Some cameras adjust the viewfinder when focusing closer but not here. The pictures:
Rangefinder test - focused on the nearest finial
Enlargement of the finial showing it to be in good focus.
Metal shutter showing parallax error in the viewfinder
Lincoln City Square
Witham looking west
Witham looking west
Old bicycle that I use as a test piece for all my old cameras
Indoor shot of Lincoln Central market - fairly slow shutter speed.
I recently made a decision to add a few rangefinder cameras to my collection. I have had a Minolta Uniomat for a few years and recently bought a Zorki 4. These two cameras represent the two lines of rangefinders that were available in the world of film.
The Zorki is from the line of interchangeable lens rangefinders that follow on from the Leica. Most of these are fairly straight copies of Leicas - all German patents were declared void after the end of WWII - with varying degrees of development.
The Uniomat is from the other - fixed lens - line. These fixed lens rangefinders are cheaper, though never cheap. Not having an interchangeable lens means they can - and do - have between-the-lens leaf shutters.
Petri 7s - front view [(C) John Margetts]
My collection of fixed lens rangefinders now numbers five (I am only including those with a coupled rangefinder) - Vitomatic II, Contessa LKE, Uniomat,Minister III and now this Petri 7s.
This Petri 7s is exactly the same size and shape as the Minister III - I could almost suspect they used a common casting for the body. The weight is not too different, either - 632g with a film loaded.
lens: Petri
focal length: 45 mm
apertures: f2.8 to f16
focus range: 0.8 m (2.6 ft)
lens fitting: fixed
shutter: Petri MVE
speeds: 1 s to 1/500 s
flash: PC socket
film size: 35mm
The top plate of the Petri 7s is uncluttered. On the left is the rewind crank. This is the now standard fold-out crank which I personally find hard to use. The crank pulls up to allow for the insertion/removal of the film cassette.
Petri 7s - top plate [(C) John Margetts]
Just left of centre is the accessory shoe. By the time this camera was designed (1963) this was usually for a flash gun. It is a cold-shoe - accessory shoe contacts had to wait a further decade to become standard. To the right of the accessory shoe is the light meter window. This is fairly small - the actual window is 5 mm diameter - and incorporates a lens to make seeing the needle and mark possible.
Next along is the shutter release button. This is fairly large - no bad thing - and is threaded for a standard cable release. On the rear right-hand corner of the top plate is the frame counter. This is also a bit on the small size but still usable.
The front of the camera is dominated by the shutter housing. This is fairly large for a fixed-lens camera - the size is necessary because of the light meter sensor around the lens (as in the Yashica Minister III).
Petri 7s shutter housing [(C) John Margetts]
The lens is a 45 mm f2.8 lens. It has no name on it apart from Petri. A green 'C' signifies that it is a coated lens - normal for the time - but does not tell us if it is multi-coated or single coated. As far as I can find out, it is a Tessar copy - four elements in three groups for the technical minded.
-------------------------------------------------------------------------------------------------------------- Blog (C) John Margetts 2014 --------------------------------------------------------------------------------------------------------------
The shutter housing has several controls on it. There are the expected control rings - focus, aperture and shutter speed - a flash synchronisation selector (X or M), a delay action lever, film speed selector and a PC connector for the flash. The shutter housing carries the name 'Petri MVE'. The shutter itself is a leaf shutter which means it is quiet in use - excellent for street work.
Above the shutter housing is an elongated window containing the rangefinder window and the viewfinder window. The viewfinder is a reverse Galilean finder (like looking through a telescope the wrong way) and the image is coloured a pale green. On the right-hand end of the front, just below the shutter release, is another window but one that does not seem to have any purpose - perhaps for a facility intended but not implemented. The viewfinder has bright lines with parallax markings. It also has a repeat of the light meter needle. This is much easier to see than the one on the top plate. It is not, however, easier to use as it is very hard to distinguish between the shutter speed and aperture rings by feel.
Petri 7s spurious window [(C) John Margetts]
The rear of the camera is plain. There is the eyepiece of the viewfinder and the film advance lever. The base of the camera is also plain. It contains a tripod boss in line with the centre of the lens (1/4" Whitworth is what I usually say, but it could well be modern enough to be 1/4" UNC. The ISO standard for tripod threads is UNC rather than Whitworth but there is not much difference between the two and Class 1A threads (to be tightened by hand) are sloppy enough to be interchangeable between Whitworth and UNC), and a recessed button to allow for rewinding the film.
Petri 7s rear view [(C) John Margetts]
Using the camera is quite easy. Setting the film speed for the light meter is a matter of rotating the black tab in front of the shutter speed ring - this is on the lower right of the shutter housing. The selected film speed appears in a small window in the shutter speed ring to the left of the fastest shutter speed. This is in both DIN and ASA and goes from 11 DIN/10 ASA to 24 DIN/200 ASA. (ASA is broadly but not technically the same as ISO) This seems a bit of a slow range by today's standards but when the camera was made, it would have covered all the films likely to be used.
To set the exposure, you can either set the required shutter speed and then rotate the aperture ring until the meter needle is centred, or set the required aperture and adjust the shutter speed ring, again until the needle is centred. The meter is a selenium meter which means it does not need batteries. These can deteriorate if left exposed to light for many years but this one is still fine (actually, I have never come across a selenium meter that was not fine - I think the deterioration thing is mostly theoretical rather than real-world).
--------------------------------------------------------------------------------------------------------------
Blog (C) John Margetts 2014
The focus ring has a large knob on the left-hand side which makes focussing with the left hand easy. There are two options for focus - scale focus or rangefinder. For scale focus, there is a big drawback in that there is no depth of field scale which makes my usual hyperfocal method impossible. The focus scale is in both feet and metres.
Using the rangefinder is not as easy as it could be. Petri have tried to make the rangefinder clear by colouring the viewfinder field a pale green and the rangefinder spot yellow. In my camera, the rangefinder spot is rather faint. In good light it does work, though, and it is quick to focus if you have suitable verticals in the frame.
The shutter release works easily without needing undue pressure but without being too much of a hair-trigger. The film advance moves about xx degrees and makes a very definite 'clunk' as it cocks the shutter.
The only other thing worth noting is that there are strap lugs at either end so I can carry the camera on a strap around my neck without needing to use the ever-ready case.
Test pictures.
I am testing this camera with Fomapan 200 Creative film - it is also a test of the film, to some extent as I have never used it before. I have a 17 metre roll of film and can cut off the amount I need - I am using a 12 exposure length for this test. This should save me quite a bit of money compared to buying colour film and paying to have it developed. I should have developed the film in the next few days and will post the results here when I have done so.
27/10/14
As well as testing the camera and film, I am also testing my developing of the film - it is basically developed OK but I can tweak it somewhat in the future to improve contrast. There are some horizontal lines visible - these are scanning artefacts due to the emulsion being a bit on the thin side.
Flooded ex-gravel pit.
The Strait, Lincoln
Steep Hill, Lincoln
Angel Coffee House, Lincoln - hand held in natural light.
Wooden bridge to test the rangefinder - I focussed on the larger wooden upright.
I do not intend to repeat the history of Ihagee here, suffice it to say that during the 1950s, 60s and 70s there were two Ihagee companies - the original Ihagee in Dresden that became absorbed into VEB Pentacon and a newer Ihagee West started by the original owner of the Dresden Ihagee (Johan Steenbergen) after he was unable to return to Dresden. This camera is from Ihagee West rather than Ihagee Dresden. I say 'from' Ihagee West and not 'by' Ihagee West as they neither designed nor made this camera which bears their name.
Ihagee West Exakta TL500
In fact, this camera was designed and made by the Japanese company Petri. I am not saying that is a bad thing - Petri made some fine cameras and this camera is a fine camera - but it is not a German camera and does not carry any of the well-loved Exakta design concepts. The legend on the front of the camera says 'Exakta TL500' but in fact it is a re-badged Petri FT - the only clue to this is the stamp on the base saying 'Made in Japan'.
This camera is fairly heavy - it weighs 682 g with no lens - and measures 145 by 95 by 50 mm. This camera was made (or rather, marketed) in 1976 only (I have been unable to find much information about this camera or, indeed, Ihagee West other than neither maker nor camera were very successful). The layout is pretty much standard for the time.
Exakta TL500
Most controls are on the top plate. On the far left is the rewind crank. (the usual Exakta system of film cassette on the right and take-up spool on the left has not been maintained) and is the now usual small fold-out crank. This lifts to release the film cassette inside.
Next to this is the the film speed selector - the main scale is ASA and is printed in white, there is also a DIN scale printed in red. This selector moves in 1/3 stop click-stops - i.e. one degree DIN. The range is from 25 ASA to 1600 ASA (ASA being effectively the same as ISO). In the middle is the bump of the pentaprism with an accessory shoe on top. This has a central contact for flash and so is a hot shoe.
To the right of the pentaprism is the shutter speed selector. This goes from one second to 1/500 seconds in the usual sequence (the maximum speed of 1/500 gives the camera its name - its sister camera, the TL1000, had a top speed of 1/1000). Flash synch is marked with a red cross as 1/60. At the date of this camera, the makers will have assumed electronic flash.
On the right hand end of the top plate is the film advance lever. This is tipped in black plastic and moves through 180 degrees to wind on one frame. Between the shutter speed selector and the film advance lever is a window for the frame counter. This resets to -2 (indicated by S) when the back is opened. This counter counts up from zero.
Exakta TL500 rear view
The front of the top plate, apart from the name, has nothing but the battery compartment. This holds a PX625A alkaline battery (still readily available). On the end of the top plate, on the left, is a PC connector for off-camera flash. Both the battery compartment and the PC socket are in unusual places. In fact, this is the first time I have seen a battery compartment anywhere but on the base plate. Unusual it might be, there is nothing wrong with it. On the front of the camera there is nothing apart from the lens. There is no shutter delay lever on this camera. The lens mount has a standard M42 thread - Ihagee abandoned their Exakta bayonet mount right at the time that other camera makers were abandoning M42 threads. On the plus side, there were (and still are) a great many lenses available in M42 mount. Replacing the threaded mounting ring with an Exakta bayonet mounting ring would have been easy and cheap but it may well have cost more to do so while maintaining the correct lens-to-film distance. Regardless, Ihagee West went with Petri's M42 mount.
At the bottom of the lens mount is the TTL exposure meter switch. This is a stop-down system - pressing the switch stops the iris diaphragm down and switches on the electronics. To use, first you select your shutter speed, then press the meter switch and, while holding down the switch, turn the aperture ring until the meter needle in the viewfinder coincides with the white circle. It is possible to use this meter by setting the aperture and adjusting the shutter speed to match the needle-white ring but this is very awkward to do. As the aperture stops-down to take the light reading, the viewfinder becomes very dark and it can be difficult to see the meter needle.
At this point, I should offer a caveat to any new user of an Exakta TL500 (or TL1000). The exposure meter is automatically switched off by taking a picture. If you cannot get the meter to respond, wind-on the film. This is a good system as leaving the camera without winding on the film will prevent the battery from running down.
The base plate is uncluttered, having the rewind button and a 1/4 inch Whitworth (i.e. standard) tripod boss. The catch for the back is on the left end and is pulled up to release the back.
Inside is as we would expect. On the left is the space for the film cassette, in the middle is the image window (24x36 mm) and on the right is the toothed sprocket that allows the film to be advanced a set number of sprocket holes. Right on the right is the take-up spool. This rotates in the opposite direction to the film advance lever. The lever moves counter-clockwise while the take-up spool rotates clockwise. This means that the film is stored emulsion side outwards..
Exakta TL500 - internal view
The edges of the back have black light-seal foam to prevent stray light getting in the join and fogging the film. This became normal in the 1960s but has the disadvantage that the foam eventually goes gooey and ceases to act as a light seal. I suspect that the designers of this camera would be surprised that their creation was still in use after forty years. I would imagine that cameras of the time had an expected life well within the useful life of the foam. Replacing light seal foam is both easy and cheap. I have a sheet of suitable self-adhesive foam bought on Ebay which only cost two or three pounds. The old foam can be removed with a cotton bud soaked in naptha (aka lighter fuel) and the new foam cut into suitable sized strips with scissors and then stuck in place.
I don't know what lens this camera came with when new but my TL500 came with an Auto Optomax. This lens is a 28mm lens so it is unlikely to be the original lens. Actually, this lens (which is in very good condition) makes a useful addition to my (small) collection of M42 lenses (this collection consists of a Helios-44 manual lens, Helios-44M auto lens, Vivitar 2x converter and this Optomax lens).
In use:
I had a spare half hour this morning and replaced the gooey light seals with new foam. The camera should be good to go, so I have loaded it with Agfaphoto Vista + 200 ISO film (£1.00 per cassette from Poundland) and spent the morning taking photos of Lincoln. This camera came with no lens. I have been using my Soviet Helios-44M lens that came with my Asahi Spotmatic SP1000. Tomorrow I am going to use my Optomax 28mm lens to finish off the roll of film. Any M42 screw threaded lens will fit.
The first thing I have noticed using this camera is the weight. Over the last few weeks I have been using my Pentax ME Super and Olympus OM 10 - both of which are about as small as a film SLR can get and both are very light.
Not being made by Ihagee, all the controls are in the right place - i.e. both shutter release and film advance are on the right which makes using this camera fairly intuitive to use.
The camera is designed to use automatic lenses - which I am doing - but will still work with manual lenses (by 'automatic' I am referring to the diaphragm not the focusing).
To set the exposure, I need to choose a shutter speed, press the meter lever at the right side of teh lens mount base and while doing so rotate the aperture ring until the needle in the viewfinder is in the centre of the ring. this sounds harder and more complicated than it is. The only problem I am having with this is finding the aperture ring by feel - this is not an issue with the camera, it is just that I am used to the aperture ring being on the outer edge of the lens barrel.
The shutter/mirror action is quite good - not a lot of jar.
All in all, I am quite enjoying using this camera. there is one problem which is to do with the camera/lens combination. Focused on infinity, everything is fine. Focused on 0.6m. everything is fine. But if I focus on the hyperfocal distance (6m @ f11) the mirror will not return after the shot. Nor will the lens unscrew. To return the mirror I am having to re-focus to infinity, wind on the film and fire the shutter. This has resulted in several wasted frames. [EDIT: this happened over the first few frames of the first film. At exposure 16 it is no longer happening.]
When the film has been developed, I will post a selection of the test pictures.
16-11-2013
Here are a selection of pictures from my test film. I am quite impressed. All are exposed well so no problems with the exposure meter. Exposure is even so the shutter blinds are moving smoothly.
Zeiss Ikon's Contina camera was a long lived and varied series of cameras. The series started as the Ikonta 35 which was a post-war version of the 120 format Ikonta adapted to take 35 mm film. This camera became two series of cameras - the Contessa and the Contina; the first Contessas and Continas were folding cameras. The Contessa version was more up-market than the Contina version. I have already written about one of the Contessa line - the Contessa LKE. The Contessa line have better lenses (Tessars) and coupled light meters and rangefinders. The Contina range have cheaper lenses (Novar, Novicar and Pantar) and the light meters, where present, are uncoupled. I have also written about the Contina line elsewhere - the Contina Ic.
lens: Novicar focal length: 45mm apertures: f2.8 to f22 focus range: 1m to infinity lens fitting: fixed shutter: Prontor-SVS speeds: 1 second to 1/300 seconds flash: PC connector film size: 35mm
Contina IIa - front view, meter window closed
To make identifying and placing Contina cameras as difficult as possible, the Contina series split into two lines of cameras simultaneously. The original Contina folding camera became the Contina II folding camera with a light meter and then a series of derivatives. That original Contina folding camera, at the same time, became the Contina I rigid camera - no light meter or rangefinder - and then a series of derivatives.
Front view - meter window open
So, at any one time after 1953 there were two different Continas available, both just designated Contina. I have been referring to Contina I, Contina II, Contina Ic, Contina IIa but I don't think those were names offered by Zeiss Ikon, rather us collectors use them to make sense of the mish-mash of models.
Daniel Jiménez has produced a 'family tree' of the Contina series which he has given me permission to use here:
Copyright Daniel Jiménez
Daniel has a useful camera blog which can be found in an English version here. He also has a much larger Spanish version here.
This camera - is a Contina IIa. It is derived from the Contina II which was a folding camera but this version does not fold - that is, it is rigid. It is a compact and solid camera measuring 120 x 65 x 85 mm and weighs 567g. It offers a built-in but uncoupled light meter and an EV enabled shutter. It was not a cheap camera - it cost £43/15/1 in 1957 (in old money, or £43.76 in new money) which, given the average male wage in 1957 was £9.00 means this camera cost the equivalent of £2,500 in 2013 values. The version with a Novar lens only cost £36/12/7.
The top plate of the camera has a number of items on it. On the left is a small rewind knob. I prefer these to the small folding cranks that became ubiquitous in the 1960s. When you first turn the rewind knob, it raises itself by one cm. This is above the height of the centre of the top plate and makes it easier to hold and turn.
rear and top view
Next to the rewind knob is an accessory shoe. At the time that this camera was made (1956/58) this was more likely to be used for a separate rangefinder than a flashgun. There are no electrical contacts in the accessory shoe so it is a cold shoe.
Next to the accessory shoe is the light meter window and the light meter control knob. Visible in the window is a needle connected to the light meter. The brighter the light, the more this needle moves towards the rear of the camera. Also in this window is a white circle which moves in response to the user moving the control knob. When the white circle is over the needle, the correct exposure can be read off the scale around the control knob. This is mostly in EV values - more later. In the centre of the control knob is the setting for the film speed. This camera was made in 1956/8 and uses the film speed standards in place at that time. A few years later (1960), the American Standards Association (ASA) revisited their film speed standard to produce the later ASA standard now known as ISO. The German DIN system remained unchanged so on this camera 21 DIN = 40 ASA rather than the later standard of 21 DIN = 100 ASA (ISO) - I always use the DIN standard with old cameras to make sure I do not get it wrong.
On the far right of the top plate is the film advance lever. This moves through about 200 degrees to advance the film and cock the shutter. The lever is all metal and only curves a very slight amount which I find makes it uncomfortable to use. In the centre of the film advance lever should be the frame counter. I can make no comment about this as a prior owner has removed it. Looking at the state of the metal that is left, I suspect a very amateurish attempt at a repair.
The front of the camera has four items - meter window, viewfinder window, shutter housing and flash PC connector. The meter window contains a two cm by one cm lens covering a selenium photoelectric cell. This does not need any batteries, which I always reckon to be a good thing. Most camera electrics from the 1960s to 1980s use mercury cells which are now illegal in just about every country there is. This window has a hinged cover - to open it, you lightly press the right-hand end (as the camera is to your eye). Selenium meters get a poor press as the photoelectric cell will deteriorate with time. However, if the cell is kept in the dark it only deteriorates very slowly, so this cell being covered, it has not yet (in 57 years) deteriorated enough to worry about. This is a single scale meter - an earlier version of the Contina IIa had a dual scale meter with a small window in the hinged cover.
Next to the meter window is the viewfinder window. This has quite a small eyepiece and a plain view with no bright lines. I find I cannot use it while wearing my glasses. The Contina Ic, which I also own, has a much larger eyepiece - this was made just a few years later in the early 1960s.
In the centre of the front is a square chrome bezel containing the shutter. This is a Prontor-SVS from Gauthier. This works on the EV system. The light meter gives you an EV value from between three and eighteen and you transfer this number to the shutter - you have to press a small tab on the shutter housing to get the EV ring to turn. Each EV number gives you a small range of shutter speed and aperture settings. If you turn the EV setting ring without pressing the small tab, different speed/aperture combinations will present themselves to the mark at the top of the housing. For very low light levels, the shutter speeds are in green - you cannot set these, but you can read them. To use them, turn the control ring on the shutter housing to B and read off a speed next to the aperture you want to use. You then need to time the exposure yourself - the speeds are from four seconds to sixty seconds and you can count this quite accurately without a watch.
The lens is a Novicar lens (a Novar lens was also available) which I have found to be excellent if stopped down to f5.6 or f8. It is threaded for 27mm filters. Maximum aperture is f2.8 and its focal length is 45 mm. Focusing is from about three feet to infinity (one metre to infinity). The throw of the focusing is only about 120 degrees, so very accurate focusing is not possible, but with no rangefinder, this camera was always going to rely on depth of field.
On the lower right of the shutter bezel (looking at the camera) is the flash PC (Prontor-Compur) connector. This is the only means of connecting a flashgun. On the side of the shutter housing there is a selector for M or X - Magnesium or Xenon - flash. M is for flash bulbs and X for electronic flash. With M, the flash is fired slightly before the shutter opens to allow the burning of the flash bulb to reach its maximum while the shutter is fully open. With X, the flash is fired as the shutter blades are fully open as electronic flash does not require time to reach its maximum intensity. This selector also has a V setting. This means Vorlaufwerk and is German for self timer. Moving the selector to this position causes an eight second delay between pressing the shutter release and the shutter firing. It is never a good idea to try this facility on an old camera as it might well cause the shutter to stop working permanently.
Rear/internal view
The back opens by pulling down a small catch on the lower right-hand edge. The back is hinged and there is a single light seal - a piece of velvet right by the hinge. The back itself has the pressure plate and a tensioning roller that goes by the take-up spool. Around the film mask are two machined film guides - showing as bright lines in the photograph above. The pawl for the rewind mechanism can be raised to enable fitting a film cassette and then lowered to secure the cassette.
24-December 2013
I have now finished my test roll of film - Agfa Vista+ 200 ISO from Poundland (yes, £1.00 per roll!). As expected, the camera works well. The only awkward thing was setting the EV values on the shutter as the mechanism is rather stiff. I definitely would not want it too loose but it would be nice for it to be a bit easier to alter. The frame counter is missing on this camera - I assume due to a botched repair by the previous owner. It does not affect the camera's functionality at all and got me the camera at a bargain price. Below are a selection of pictures from the test film.


 T