
Minolta
Uniomat
 |
| Minolta Uniomat |
This
is my first Minolta (ignoring my Minolta Dimage digital camera). The
Uniomat is a semi-automatic exposure rangefinder camera. It takes 35
mm film. It is not a particularly large camera for a rangefinder but
it is heavy. It measures 230 mm wide by 170 mm deep and 185 mm high.
This makes it too large to be considered a pocket camera – quite
apart from the weight (745 g with a short test film loaded).
The maker is stamped on the base-plate “Chiyoda Kogaku” and the camera was made in Japan. Chiyoda Kogaku made Minolta cameras from the mid 1930s but only changed their company name to Minolta in 1962. In North America, Minolta cameras were known as Ansco through a trading agreement with the USA company of that name , and the Minolta Uniomat was sold as the Ansco Anscoset.
The maker is stamped on the base-plate “Chiyoda Kogaku” and the camera was made in Japan. Chiyoda Kogaku made Minolta cameras from the mid 1930s but only changed their company name to Minolta in 1962. In North America, Minolta cameras were known as Ansco through a trading agreement with the USA company of that name , and the Minolta Uniomat was sold as the Ansco Anscoset.
My
particular camera can be dated to 1960/61 by the black plastic
surround to the light cell and the black plastic surround to the
viewfinder. In the Uniomat II this was chrome around the light cell
and white plastic around the viewfinder.
Being
a rangefinder, there are two images in the centre of the viewfinder
image which the user has to align using the focussing ring on the
front of the lens. This focussing patch in the centre of the
viewfinder is reasonably clear – particularly bearing in mind that
this camera is now fifty years old. I, personally, have a slight
problem in that my natural method of holding the camera means that my
left hand obliterates the rangefinder window as it is well to the
left of the camera. However, this is not lethal as I can easily move
my left index finger slightly when focussing.
 |
| Top view |
Setting
the exposure is simplicity itself. First you need to set the ASA
rating of your film (no DIN option) by lifting the inner ring on the
lens and moving the red dot on the inner right of the lens to the
correct ASA number (there are FOUR red dots on this ring for
different purposes but it is fairly clear which one you need to use
at a given moment). You then move the inner ring on the lens until
the needles in the exposure window are superimposed. That is it.
This sets both shutter speed and aperture – you have no control
over either. There is a scale on the lens of standard EV numbers and
a red dot indicating which one is in use, but you cannot influence
the setting other than to move to a different EV if you want to
increase or decrease the exposure.
Wallace Koopmans has produced a chart to show the aperture and shutter speed you get for each EV value. You can see the original and read Wallace's comments on the Uniomat at Wallace Koopmans Artlog. My thanks to Wallace for his permission to use his chart.
Wallace Koopmans has produced a chart to show the aperture and shutter speed you get for each EV value. You can see the original and read Wallace's comments on the Uniomat at Wallace Koopmans Artlog. My thanks to Wallace for his permission to use his chart.
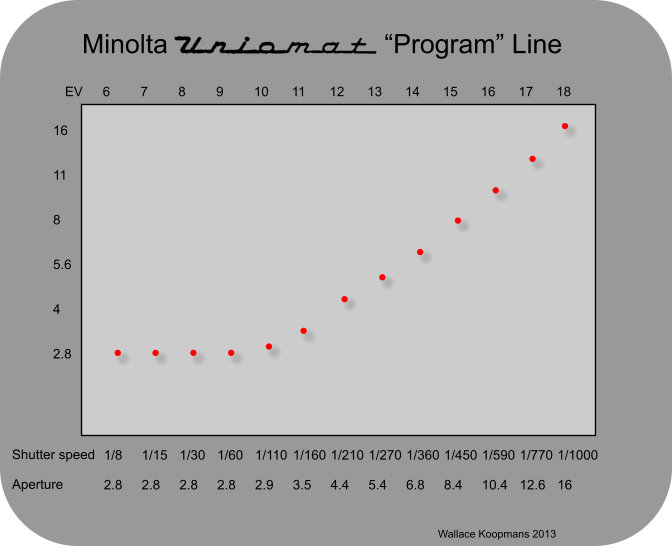 |
| Copyright Wallace Koopmans |
Once
the exposure is set, there is another red dot on the right of the
lens which indicates which shutter speed has been selected. These go
from 1/8 to 1/1,000 seconds. That last, 1/1,000 seconds, is very
fast for a leaf shutter. It is worth mentioning how Citizen (the
manufacturer of the shutter) have achieved this. In most cameras,
there are separate diaphragm and shutter blades. You set the
diaphragm to the required aperture and when the film is exposed, the
shutter blades open to the maximum aperture (which on this camera is
f2.8). This means that for smaller apertures, the shutter is
spending time moving beyond the diaphragm blades and achieving
nothing. In this Citizen shutter, there is only one set of blades in
the lens (five blades in all) and the shutter blades double as diaphragm blades. So, at
f2.8, the shutter blades open fully and offer a maximum speed of 1/60
seconds. At f5.4, the shutter blades do not open so far and the
speed is 1/270 seconds. At the smallest aperture, f16, the shutter
blades do not have to move very far at all and the shutter speed is
an amazing 1/1,000 seconds.
 |
| Front view |
There
are other controls on the lens that are not obvious. First is the
depth of field scale. It is always nice to have one of these
but this one is different. Because you cannot set the aperture, the
depth of field scale does not use f numbers but EV numbers. In use
it is much the same but slightly confusing to start with. Maximum
depth of field is at EV18 and the depth of filed scale goes down to
EV9. Below EV9, the aperture is always f2.8. The are two scales to make using flash easy - one for electronic flash (x) and one for flash bulbs (M). to use these, you line up the distance to the subject (taken from the focussing ring) against one of five letters (A, B, C, D and E). This sets an appropriate EV and thus both shutter speed and aperture. There is also a red dot that will tell you if you are too far away to use flash.
Other controls on the lens barrel are a flash selector - X (electronic) or M (bulb). the difference between these (as on all cameras) is the timing of the flash and shutter. With X, the flash fires as soon as the shutter is completely open and will synchronise at a speed somewhere between 1/250 and 1/500 seconds which is quite fast; faster than you will get with a focal plane shutter. With M, the flash fires just before the shutter opens to allow the bulb to reach maximum intensity as the shutter is fully open. In this case the flash will synchronise at 1/1,000 seconds which is extremely fast. The last control here is the delayed action lever marked V (Vorlaufwerk, the German for 'delay').
The lens is a Rokkor 1:2.8 45mm lens about which I know nothing as yet - I will share when I do.
Just got the test film back from the lab. Fairly impressed with the results. Only downside is that I managed to get flare on a very overcast day. Some examples:
Other controls on the lens barrel are a flash selector - X (electronic) or M (bulb). the difference between these (as on all cameras) is the timing of the flash and shutter. With X, the flash fires as soon as the shutter is completely open and will synchronise at a speed somewhere between 1/250 and 1/500 seconds which is quite fast; faster than you will get with a focal plane shutter. With M, the flash fires just before the shutter opens to allow the bulb to reach maximum intensity as the shutter is fully open. In this case the flash will synchronise at 1/1,000 seconds which is extremely fast. The last control here is the delayed action lever marked V (Vorlaufwerk, the German for 'delay').
The lens is a Rokkor 1:2.8 45mm lens about which I know nothing as yet - I will share when I do.
1-11-2012:
Just got the test film back from the lab. Fairly impressed with the results. Only downside is that I managed to get flare on a very overcast day. Some examples:
 |
| Busker, Lincoln city centre |
 |
| Path in Lincoln's Arboretum |
 |
| Pottergate, Lincoln |
No comments:
Post a Comment