Showing posts with label DIN. Show all posts

Thursday, 14 January 2016

Yashica Minister D


I already have an article on Yashica Minister III rangefinders. This Minister D is clearly from the same stable.

The camera is about the same size to look at  - I suspect the Minister II and D both use the same main casting. The most obvious difference is with the light meter. With the Minister III, the meter cells are selenium cells in a ring around the lens and do not require a battery. The Minister D meter has the sensor on the left edge of the top plate and it does require a battery.

lens: Yashinon 
focal length:  45 mm
apertures: f/2.8 to f/16
focus range: 0.8 m to infinity
lens fitting:  fixed
shutter: Copal SVL
speeds: 1 second to 1/500
flash: PC socket
film size: 35 mm

The camera measures 135 mm long (not including the strap lugs), 85 mm high and 40 mm deep - 75 mm including the lens.
-----------------------------------------------------------------------------------------------------------------
(C) John Margetts
-----------------------------------------------------------------------------------------------------------------
The controls are as had become standard on (non-SLR) 35 mm cameras. On the right is the film advance lever. this lever moves through about 120 degrees to advance the film one frame which is easily achieved with one movement of the thumb. Between the film advance lever and the right edge of the top plate is a window to the frame counter. This counter is automatically reset to 'S' when the back of the camera is opened. This is two before the counter shows '1' allowing for the film to be wound on two frames to move the fogged film leader past the film gate once the back is closed.

Just to the left of the film advance lever and slightly in front is the shutter release button. this is chrome plated and is 5 mm is diameter. It is threaded for a standard cable release.

To the left of these three, the top plate is slightly raised. on this raised portion are the light meter display and ASA setting. ASA (effectively the same as ISO) can be set from 10 to 400 - about the range of film speeds available in the early 1960s. the film speed can only be set in ASA numbers - there is no DIN scale - but for those who prefer DIN (me!) there is a ASA/DIN conversion scale on the inside of the back door.

The light meter consists of a window to a black and white scale and a pointer - see forward on how to use it.

Left of the light meter is an accessory shoe - no electrical contacts so a 'cold' shoe. On the far left is the rewind crank. This pulls up to release the film cassette when loading/unloading but plays no part in releasing the back.

The front of the top-plate has the viewfinder window - fairly large at 20 mm by 13 mm - and a small rangefinder window at the end of the 'Minister D' logo. To the right of the viewfinder is the light meter cell. This is circular and is around 5 mm diameter in a 15 mm diameter enclosure.

The lens is central in the Copal SVL shutter. Just to the left of the shutter housing is a PC (Prontor Compur) flash connector.

The base plate is uncluttered. It has a button to release the rewind mechanism, a 1/4 inch UNC tripod boss (the old standard for tripods was 1/4 inch Whitworth which is very close to 1/4" UNC), a battery compartment and then usual Yashica recessed catch for the back. This is marked O-P - 'O' for open and 'P' for closed.

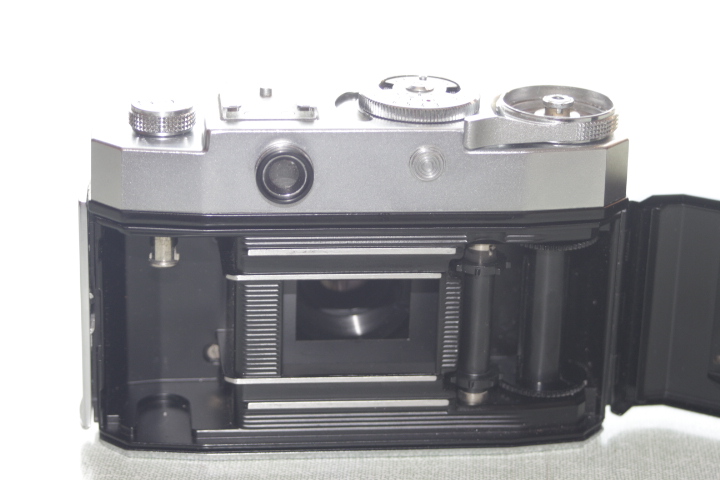
The back of the camera, as well as having the hinged back, has the light meter actuating button, the viewfinder eyepiece and a grey plastic plug. This plug hides the rangefinder adjusting screw. last thing to note is the presence of strap lugs at either end.

The lens is a Yashinon f/2.8, 45 mm lens (actually described on the lens fascia as 4.5 cm as was usual up to the 1940s but was old hat by the 1960s). I am told the lens has five elements in four groups. It is, of course, coated as was usual by the 1960s. The camera focusses by moving the whole lens; this is the high quality method of focusing compared to the cheaper method of just moving the front element of the lens.

The lens is set in a Copal SVL shutter:
S - for flash synchronised
V - for Vorlaufwerk (delayed action)
L - for light value settings

The shutter clearly takes its name from the German Prontor shutters - S, SV and SVS.

The lens can focus down to 0.8 m (2.8 feet) and is coupled to the rangefinder. this camera is now 50 years old and the rangefinder patch is fairly dim. However, knowing this is in the centre of the viewfinder it is not necessary to actually see it. It is still quite easy to the secondary images of strong verticals and so the rangefinder is straight forward to use. On the rear of the top plate is a small (5 mm) grey plastic plug. This is easily removed to reveal a small screw which is used to adjust the rangefinder. This camera seems to be already adjusted correctly. 

Incidentally, it is possible to improve the contrast of dim rangefinder patches. this can be done by inking in a small black circle in the middle of the viewfinder using a Sharpie or such.

Another nice feature with focusing this camera is parallax adjustment. As you focus the camera closer, the bright lines in the viewfinder move progressively to the right and down. You will still get some parallax error in your framing but you should be able to avoid cutting peoples' heads off.

There is a usable range of f stops from f/2.8 to f/16. This couples with shutter speeds from 1 second to 1/500 seconds. With films rated between 100 ISO and 400 ISO there will be few conditions that this camera will not cope with - at least in the UK; Florida beaches might be a problem.

Setting the exposure takes several steps.

1) press the red button on the rear of the top plate to switch on the meter
2) while holding the red button in, note the number the meter needle is pointing to
3) transfer this number to the outer-most ring on the lens/shutter housing

This sets the exposure but to the camera's choice of aperture and shutter speed. To get either the aperture or speed you want requires a fourth step.

4) turn the inner, gnarled, ring until either the aperture you want, or shutter speed, is against the red index mark. Not every aperture or shutter speed will be available for a given LV setting. For instance, with an LV setting of 17 you are stuck with f/16 and 1/500 and at LV 3 you only get shutter speed of 1 second and an aperture of f/2.8.

This is essentially a shutter priority system as altering the LV will alter the aperture, the shutter speed staying constant until the aperture required is outside the available range.

Most Japanese cameras use black foam in the recess the back fits in. this acts as a light seal. Unfortunately, this foam eventually turns to goo which has happened to this camera. Before I can run a test film I need to clean out the remains of the light seals and fit new black foam - easily secured on the Interweb.


Tuesday, 4 November 2014

Mamiya EE Super merit (AKA Mansfield Eye-tronic)

Mamiya made cameras both for themselves and for re-badging by other companies.  This camera is re-badged by the USA company of Mansfield. It is badged as a Mansfield Eye-tronic but is actually a Mamiya EE Super Merit. This model was also available in the USA as a Honeywell Electric Eye 35 and in the UK as the Vulcan.  The camera is well designed and well made as I would expect from the Japanese in 1962 (the year of this model's introduction, in September).  That makes this camera 50 years old (give or take a year) - and it is in very good condition. It all functions as it should, the only real deterioration being the foam light seals - as is usual on Japanese cameras of any age, these are reduced to a sticky goo and I have partially replaced them. The seals I have replaced are the two ends: around the hinge and around the catch. The long seals top and bottom of the back look to be recessed enough not to cause any trouble - I shall see for sure when my test film is completed (12 exposures of Fomapan 200 Creative).

lens: Mamiya-Kominar badged as Mantinar
focal length:  40 mm
apertures: f/2.8 to f/22
focus range: 1 m to infinity
lens fitting: fixed
shutter: Seikosha
speeds: 1/30, 1/60, 1/125, 1/250
flash: PC socket
film size: 35 mm

Front view - lens with a Petri UV filter in place


This camera is about the standard size and weight for a fixed-lens Japanese rangefinder camera of the period. it measures 130 x 60 x 80 mm and weighs xxxg. Of the three Japanese rangefinders I own, this is the most thoughtfully designed. 

The top plate is spare. On the left is the rewind crank which is slightly proud of the top plate when not in use. In the centre is the accessory shoe - a cold shoe as it has no flash contacts. In front of then accessory shoe is stamped the name "Mansfield" - this would say "Mamiya" on a non-re-badged version or "Honeywell" or "Vulcan" for the other brands of re-badged Mamiyas. On the right of the top plate is the frame counter - this counts down to zero so needs to be set at the film length when you load the film. I don't usually bother with frame counters - I just keep using the camera until the increased tension in the film advance tells me the end has come. With this camera it is, if not essential, then very useful to set the frame counter as when the film is finished the film advance lever keeps moving with no change in tension. What this camera does is when the frame counter reaches zero the word "END" appears in the viewfinder. You can keep winding the film and pressing the shutter release but the film is not moving and you are repeatedly exposing the same last frame.
Top view
The front has no surprises. The viewfinder bezel is at the top. This is black plastic with a very worn (on my camera) chrome outline. The viewfinder is slightly to the left of the lens and the rangefinder window is slightly to the right (both as when using the camera).

The viewfinder has bright-lines and the display for the light meter. There are no parallax markings for close-ups as the viewfinder physically moves as you focus the lens. This is quite a sophisticated facility for a mid-range camera. The viewfinder also includes the word "END" when the frame counter reaches zero.

The rangefinder spot is yellow (as is usual) but is an undefined blob which makes using the rangefinder harder than it should be. Having said that, it does work in good light - test photos will tell me how well. Both the light meter and the rangefinder are coupled.
Inside
Below the viewfinder bezel is the shutter assembly. The shutter is made by Seikosha and is a leaf shutter. the camera offers a choice between automatic and manual exposure control. In auto, the required shutter speed is set and the diaphragm set to auto - the camera selecting the aperture. See the notes on the test film to see how well this works. If you want manual control of the exposure, you can set the aperture as well as the shutter speed. the light meter display in the viewfinder will tell you the required aperture for the set shutter speed (the only time you need to look at the light meter display) or you can use a hand-held light meter to gauge exposure (see below where I have tried all three methods on one picture).

back
On the bottom of the shutter housing is the selector for the film speed. this shows the camera's age as it goes as low a 10ASA/11DIN but only as high as 200ASA/24DIN. The lens itself is surrounded in common Japanese fashion with a circular selenium light sensor. This means it is always pointing the same way as the lens and gets covered by any filter used. In turn, this means that no exposure compensation is needed with filters - as good as you can get without TTL metering. Incidentally, selenium means that no battery is required for the light meter to work.
Underside of lens showing DIN/ASA selector
To the right of the shutter housing is the shutter release button. Personally, I do not like face mounted shutter releases but I have to admit that this one is fine in use. There is a screw socket for a cable release but this is on the top plate. On the opposite side of the shutter housing is a PC socket for flash. There is no means of synchronising  the flash so I assume it is intended for FP bulbs or electronic flash.

The back of the camera is very plain - just the viewfinder eyepiece and the film advance lever. Inside, film attachment is very simple and is about the easiest I have ever come across. There is a generously wide slot with a prominent tang to fit into a sprocket hole. Most 35mm cameras have a shaft with top and bottom sprocket wheels. Not here. There is a single large sprocket wheel below the film gate. This does nothing with the back open making it easy to secure the film to the take-up spool - the film advance will keep moving the film without the user having to repeatedly press the shutter release. Once the back is shut, this sprocket wheel will only allow one frame to advance at a time.
Shutter set to shutter priority automatic exposure
The base of the camera is also bare - just the tripod boss (1/4 inch) and the rewind button.
Shutter set to manual exposure.


Test film results.

The results are good. In the pictures, the horizontal bars to be seen in the sky in some pictures are a scanning artefact due to the negatives being a bit thin (i.e. under-exposed). Overall, both focus and exposure are as they should be producing usable negatives. Although not all the negatives have scanned well, they would produce reasonable silver -prints.
Derelict factory, Stamp End, Lincoln

Social housing estate, Lincoln

River Witham, Lincoln

Footpath
 This next photograph is a test of the rangefinder. I focussed on the nearest pale ball on top of the black steel fence. It is not quite in focus - focus being just a bit closer than it should be (look at the black top rail of the fence just this side of the pale ball).
Rangefinder test

Stamp End lock, Lincoln

River Witham, Lincoln

 This is what happens if you continue to take pictures after the film has ended. The camera does nothing to stop you (apart from displaying the word "END" in the viewfinder) and you end up with multiple exposures on one frame.
The last frame of test film - multiple exposure
 These last three show the effects of 1) using automatic exposure, 2) manual exposure using the built-in meter and 3) manual exposure using a separate hand held meter. All three are exposed well enough to be usable with the automatic exposure perhaps being the best exposure. it is a bit surprising that using the built-in meter automatically differs from using the same meter manually, but the difference is there.  This is possibly due the the camera being able to select in-between aperture values while with manual exposure you have to use one of the marked aperture values. The last exposure, using my trusty (and trusted) Ikophot meter is of more concern as it is clearly rather underexposed.
Child's bike - auto exposure

Child's bike - manual exposure using built-in meter

Child's bike - manual exposure using Zeiss Ikon Ikophot hand held meter.

Thursday, 3 October 2013

Canon EOS 5 (A2, A2e)


Canon EOS 5 - front view

This is an early model EOS camera dating from 1992 to 1998. All EOS cameras have the same basic shape from the first film EOS (EOS 650) to the latest digital EOS . The main way in which the various EOS models vary is in size. This EOS 5 is a large and heavy camera. It weighs 665 g (with no lens, battery or strap) and measures 154 by 120 by 75 mm.

The EOS 5 was aimed at what is now called the prosumer market - that is, the lower-end professional and high-end amateur market.

The outside of the camera is black plastic - I think polycarbonate but I am far from certain about that. The weight of the camera clearly says that the camera has a metal chassis. The battery holder on the right acts as a grip and is covered in a rubbery material. The battery is a lithium 2CR5.

For its day, it has a lot of controls but very few compared to a modern digital SLR. The controls are in two places. The most used are on the top plate and the less used on the back.

On the far left of the top plate is a mode selector dial. This has the expected options for a serious photographer - Programme, Tv, Av and M. It also has DEP, x, CF and CAL - details later. On the opposite side of off ('L') are settings that declare this to be an amateur camera. Here are no words or letters, just icons. This offers four options: Portrait, Landscape, Macro and Action.

Next to the mode selector is a button to release the built-in flashgun. Once the flashgun is raised, this button allows you to set flash exposure compensation.

Towards the rear by the mode selector is the indicator for the position of the film plane.
Canon EOS 5 - top view

In the middle, as is usual with SLR cameras, is the pentaprism viewfinder.  This is an actual pentaprism - on lower-end EOS models, Canon used a penta-mirror which gives a smaller and darker image in the viewfinder. On top of this is the built-in flashgun. This is a sophisticated flashgun which has a zoom function to allow the best illumination of the subject. On top of the built-in flashgun is a Canon-specific hot shoe. I am not calling it an accessory shoe as I cannot imagine that anyone has ever fitted anything but a flashgun here.

The space to the right of the pentaprism is dominated  by an LCD screen. This displays various pieces of information depending on the set functions and the actions being carried out at the time. In front of this is a button to activate the self-timer which gives a ten second delay between pressing the shutter release and the shutter firing.

On the right, in front of the LCD screen, is the now ubiquitous selector wheel and in front of this is the shutter release. This last is a plain, smooth button - no cable release thread now.

On the back are more controls. On the top right are two buttons. The right-hand one allows you to set just one of the five autofocus points to be active - or all five. The left-hand one has two functions. Normally, it acts as the exposure lock. This allows you to point the camera at the most significant light source in your subject and then recompose without altering the exposure. Useful where too much sky will result in underexposure of the key elements. It is also used to toggle between 0 and 1 when setting the Custom Functions.
Canon EOS 5 - back view

In the centre of the back is a secondary selector wheel - this one has an on/off switch and it is not necessary to ever use it. On the left of the back are four more buttons. These are labelled 'Drive' (to select how many photographs are taken with one press of the shutter release), 'AF' (to select how the camera attempts to focus), '<icon>' (which selects the exposure metering system), and a multi-function button which allows you to override the ISO setting, set exposure bracketing, red-eye prevention, silence the beeper and, finally, allow multiple exposures on one frame. Right to the left is a window to allow you to see the cassette inside the camera. This is very useful to people with poor memory like me (although I prefer a holder for the film box end which allows you to add personal notes like pushed ISO rating).

On the front of the camera is the EF lens mount. As this is a 35mm camera, it is 'full frame' and will not accept the modern digital EF-S lenses. As is usual with EOS cameras, the lens release button is on the left of the lens mount.

To the right of the lens mount, towards the top of the camera, is an auxiliary light emitter for the autofocus system. This helps the camera focus in poor light.

On the right-hand end of the camera are three items - a button to rewind the film part way through, a socket for an electrical remote control and the catch for the battery compartment. The remote socket is of an older design - it has three electrical contacts - and is not compatible with the later remote controls with a jack plug.

On the left end is the catch for the back and a PC socket for a flash cable. The last (also known as a German socket) has become obsolete since this camera but its presence here means I can use any of my old flashguns as well as my Canon specific Speedlite.  The base has a connector for a motor drive and a standard (1/4 inch Whitworth) tripod socket.

Control details.

The mode selector has what has become standard (Tv, Av, M & P) but also has four extras. These are DEP, x, CF and CAL.

'DEP' is a system to optimise depth of field. It works by then user focusing on the nearest point of interest and pressing teh shutter release, then focusing on the furthest point of interest and pressing teh shutter release. At this point, the camera selects a focus point and aperture that will result in both these points being in focus. The user then presses the shutter release a third time to actually take the picture.

'x' allows for flash synchronisation with the PC socket. The user can select between shutter speeds of 1/200, 1/125, 1/90 or 1/60 using the rear selector wheel.

'CF' allows the user to set any of the custom functions. The only one of these I use is the custom function to leave the film leader out of the cassette when rewinding.

'CAL' is used to calibrate the eye controlled focusing system. I find this both useful and easy to use. The EOS 50e also has this system. I read reports on the Interweb about how poor this eye control focusing is but I suspect those people have not calibrated the system properly - or not at all.

In addition to these 'creative zone' settings (Canon's term) there are also 'image zone' settings. For anyone who understands the basics of photography these settings are unnecessary. Their big disadvantage is that they disable user control over shutter speed, aperture, focusing system, metering mode and flash. The only advantage to using image zone settings is that you can use the camera as a point-and-shoot camera with interchangeable lenses.  This also applies to modern Canon digital SLRs. The five image zone settings are full auto, portrait, landscape, close up and sport.

The button to release the built-in flashgun has two functions - it releases the flashgun and, when pressed a twice, it allows you to set flash exposure compensation. If an external flash is fitted to the hot shoe (rather than by way of the PC connector), the flash release button will not release the built-in flashgun but pressing it just the once will allow you to set the flash exposure compensation.

The built-in flashgun is rather sophisticated - at least when compared to the built-in flashguns on the EOS 650, EOS 50e, EOS 350D and EOS 650D. This flashgun has a zoom function and changes focus according to the focal length signal from the lens. This is supposed to optimise illumination for differing angles of view. You can hear this focusing of the flashgun taking place as you rotate the zoom control on the lens. I have not tried this out so I cannot comment on how well the flash illumination optimisation works.

This built-in flashgun also has a separate red-eye reduction lamp. The way this works, when set, is the subjects of a portrait are asked to look directly at teh flashgun and just before the shutter opens and the main flash fires, this small red-eye reduction lamp fires several times. Red-eye in flash portraits is caused by the pupil in the eye being dilated due to the low light level allowing the flash to enter the eye, bounce of the red coloured back of the eye and then going back to the camera. This red-eye reduction lamp causes the subjects' pupils to contract, allowing less light into the eye and even less reflected light to bounce out of the eye. So no more excuses for zombie-eyed portraits.

I like having the flash PC (Prontor-Compur) connector for using off-camera flashguns. For modern photographers this is obsolete as neither cameras nor flashguns have PC connectors, but I am not really a modern photographer.

I am not going to go over all the options available on this camera. As a computer-controlled camera, the options are legion, but there are a few things worth mentioning.

Film rewind is automatic at the end of the roll of film. This rewinds fairly slowly and retracts all the film into the cassette. This can be altered in two ways. Firstly, the rewind speed can be increased - useful at social functions where dead-time spent reloading the camera with film is not a good thing. Normally, slow rewind is better for the film (less scratches and less build-up of static to attract dust) but this is not always the most important thing. Secondly, you can set the camera to leave the film leader out of the cassette. This is what I was always taught to do as the presence of film between the velvet light seals of the cassette improves the blocking of light. It also makes it much easier to load the film into the spirals for developing.  It is also possible to force film rewind part-way through the roll of film. For an amateur, we are always going to finish all the film in the camera, but a professional is very likely to have a number of unexposed frames left at the end of an assignment.

Film speed is set automatically by the DX coding on the film cassette. If you are using Adox films (for example) with no DX coding or loading your own bulk film into reusable cassettes, you need to set the film speed manually. This is entirely as ISO (which I still think of as ASA) with no provision for DIN settings. Not a problem, really. If you are using DX encoded cassettes, you can still set the film speed manually - useful if you want to push the film speed.

This camera takes a single lithium 2CR5 battery. This is common with all my EOS film cameras - I have three currently and have previously owned three others. In normal use, this should last for about forty rolls of 24 exposure film. This battery life can be extended by not excessively refocusing the camera, not keeping your finger on the shutter release button too long, not using the eye-controlled focusing and turning the camera off if you are not actually using it. You can also seriously reduce battery life by doing the opposite of all those things.


test photographs:
Ivy flowers
 Field, Lincolnshire Wolds

Rockabilly Buskers, Lincoln.

Rockabilly Busker, Lincoln

Thursday, 5 September 2013

Contina IIa

Zeiss Ikon's Contina camera was a long lived and varied series of cameras.  The series started as the Ikonta 35 which was a post-war version of the 120 format Ikonta adapted to take 35 mm film.  This camera became two series of cameras - the Contessa and the Contina; the first Contessas and Continas were folding cameras. The Contessa version was more up-market than the Contina version. I have already written about one of the Contessa line - the Contessa LKE. The Contessa line have better lenses (Tessars) and coupled light meters and rangefinders. The Contina range have cheaper lenses (Novar, Novicar and Pantar) and the light meters, where present, are uncoupled. I have also written about the Contina line elsewhere - the Contina Ic.

lens: Novicar
focal length:  45mm
apertures: f2.8 to f22
focus range: 1m to infinity
lens fitting: fixed
shutter: Prontor-SVS
speeds: 1 second to 1/300 seconds
flash: PC connector
film size: 35mm

Contina IIa - front view, meter window closed
To make identifying and placing Contina cameras as difficult as possible, the Contina series split into two lines of cameras simultaneously.  The original Contina folding camera  became the Contina II folding camera with a light meter and then a series of derivatives. That original Contina folding camera, at the same time, became the Contina I rigid camera - no light meter or rangefinder - and then a series of derivatives.
Front view - meter window open

So, at any one time after 1953 there were two different Continas available, both just designated Contina. I have been referring to Contina I, Contina II, Contina Ic, Contina IIa but I don't think those were names offered by Zeiss Ikon, rather us collectors use them to make sense of the mish-mash of models.

Daniel Jiménez has produced a 'family tree' of the Contina series which he has given me permission to use here:

Copyright Daniel Jiménez
Daniel has a useful camera blog which can be found in an English version here. He also has a much larger Spanish version here.

This camera - is a Contina IIa. It is derived from the Contina II which was a folding camera but this version does not fold - that is, it is rigid. It is a compact and solid camera measuring 120 x 65 x 85 mm and weighs 567g. It offers a built-in but uncoupled light meter and an EV enabled shutter. It was not a cheap camera - it cost £43/15/1 in 1957 (in old money, or £43.76 in new money) which, given the average male wage in 1957 was £9.00 means this camera cost the equivalent of £2,500 in 2013 values. The version with a Novar lens only cost £36/12/7.

The top plate of the camera has a number of  items on it. On the left is a small rewind knob. I prefer these to the small folding cranks that became ubiquitous in the 1960s. When you first turn the rewind knob, it raises itself by one cm. This is above the height of the centre of the top plate and makes it easier to hold and turn.

rear and top view
Next to the rewind knob is an accessory shoe. At the time that this camera was made (1956/58) this was more likely to be used for a separate rangefinder than a flashgun. There are no electrical contacts in the accessory shoe so it is a cold shoe.

Next to the accessory shoe is the light meter window and the light meter control knob. Visible in the window is a needle connected to the light meter. The brighter the light, the more this needle moves towards the rear of the camera. Also in this window is a white circle which moves in response to the user moving the control knob. When the white circle is over the needle, the correct exposure can be read off the scale around the control knob. This is mostly in EV values - more later. In the centre of the control knob is the setting for the film speed. This camera was made in 1956/8 and uses the film speed standards in place at that time. A few years later (1960), the American Standards Association (ASA) revisited their film speed standard to produce the later ASA standard now known as ISO. The German DIN system remained unchanged so on this camera 21 DIN = 40 ASA rather than the later standard of 21 DIN = 100 ASA (ISO) - I always use the DIN standard with old cameras to make sure I do not get it wrong.

On the far right of the top plate is the film advance lever. This moves through about 200 degrees to advance the film and cock the shutter. The lever is all metal and only curves a very slight amount which I find makes it uncomfortable to use. In the centre of the film advance lever should be the frame counter. I can make no comment about this as a prior owner has removed it. Looking at the state of the metal that is left, I suspect a very amateurish attempt at a repair.

The front of the camera has four items - meter window, viewfinder window, shutter housing and flash PC connector. The meter window contains a two cm by one cm lens covering a selenium photoelectric cell.  This does not need any batteries, which I always reckon to be a good thing.  Most camera electrics from the 1960s to 1980s use mercury cells which are now illegal in just about every country there is. This window has a hinged cover - to open it, you lightly press the right-hand end (as the camera is to your eye). Selenium meters get a poor press as the photoelectric cell will deteriorate with time. However, if the cell is kept in the dark it only deteriorates very slowly, so this cell being covered, it has not yet (in 57 years) deteriorated enough to worry about. This is a single scale meter - an earlier version of the Contina IIa had a dual scale meter with a small window in the hinged cover.

Next to the meter window is the viewfinder window. This has quite a small eyepiece and a plain view with no bright lines. I find I cannot use it while wearing my glasses.  The Contina Ic, which I also own, has a much larger eyepiece - this was made just a few years later in the early 1960s.

In the centre of the front is a square chrome bezel containing the shutter.  This is a Prontor-SVS from Gauthier. This works on the EV system.  The light meter gives you an EV value from between  three and eighteen and you transfer this number to the shutter - you have to press a small tab on the shutter housing to get the EV ring to turn. Each EV number gives you a small range of shutter speed and aperture settings.  If you turn the EV setting ring without pressing the small tab, different speed/aperture combinations will present themselves to the mark at the top of the housing. For very low light levels, the shutter speeds are in green - you cannot set these, but you can read them.  To use them, turn the control ring on the shutter housing to B and read off a speed next to the aperture you want to use.  You then need to time the exposure yourself - the speeds are from four seconds to sixty seconds and you can count this quite accurately without a watch.

The lens is a Novicar lens (a Novar lens was also available) which I have found to be excellent if stopped down to f5.6 or f8. It is threaded for 27mm filters.  Maximum aperture is f2.8 and its focal length is 45 mm. Focusing is from about three feet to infinity (one metre to infinity). The throw of the focusing is only about 120 degrees, so very accurate focusing is not possible, but with no rangefinder, this camera was always going to rely on depth of field.

On the lower right of the shutter bezel (looking at the camera) is the flash PC (Prontor-Compur) connector.  This is the only means of connecting a flashgun. On the side of the shutter housing there is a selector for M or X - Magnesium or Xenon  - flash. M is for flash bulbs and X for electronic flash. With M, the flash is fired slightly before the shutter opens to allow the burning of the flash bulb to reach its maximum while the shutter is fully open. With X, the flash is fired as the shutter blades are fully open as electronic flash does not require time to reach its maximum intensity. This selector also has a V setting. This means Vorlaufwerk and is German for self timer. Moving the selector to this position causes an eight second delay between pressing the shutter release and the shutter firing. It is never a good idea to try this facility on an old camera as it might well cause the shutter to stop working permanently.

Rear/internal view

The back opens by pulling down a small catch on the lower right-hand edge. The back is hinged and there is a single light seal - a piece of velvet right by the hinge. The back itself has the pressure plate and a tensioning roller that goes by the take-up spool. Around the film mask are two machined film guides - showing as bright lines in the photograph above. The pawl for the rewind mechanism can be raised to enable fitting a film cassette and then lowered to secure the cassette.

24-December 2013


I have now finished my test roll of film - Agfa Vista+ 200 ISO from Poundland (yes, £1.00 per roll!). As expected, the camera works well. The only awkward thing was setting the EV values on the shutter as the mechanism is rather stiff.  I definitely would not want it too loose but it would be nice for it to be a bit easier to alter. The frame counter is missing on this camera - I assume due to a botched repair by the previous owner. It does not affect the camera's functionality at all and got me the camera at a bargain price. Below are a selection of pictures from the test film.

Pottergate Arch, Lincoln


Fountain in Lincoln Arboretum


Rockabilly Buskers, Lincoln


Lincoln Shoppers getting ready for Xmas


Foreign Buskers, Lincoln


Tuesday, 27 August 2013

Pentax Spotmatic SP 1000

The Spotmatics were the first autoexposure SLR - or, at least, the first successful autoexposure SLR. They built on Pentax's earlier success with the manual SLRs. Despite the name, the exposure system was not a spot system but was a centre weighted system. 


Asahi Pentax SP1000
lens: none supplied
focal length:  n/a
apertures: n/a
focus range: n/a
lens fitting: M42 thread (AKA Pentax fit), automatic
shutter: horizontal cloth focal plane
speeds: 1/2 to 1/1000
flash: PC connector
film size: 35mm

The SP1000 (and SP500, which was introduced at the same time) built on the design of the original Spotmatic. For anyone who is used to SLR cameras from the 1960s and 70s there are no surprises here, partly because this camera helped to define the genre. They were made between 1973 and 1976.

So - a general description. The camera measures 143 by 92 by 88 mm and weighs 610 g (body alone). This is heavy by modern standards - particularly compared to Pentax's later K-mount ME series. I have no objection to weight in a camera if only because weight helps with stability and results in less camera shake.

The layout of the camera is pretty much standard. On the left is a fold-away rewind crank. Around this is an aide memoire for the type of film in use. This gives the options of Empty, Panchro(matic), daylight colour and tungsten colour. The Empty setting is particularly useful as I often have more than one film camera on the go and on occasion open a camera only to find a part-used film inside.  Panchro refers to black-and-white film (which is usually panchromatic). The two colour options are for outside and inside use respectively and refer to the white balance of the film.
Pentax SP1000 - top plate

In the centre of the top plate is the lump of the pentaprism with the viewfinder behind. Traditionally, this is where the accessory shoe is put but the SP1000 has no accessory shoe as standard. Those who needed one could buy one as an optional extra which fitted into a groove around the viewfinder surround.

To the right of the pentaprism is the speed selector. For shutter speeds this simply turns to click-stops and it is quite possible to move directly from 1/1000 to B. 1/60 is marked with a red X to indicate that this is the electronic flash synch speed. The shutter speed dial also doubles as the film speed dial. To alter the film speed, it is necessary to lift the dial and turn. Film speeds are from 20 ASA to 1600 ASA. No DIN scale is available but the selector moves in 1/3 stop click-stops each of which is equal to one degree DIN. (For my younger readers, ASA = ISO [very nearly!])

To the right of the selector dial is the film advance lever. This is metal and is slightly curved to allow the user's thumb to access it. I prefer this to Pentax's later style of a plastic tipped lever that stands proud of the body.

The centre of the film advance contains the frame counter. This automatically resets to -2 when the back is opened. When you advance the new film to get rid of the fogged portion on loading, the counter will point to zero.

Between the selector dial and film advance and slightly forward of them is the shutter release button. This is threaded for a standard cable release.
Pentax SP1000 - inside view

The front of the camera has three items (the back is entirely clean). These are the meter switch and two PC (Prontor-Compur) flash connectors. The meter switch switches on the TTL (Through The Lens) meter and stops down the diaphragm. This is basically a shutter priority system.  The user sets the required shutter speed and then turns the aperture ring until the needle in the viewfinder is centred. When you switch off the meter (and you need to remember to or you will rapidly flatten the battery) the diaphragm should then open again to allow you to finesse the composition. On my specimen, this did not happen initially, I assume from the lack of use as it will eventually open itself. I have soaked the linkage with naptha and worked the switch repeatedly and it now works.  The diaphragm stop-down system operated by the shutter release works fine as this is a completely separate system.

The two PC flash connectors are marked for FP and X. FP is for fast flash bulbs and will synch at any shutter speed. X is for electronic flash and will only synch at 1/60 or slower.

This is an old-fashioned camera and it is fairly heavy (610g) - much more so than a Pentax ME Super (445g) or OM10 (450g). Weight is not necessarily a bad thing as it enhances stability. It is much easier to hold a heavy camera steady than it is a very light one. The down side is when you are carrying the camera all day especially when hung around your neck.

The focusing screen is a Fresnel screen with a microprism ring in the centre.  The microprisms break-up the image when it is out of focus. Best focus is achieved when the microprisms disappear. There is no split-image centre here as many SLRs have but the camera is easy to focus without it.

When you press the shutter release, the action is quite light - no heavy 'clunk' as with my Zenit or Praktica cameras, although it is still noisy compared to my leaf shuttered rangefinders.

Sample pictures.

Very impressed - both with the camera and with the Helios-44M lens.  I had no battery for this test, so exposures were manually sorted with my Ikophot meter.

Thimbleby, Lincolnshire

Choir screen, Lincoln cathedral

New carving, Lincoln cathedral

Lincolnshire wolds

Monday, 12 August 2013

Praktica MTL5B

This is my second Praktica (the other one being a Praktica TL3).  It is in good condition - including the battery compartment - and came with a number of extras.  These were a Vivitar 2x teleconverter (M42 thread so usable with my other M42 thread cameras), a Praktica flash, a Leningrad light meter and a cheap but quite good carry bag.

Praktica MTL 5B


lens:  Helios-44M
focal length:   58 mm
apertures:  2 - 16
focus range:  0.55m to infinity
lens fitting:  M42 thread
shutter:  metal focal plane
speeds:  1, 1/2, 1/4, 1/8, 1/16, 1/30, 1/60, 1/125, 1/250, 1/500, 1/1000
flash:  Hot shoe, no PC connector
film size: 35 mm

This is a fairly standard late 70s to mid-80s SLR camera. My first Praktica - I also have a TL3It is squarish and heavy with minimal use of plastics.  It is 150mm by 95mm by 55mm, not counting the lens.  The controls are standard for the time and where you would expect to find them.  The film advance is on the top right of the camera and is a lever which moves about a quarter of a turn.  At this late date, advancing the film also cocks the shutter.  Next to the film advance is the combined shutter speed selector and film speed setting control.  Shutter speeds are noted above and are all any photographer could realistically want.  Film speed can be set from 12 DIN/12 ASA to 33 DIN/1600 ASA.  The setting can be changed in one DIN increments (one third of a stop).

The camera came with a Soviet Helios-44M lens which is not original.  The Helios-44 lenses have a very good reputation - they are good copies of the Carl Zeiss Biotar lens - and this one is in very good, clean condition.  It is an automatic version of the lens - I also have a manual Helios-44 lens which came with my Zenit E - with a switch  to change between manual diaphragm and automatic diaphragm.  The aperture can be changed in half stops which is an improvement on my other Helios-44 lens.

The shutter release is an angled button on the right face of the camera.  My finger falls fairly naturally on this and it is comfortable to use.  Right by this button is a plastic lever which actuates the TTL metering system.  In use, you put your finger on the shutter release and instead of pushing down, you push towards yourself.  The diaphragm closes and the needle in the right side of the viewfinder moves.  You then adjust either the shutter speed or aperture to get the needle lined up with the notch in the middle (this is basically a match-needle type of meter).  It is designed as a shutter priority system, the idea being that you set the shutter speed with the camera away from your eye and then move the camera to eye level and adjust the aperture ring with your left hand while pressing the meter lever with your right hand.  Used this way, it is fairly easy to use.

If, like me, you prefer aperture priority metering, you need to set the aperture first and then adjust the shutter speed while looking through the viewfinder.  It is just about possible to do this but it is very awkward to do.  I am finding myself moving the camera down to adjust the shutter speed which makes the whole operation slower and less fluid.  The meter is powered by a 1.33V button battery.  Originally, this would have been a mercury cell which is now not available.  I am using a same sized silver button of 1.5V which will cause a slight mis-reading of the meter but of less than a stop so this will not be a problem with negative film.  With reversal (slide) film this might be a problem.

Focusing this camera is a delight.  The focusing screen carries the usual plain ground glass screen with a micro-prism circle and a split-image centre.  However, the split-image part on this camera is diagonal. With a standard horizontal split-image centre, it is necessary to find a strong vertical to focus on.  With this camera either a strong vertical or a strong horizontal will work as will a strong diagonal.  When I was using this camera to photograph a bush earlier today, there were no verticals, horizontals or diagonals I could focus on. I used the micro-prism circle which also worked well.  For those who have never used a micro-prism focusing screen, what you do is focus until the micro-prisms disappear.  The further from focus you are, the more prominent the micro-prisms are.  Once you can not make out the micro-prisms (or until they are as indistinct as you can make them) the image is in focus.

Below the shutter release there is a self-timer (Vorlaufwerk in German) which works by turning the small lever through 180 degrees and then pressing the centre button to actuate the shutter instead on using the shutter release button.  This does work on my camera but not well.  It is very hesitant and stops for significant times but the mechanism is clockwork and has probably not been used for the thirty years since the camera was new.

The left side of the camera is bare apart from the rewind crank.  This is the normal small folding crank  that became usual during the 1960s.  It is released by pressing a button on the base of the camera.

The other external features are a frame counter beside the film advance lever which is reset by opening the back of the camera.  This counts up from one.  I prefer the Voigtlander system from the 1950s where the frame counter counted down to tell you how many frames are left but this did not become the industry standard.  There is also an accessory shoe which is a hot shoe in flash terms.  There is no PC connector (these had become passé by the time this camera was made) so flash must by on-camera flash or the photographer must buy a third-party flash attachment to allow studio flash.  The tripod boss is not on the base plate but moved forward onto the underneath of the lens mount.  This will give better balance when using longer lenses and is something I have not seen on more upmarket cameras although it makes a lot of sense.

The outside of the camera is 'silver' plastic top and bottom plate and a padded leatherette which is very nice to hold.  This is a big improvement on the standard leatherette on my Praktica TL3.

Inside is mostly standard film SLR layout.  The shutter is a metal vertical focal plane shutter.  Superficially, this is the same as on my Canon SLRs with several horizontal metal strips.  However, the fixing does not look as sophisticated as the Canon's shutter.  It does, however, work well and offers shutter speeds up to 1/1000 and flash synchronisation at 1/125.

This camera has automatic film loading.  You pull the film leader out to the green mark on the right and wind on.  One of two metal loops will then pull the film onto the sprockets and around the spool.  This works very well although the manual mentions that with particularly curly film it might be necessary to manually move the metal loop over the film.

Light seals are foam by the hinge of the back and black 'string' along the top and bottom of the recess the back fits into.  These pieces of string look rather amateurish but have the advantage that they will not deteriorate like foam always does.  On this camera the string light seals as as good as new while the foam light seal by the hinge is reduced to a sticky mess and needs to be replaced. (edit, 27-2-2017: I am advised by James Hays that the strings are not original items and have been added by an owner.)

Sample pictures.

These pictures are taken on Agfa Vista + colour film from Poundland (£1.00 per cassette!) and developed and scanned by Snappy Snaps in Lincoln.  I am quite pleased with these.  I have also tried out the Vivitar 2x teleconverter to see how it performs.  I quite pleased with the results - a teleconverter is never going to be as good as using a designed lens - and I think the teleconverter is usable for non-critical work.

carving on Lincoln's Stonebow - 50 mm lens

carving on Lincoln's Stonebow - 50 mm + 2x teleconverter

Piano busker, Lincoln

Lincolnshire Wolds

Thimbleby main street, Lincolnshire