Showing posts with label asa. Show all posts

Tuesday, 4 November 2014

Mamiya EE Super merit (AKA Mansfield Eye-tronic)

Mamiya made cameras both for themselves and for re-badging by other companies.  This camera is re-badged by the USA company of Mansfield. It is badged as a Mansfield Eye-tronic but is actually a Mamiya EE Super Merit. This model was also available in the USA as a Honeywell Electric Eye 35 and in the UK as the Vulcan.  The camera is well designed and well made as I would expect from the Japanese in 1962 (the year of this model's introduction, in September).  That makes this camera 50 years old (give or take a year) - and it is in very good condition. It all functions as it should, the only real deterioration being the foam light seals - as is usual on Japanese cameras of any age, these are reduced to a sticky goo and I have partially replaced them. The seals I have replaced are the two ends: around the hinge and around the catch. The long seals top and bottom of the back look to be recessed enough not to cause any trouble - I shall see for sure when my test film is completed (12 exposures of Fomapan 200 Creative).

lens: Mamiya-Kominar badged as Mantinar
focal length:  40 mm
apertures: f/2.8 to f/22
focus range: 1 m to infinity
lens fitting: fixed
shutter: Seikosha
speeds: 1/30, 1/60, 1/125, 1/250
flash: PC socket
film size: 35 mm

Front view - lens with a Petri UV filter in place


This camera is about the standard size and weight for a fixed-lens Japanese rangefinder camera of the period. it measures 130 x 60 x 80 mm and weighs xxxg. Of the three Japanese rangefinders I own, this is the most thoughtfully designed. 

The top plate is spare. On the left is the rewind crank which is slightly proud of the top plate when not in use. In the centre is the accessory shoe - a cold shoe as it has no flash contacts. In front of then accessory shoe is stamped the name "Mansfield" - this would say "Mamiya" on a non-re-badged version or "Honeywell" or "Vulcan" for the other brands of re-badged Mamiyas. On the right of the top plate is the frame counter - this counts down to zero so needs to be set at the film length when you load the film. I don't usually bother with frame counters - I just keep using the camera until the increased tension in the film advance tells me the end has come. With this camera it is, if not essential, then very useful to set the frame counter as when the film is finished the film advance lever keeps moving with no change in tension. What this camera does is when the frame counter reaches zero the word "END" appears in the viewfinder. You can keep winding the film and pressing the shutter release but the film is not moving and you are repeatedly exposing the same last frame.
Top view
The front has no surprises. The viewfinder bezel is at the top. This is black plastic with a very worn (on my camera) chrome outline. The viewfinder is slightly to the left of the lens and the rangefinder window is slightly to the right (both as when using the camera).

The viewfinder has bright-lines and the display for the light meter. There are no parallax markings for close-ups as the viewfinder physically moves as you focus the lens. This is quite a sophisticated facility for a mid-range camera. The viewfinder also includes the word "END" when the frame counter reaches zero.

The rangefinder spot is yellow (as is usual) but is an undefined blob which makes using the rangefinder harder than it should be. Having said that, it does work in good light - test photos will tell me how well. Both the light meter and the rangefinder are coupled.
Inside
Below the viewfinder bezel is the shutter assembly. The shutter is made by Seikosha and is a leaf shutter. the camera offers a choice between automatic and manual exposure control. In auto, the required shutter speed is set and the diaphragm set to auto - the camera selecting the aperture. See the notes on the test film to see how well this works. If you want manual control of the exposure, you can set the aperture as well as the shutter speed. the light meter display in the viewfinder will tell you the required aperture for the set shutter speed (the only time you need to look at the light meter display) or you can use a hand-held light meter to gauge exposure (see below where I have tried all three methods on one picture).

back
On the bottom of the shutter housing is the selector for the film speed. this shows the camera's age as it goes as low a 10ASA/11DIN but only as high as 200ASA/24DIN. The lens itself is surrounded in common Japanese fashion with a circular selenium light sensor. This means it is always pointing the same way as the lens and gets covered by any filter used. In turn, this means that no exposure compensation is needed with filters - as good as you can get without TTL metering. Incidentally, selenium means that no battery is required for the light meter to work.
Underside of lens showing DIN/ASA selector
To the right of the shutter housing is the shutter release button. Personally, I do not like face mounted shutter releases but I have to admit that this one is fine in use. There is a screw socket for a cable release but this is on the top plate. On the opposite side of the shutter housing is a PC socket for flash. There is no means of synchronising  the flash so I assume it is intended for FP bulbs or electronic flash.

The back of the camera is very plain - just the viewfinder eyepiece and the film advance lever. Inside, film attachment is very simple and is about the easiest I have ever come across. There is a generously wide slot with a prominent tang to fit into a sprocket hole. Most 35mm cameras have a shaft with top and bottom sprocket wheels. Not here. There is a single large sprocket wheel below the film gate. This does nothing with the back open making it easy to secure the film to the take-up spool - the film advance will keep moving the film without the user having to repeatedly press the shutter release. Once the back is shut, this sprocket wheel will only allow one frame to advance at a time.
Shutter set to shutter priority automatic exposure
The base of the camera is also bare - just the tripod boss (1/4 inch) and the rewind button.
Shutter set to manual exposure.


Test film results.

The results are good. In the pictures, the horizontal bars to be seen in the sky in some pictures are a scanning artefact due to the negatives being a bit thin (i.e. under-exposed). Overall, both focus and exposure are as they should be producing usable negatives. Although not all the negatives have scanned well, they would produce reasonable silver -prints.
Derelict factory, Stamp End, Lincoln

Social housing estate, Lincoln

River Witham, Lincoln

Footpath
 This next photograph is a test of the rangefinder. I focussed on the nearest pale ball on top of the black steel fence. It is not quite in focus - focus being just a bit closer than it should be (look at the black top rail of the fence just this side of the pale ball).
Rangefinder test

Stamp End lock, Lincoln

River Witham, Lincoln

 This is what happens if you continue to take pictures after the film has ended. The camera does nothing to stop you (apart from displaying the word "END" in the viewfinder) and you end up with multiple exposures on one frame.
The last frame of test film - multiple exposure
 These last three show the effects of 1) using automatic exposure, 2) manual exposure using the built-in meter and 3) manual exposure using a separate hand held meter. All three are exposed well enough to be usable with the automatic exposure perhaps being the best exposure. it is a bit surprising that using the built-in meter automatically differs from using the same meter manually, but the difference is there.  This is possibly due the the camera being able to select in-between aperture values while with manual exposure you have to use one of the marked aperture values. The last exposure, using my trusty (and trusted) Ikophot meter is of more concern as it is clearly rather underexposed.
Child's bike - auto exposure

Child's bike - manual exposure using built-in meter

Child's bike - manual exposure using Zeiss Ikon Ikophot hand held meter.

Monday, 16 September 2013

Ihagee West - Exakta TL500

I do not intend to repeat the history of Ihagee here, suffice it to say that during the 1950s, 60s and 70s there were two Ihagee companies - the original Ihagee in Dresden that became absorbed into VEB Pentacon and a newer Ihagee West started by the original owner of the Dresden Ihagee (Johan Steenbergen) after he was unable to return to Dresden.  This camera is from Ihagee West rather than Ihagee Dresden. I say 'from' Ihagee West and not 'by' Ihagee West as they neither designed nor made this camera which bears their name.

Ihagee West Exakta TL500
In fact, this camera was designed and made by the Japanese company Petri. I am not saying that is a bad thing - Petri made some fine cameras and this camera is a fine camera - but it is not a German camera and does not carry any of the well-loved Exakta design concepts. The legend on the front of the camera says 'Exakta TL500' but in fact it is a re-badged Petri FT - the only clue to this is the stamp on the base saying 'Made in Japan'.

This camera is fairly heavy - it weighs 682 g with no lens - and measures 145 by 95 by 50 mm. This camera was made (or rather, marketed) in 1976 only (I have been unable to find much information about this camera or, indeed, Ihagee West other than neither maker nor camera were very successful). The layout is pretty much standard for the time.

Exakta TL500
Most controls are on the top plate. On the far left is the rewind crank. (the usual Exakta system of film cassette on the right and take-up spool on the left has not been maintained) and is the now usual small fold-out crank. This lifts to release the film cassette inside.

Next to this is the the film speed selector - the main scale is ASA and is printed in white, there is also a DIN scale printed in red. This selector moves in 1/3 stop click-stops - i.e. one degree DIN. The range is from 25 ASA to 1600 ASA (ASA being effectively the same as ISO). In the middle is the bump of the pentaprism with an accessory shoe on top. This has a central contact for flash and so is a hot shoe.

To the right of the pentaprism is the shutter speed selector. This goes from one second to 1/500 seconds in the usual sequence (the maximum speed of 1/500 gives the camera its name - its sister camera, the TL1000, had a top speed of 1/1000). Flash synch is marked with a red cross as 1/60. At the date of this camera, the makers will have assumed electronic flash.

On the right hand end of the top plate is the film advance lever. This is tipped in black plastic and moves through 180 degrees to wind on one frame.  Between the shutter speed selector and the film advance lever is a window for the frame counter. This resets to -2 (indicated by S) when the back is opened. This counter counts up from zero.
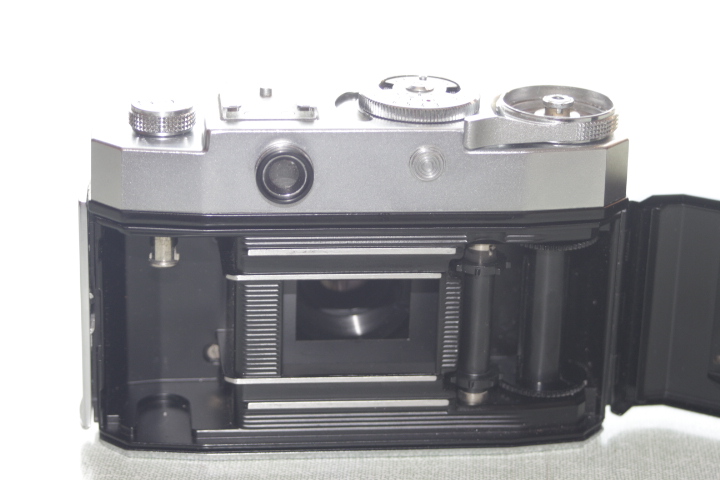
Exakta TL500 rear view

The front of the top plate, apart from the name, has nothing but the battery compartment. This holds a PX625A alkaline battery (still readily available). On the end of the top plate, on the left, is a PC connector for off-camera flash. Both the battery compartment and the PC socket are in unusual places. In fact, this is the first time I have seen a battery compartment anywhere but on the base plate. Unusual it might be, there is nothing wrong with it.  On the front of the camera there is nothing apart from the lens. There is no shutter delay lever on this camera. The lens mount has a standard M42 thread - Ihagee abandoned their Exakta bayonet mount right at the time that other camera makers were abandoning M42 threads. On the plus side, there were (and still are) a great many lenses available in M42 mount. Replacing the threaded mounting ring with an Exakta bayonet mounting ring would have been easy and cheap but it may well have cost more to do so while maintaining the correct lens-to-film distance. Regardless, Ihagee West went with Petri's M42 mount.

At the bottom of the lens mount is the TTL exposure meter switch. This is a stop-down system - pressing the switch stops the iris diaphragm down and switches on the electronics. To use, first you select your shutter speed, then press the meter switch and, while holding down the switch, turn the aperture ring until the meter needle in the viewfinder coincides with the white circle. It is possible to use this meter by setting the aperture and adjusting the shutter speed to match the needle-white ring but this is very awkward to do.  As the aperture stops-down to take the light reading, the viewfinder becomes very dark and it can be difficult to see the meter needle. 

At this point, I should offer a caveat to any new user of an Exakta TL500 (or TL1000). The exposure meter is automatically switched off by taking a picture. If you cannot get the meter to respond, wind-on the film. This is a good system as leaving the camera without winding on the film will prevent the battery from running down.

The base plate is uncluttered, having the rewind button and a 1/4 inch Whitworth (i.e. standard) tripod boss.  The catch for the back is on the left end and is pulled up to release the back.

Inside is as we would expect. On the left is the space for the film cassette, in the middle is the image window (24x36 mm) and on the right is the toothed sprocket that allows the film to be advanced a set number of sprocket holes. Right on the right is the take-up spool. This rotates in the opposite direction to the film advance lever. The lever moves counter-clockwise while the take-up spool rotates clockwise. This means that the film is stored emulsion side outwards..
Exakta TL500 - internal view

The edges of the back have black light-seal foam to prevent stray light getting in the join and fogging the film. This became normal in the 1960s but has the disadvantage that the foam eventually goes gooey and ceases to act as a light seal. I suspect that the designers of this camera would be surprised that their creation was still in use after forty years. I would imagine that cameras of the time had an expected life well within the useful life of the foam. Replacing light seal foam is both easy and cheap. I have a sheet of suitable self-adhesive foam bought on Ebay which only cost two or three pounds. The old foam can be removed with a cotton bud soaked in naptha (aka lighter fuel) and the new foam cut into suitable sized strips with scissors and then stuck in place.

I don't know what lens this camera came with when new but my TL500 came with an Auto Optomax. This lens is a 28mm lens so it is unlikely to be the original lens. Actually, this lens (which is in very good condition) makes a useful addition to my (small) collection of M42 lenses (this collection consists of a Helios-44 manual lens, Helios-44M auto lens, Vivitar 2x converter and this Optomax lens).

In use:

I had a spare half hour this morning and replaced the gooey light seals with new foam.  The camera should be good to go, so I have loaded it with Agfaphoto Vista + 200 ISO film (£1.00 per cassette from Poundland) and spent the morning taking photos of Lincoln. This camera came with no lens. I have been using my Soviet Helios-44M lens that came with my Asahi Spotmatic SP1000.  Tomorrow I am going to use my Optomax 28mm lens to finish off the roll of film.  Any M42 screw threaded lens will fit.

The first thing I have noticed using this camera is the weight. Over the last few weeks I have been using my Pentax ME Super and Olympus OM 10 - both of which are about as small as a film SLR can get and both are very light.

Not being made by Ihagee, all the controls are in the right place - i.e. both shutter release and film advance are on the right which makes using this camera fairly intuitive to use.

The camera is designed to use automatic lenses - which I am doing - but will still work with manual lenses (by 'automatic' I am referring to the diaphragm not the focusing).

To set the exposure, I need to choose a shutter speed, press the meter lever at the right side of teh lens mount base and while doing so rotate the aperture ring until the needle in the viewfinder is in the centre of the ring.  this sounds harder and more complicated than it is. The only problem I am having with this is finding the aperture ring by feel - this is not an issue with the camera, it is just that I am used to the aperture ring being on the outer edge of the lens barrel. 

The shutter/mirror action is quite good - not a lot of jar.

All in all, I am quite enjoying using this camera. there is one problem which is to do with the camera/lens combination. Focused on infinity, everything is fine. Focused on 0.6m. everything is fine. But if I focus on the hyperfocal distance (6m @ f11) the mirror will not return after the shot. Nor will the lens unscrew. To return the mirror I am having to re-focus to infinity, wind on the film and fire the shutter.  This has resulted in several wasted frames.  [EDIT: this happened over the first few frames of the first film. At exposure 16 it is no longer happening.]

When the film has been developed, I will post a selection of the test pictures.

16-11-2013

Here are a selection of pictures from my test film.  I am quite impressed.  All are exposed well so no problems with the exposure meter.  Exposure is even so the shutter blinds are moving smoothly.

Bridge over the Witham, Lincoln

High Street, Lincoln

Swans on the Witham, Lincoln

Housing estate road, Lincoln


Thursday, 5 September 2013

Contina IIa

Zeiss Ikon's Contina camera was a long lived and varied series of cameras.  The series started as the Ikonta 35 which was a post-war version of the 120 format Ikonta adapted to take 35 mm film.  This camera became two series of cameras - the Contessa and the Contina; the first Contessas and Continas were folding cameras. The Contessa version was more up-market than the Contina version. I have already written about one of the Contessa line - the Contessa LKE. The Contessa line have better lenses (Tessars) and coupled light meters and rangefinders. The Contina range have cheaper lenses (Novar, Novicar and Pantar) and the light meters, where present, are uncoupled. I have also written about the Contina line elsewhere - the Contina Ic.

lens: Novicar
focal length:  45mm
apertures: f2.8 to f22
focus range: 1m to infinity
lens fitting: fixed
shutter: Prontor-SVS
speeds: 1 second to 1/300 seconds
flash: PC connector
film size: 35mm

Contina IIa - front view, meter window closed
To make identifying and placing Contina cameras as difficult as possible, the Contina series split into two lines of cameras simultaneously.  The original Contina folding camera  became the Contina II folding camera with a light meter and then a series of derivatives. That original Contina folding camera, at the same time, became the Contina I rigid camera - no light meter or rangefinder - and then a series of derivatives.
Front view - meter window open

So, at any one time after 1953 there were two different Continas available, both just designated Contina. I have been referring to Contina I, Contina II, Contina Ic, Contina IIa but I don't think those were names offered by Zeiss Ikon, rather us collectors use them to make sense of the mish-mash of models.

Daniel Jiménez has produced a 'family tree' of the Contina series which he has given me permission to use here:

Copyright Daniel Jiménez
Daniel has a useful camera blog which can be found in an English version here. He also has a much larger Spanish version here.

This camera - is a Contina IIa. It is derived from the Contina II which was a folding camera but this version does not fold - that is, it is rigid. It is a compact and solid camera measuring 120 x 65 x 85 mm and weighs 567g. It offers a built-in but uncoupled light meter and an EV enabled shutter. It was not a cheap camera - it cost £43/15/1 in 1957 (in old money, or £43.76 in new money) which, given the average male wage in 1957 was £9.00 means this camera cost the equivalent of £2,500 in 2013 values. The version with a Novar lens only cost £36/12/7.

The top plate of the camera has a number of  items on it. On the left is a small rewind knob. I prefer these to the small folding cranks that became ubiquitous in the 1960s. When you first turn the rewind knob, it raises itself by one cm. This is above the height of the centre of the top plate and makes it easier to hold and turn.

rear and top view
Next to the rewind knob is an accessory shoe. At the time that this camera was made (1956/58) this was more likely to be used for a separate rangefinder than a flashgun. There are no electrical contacts in the accessory shoe so it is a cold shoe.

Next to the accessory shoe is the light meter window and the light meter control knob. Visible in the window is a needle connected to the light meter. The brighter the light, the more this needle moves towards the rear of the camera. Also in this window is a white circle which moves in response to the user moving the control knob. When the white circle is over the needle, the correct exposure can be read off the scale around the control knob. This is mostly in EV values - more later. In the centre of the control knob is the setting for the film speed. This camera was made in 1956/8 and uses the film speed standards in place at that time. A few years later (1960), the American Standards Association (ASA) revisited their film speed standard to produce the later ASA standard now known as ISO. The German DIN system remained unchanged so on this camera 21 DIN = 40 ASA rather than the later standard of 21 DIN = 100 ASA (ISO) - I always use the DIN standard with old cameras to make sure I do not get it wrong.

On the far right of the top plate is the film advance lever. This moves through about 200 degrees to advance the film and cock the shutter. The lever is all metal and only curves a very slight amount which I find makes it uncomfortable to use. In the centre of the film advance lever should be the frame counter. I can make no comment about this as a prior owner has removed it. Looking at the state of the metal that is left, I suspect a very amateurish attempt at a repair.

The front of the camera has four items - meter window, viewfinder window, shutter housing and flash PC connector. The meter window contains a two cm by one cm lens covering a selenium photoelectric cell.  This does not need any batteries, which I always reckon to be a good thing.  Most camera electrics from the 1960s to 1980s use mercury cells which are now illegal in just about every country there is. This window has a hinged cover - to open it, you lightly press the right-hand end (as the camera is to your eye). Selenium meters get a poor press as the photoelectric cell will deteriorate with time. However, if the cell is kept in the dark it only deteriorates very slowly, so this cell being covered, it has not yet (in 57 years) deteriorated enough to worry about. This is a single scale meter - an earlier version of the Contina IIa had a dual scale meter with a small window in the hinged cover.

Next to the meter window is the viewfinder window. This has quite a small eyepiece and a plain view with no bright lines. I find I cannot use it while wearing my glasses.  The Contina Ic, which I also own, has a much larger eyepiece - this was made just a few years later in the early 1960s.

In the centre of the front is a square chrome bezel containing the shutter.  This is a Prontor-SVS from Gauthier. This works on the EV system.  The light meter gives you an EV value from between  three and eighteen and you transfer this number to the shutter - you have to press a small tab on the shutter housing to get the EV ring to turn. Each EV number gives you a small range of shutter speed and aperture settings.  If you turn the EV setting ring without pressing the small tab, different speed/aperture combinations will present themselves to the mark at the top of the housing. For very low light levels, the shutter speeds are in green - you cannot set these, but you can read them.  To use them, turn the control ring on the shutter housing to B and read off a speed next to the aperture you want to use.  You then need to time the exposure yourself - the speeds are from four seconds to sixty seconds and you can count this quite accurately without a watch.

The lens is a Novicar lens (a Novar lens was also available) which I have found to be excellent if stopped down to f5.6 or f8. It is threaded for 27mm filters.  Maximum aperture is f2.8 and its focal length is 45 mm. Focusing is from about three feet to infinity (one metre to infinity). The throw of the focusing is only about 120 degrees, so very accurate focusing is not possible, but with no rangefinder, this camera was always going to rely on depth of field.

On the lower right of the shutter bezel (looking at the camera) is the flash PC (Prontor-Compur) connector.  This is the only means of connecting a flashgun. On the side of the shutter housing there is a selector for M or X - Magnesium or Xenon  - flash. M is for flash bulbs and X for electronic flash. With M, the flash is fired slightly before the shutter opens to allow the burning of the flash bulb to reach its maximum while the shutter is fully open. With X, the flash is fired as the shutter blades are fully open as electronic flash does not require time to reach its maximum intensity. This selector also has a V setting. This means Vorlaufwerk and is German for self timer. Moving the selector to this position causes an eight second delay between pressing the shutter release and the shutter firing. It is never a good idea to try this facility on an old camera as it might well cause the shutter to stop working permanently.

Rear/internal view

The back opens by pulling down a small catch on the lower right-hand edge. The back is hinged and there is a single light seal - a piece of velvet right by the hinge. The back itself has the pressure plate and a tensioning roller that goes by the take-up spool. Around the film mask are two machined film guides - showing as bright lines in the photograph above. The pawl for the rewind mechanism can be raised to enable fitting a film cassette and then lowered to secure the cassette.

24-December 2013


I have now finished my test roll of film - Agfa Vista+ 200 ISO from Poundland (yes, £1.00 per roll!). As expected, the camera works well. The only awkward thing was setting the EV values on the shutter as the mechanism is rather stiff.  I definitely would not want it too loose but it would be nice for it to be a bit easier to alter. The frame counter is missing on this camera - I assume due to a botched repair by the previous owner. It does not affect the camera's functionality at all and got me the camera at a bargain price. Below are a selection of pictures from the test film.

Pottergate Arch, Lincoln


Fountain in Lincoln Arboretum


Rockabilly Buskers, Lincoln


Lincoln Shoppers getting ready for Xmas


Foreign Buskers, Lincoln


Tuesday, 27 August 2013

Pentax Spotmatic SP 1000

The Spotmatics were the first autoexposure SLR - or, at least, the first successful autoexposure SLR. They built on Pentax's earlier success with the manual SLRs. Despite the name, the exposure system was not a spot system but was a centre weighted system. 


Asahi Pentax SP1000
lens: none supplied
focal length:  n/a
apertures: n/a
focus range: n/a
lens fitting: M42 thread (AKA Pentax fit), automatic
shutter: horizontal cloth focal plane
speeds: 1/2 to 1/1000
flash: PC connector
film size: 35mm

The SP1000 (and SP500, which was introduced at the same time) built on the design of the original Spotmatic. For anyone who is used to SLR cameras from the 1960s and 70s there are no surprises here, partly because this camera helped to define the genre. They were made between 1973 and 1976.

So - a general description. The camera measures 143 by 92 by 88 mm and weighs 610 g (body alone). This is heavy by modern standards - particularly compared to Pentax's later K-mount ME series. I have no objection to weight in a camera if only because weight helps with stability and results in less camera shake.

The layout of the camera is pretty much standard. On the left is a fold-away rewind crank. Around this is an aide memoire for the type of film in use. This gives the options of Empty, Panchro(matic), daylight colour and tungsten colour. The Empty setting is particularly useful as I often have more than one film camera on the go and on occasion open a camera only to find a part-used film inside.  Panchro refers to black-and-white film (which is usually panchromatic). The two colour options are for outside and inside use respectively and refer to the white balance of the film.
Pentax SP1000 - top plate

In the centre of the top plate is the lump of the pentaprism with the viewfinder behind. Traditionally, this is where the accessory shoe is put but the SP1000 has no accessory shoe as standard. Those who needed one could buy one as an optional extra which fitted into a groove around the viewfinder surround.

To the right of the pentaprism is the speed selector. For shutter speeds this simply turns to click-stops and it is quite possible to move directly from 1/1000 to B. 1/60 is marked with a red X to indicate that this is the electronic flash synch speed. The shutter speed dial also doubles as the film speed dial. To alter the film speed, it is necessary to lift the dial and turn. Film speeds are from 20 ASA to 1600 ASA. No DIN scale is available but the selector moves in 1/3 stop click-stops each of which is equal to one degree DIN. (For my younger readers, ASA = ISO [very nearly!])

To the right of the selector dial is the film advance lever. This is metal and is slightly curved to allow the user's thumb to access it. I prefer this to Pentax's later style of a plastic tipped lever that stands proud of the body.

The centre of the film advance contains the frame counter. This automatically resets to -2 when the back is opened. When you advance the new film to get rid of the fogged portion on loading, the counter will point to zero.

Between the selector dial and film advance and slightly forward of them is the shutter release button. This is threaded for a standard cable release.
Pentax SP1000 - inside view

The front of the camera has three items (the back is entirely clean). These are the meter switch and two PC (Prontor-Compur) flash connectors. The meter switch switches on the TTL (Through The Lens) meter and stops down the diaphragm. This is basically a shutter priority system.  The user sets the required shutter speed and then turns the aperture ring until the needle in the viewfinder is centred. When you switch off the meter (and you need to remember to or you will rapidly flatten the battery) the diaphragm should then open again to allow you to finesse the composition. On my specimen, this did not happen initially, I assume from the lack of use as it will eventually open itself. I have soaked the linkage with naptha and worked the switch repeatedly and it now works.  The diaphragm stop-down system operated by the shutter release works fine as this is a completely separate system.

The two PC flash connectors are marked for FP and X. FP is for fast flash bulbs and will synch at any shutter speed. X is for electronic flash and will only synch at 1/60 or slower.

This is an old-fashioned camera and it is fairly heavy (610g) - much more so than a Pentax ME Super (445g) or OM10 (450g). Weight is not necessarily a bad thing as it enhances stability. It is much easier to hold a heavy camera steady than it is a very light one. The down side is when you are carrying the camera all day especially when hung around your neck.

The focusing screen is a Fresnel screen with a microprism ring in the centre.  The microprisms break-up the image when it is out of focus. Best focus is achieved when the microprisms disappear. There is no split-image centre here as many SLRs have but the camera is easy to focus without it.

When you press the shutter release, the action is quite light - no heavy 'clunk' as with my Zenit or Praktica cameras, although it is still noisy compared to my leaf shuttered rangefinders.

Sample pictures.

Very impressed - both with the camera and with the Helios-44M lens.  I had no battery for this test, so exposures were manually sorted with my Ikophot meter.

Thimbleby, Lincolnshire

Choir screen, Lincoln cathedral

New carving, Lincoln cathedral

Lincolnshire wolds

Friday, 12 April 2013

Praktica TL3

Praktica TL3, front view

lens: Meyer-Optik Görlitz Domiplan
focal length:  50 mm
apertures:  f2.8 to f22
focus range: 0.75m to infinity
lens fitting: 42 mm thread
shutter: metal vertical focal plane
speeds: to 1/1000
flash: bulb or electronic
film size: 35 mm

This is a standard looking camera from between 1984 and 1986.  It is a fairly heavy (very heavy by modern standards) and large enough to hold in two hands.  The ergonomics - the layout of the controls - is, again, normal for the time.  It is my second Praktica, the other being an MTL5B.

This camera takes 42mm thread lenses (also known as Pentax thread) which means that lenses are readily available.  It is specifically designed to work with automatic lenses (those with a pin to stop down the lens) - when the shutter is fired, a cam presses the pin and closes the aperture.  This is not essential, though, and the camera works fine with fully manual lenses.  I have shot half my test film with my Soviet Helios-44 lens from my Zenit E.  So long as you remember to manually stop the lens down for both metering and picture taking there is no problem.

This is a fully mechanical camera and no battery is required for its operation.  It does, however, use a battery for the metering system.  This should be a mercury battery giving 1.3 volts but these are no longer available.  I am using an alkaline 1.5 volt alternative which 'should' cause the camera to underexpose but I have checked the results of the built-in meter with my Ikophot meter and they are in complete agreement.

This is an SLR camera and so both metering and focussing are conducted through the lens (known as TTL, for the uninitiated).  With an automatic lens fitted, metering is done by selecting either the shutter speed or aperture, holding down the metering lever beside the shutter release and the adjusting either the aperture or the shutter speed until the needle in the viewfinder is as close to the circle as possible (i.e. it is a match-needle meter).  With the supplied lens, this is within 1/2 stop of 'perfect', with the Helios-44 it is to the nearest whole stop.

The meter can be set to a range of film speeds from 12 ASA/12 DIN to 1600 ASA/33 DIN.  It is settable in 1 DIN stages which equates to 1/3 stop.

top and rear view
The shutter is a vertical metal focal plane shutter.  It has a good range of speeds - up to 1/1000 seconds which is plenty fast enough for my photography.  There are two flash synchronisation speeds: 1/30 for bulbs and a separate position on the speed selector dial for electronic flash, which the manual says is 'about 1/125.  Both bulbs and electronic flash can synchronise at slower speeds.

Electronic flash can synchronise at 1/125 seconds (quite a high sync speed for the time) because this camera has a vertical shutter with three metal blades.  In the manual, Praktica tout this as a modern invention but Zeiss Ikon used a vertical metal shutter in the Contax I in 1932

The shutter release is not my favourite part of this camera.  It is placed on the front of the camera rather than on the top plate which I always find awkward.  Secondly, the shutter release has to be pressed flush with the housing.  This might be just my camera but a little less travel would be good.

The film winder is a lever which travels through 180 degrees but the first 20 or so degrees do nothing.

On top of the prism is an accessory shoe which has 'hot' contacts for a flash gun.  This is the only way of connecting a flash gun as there is no PC connector.  The only other control on the top plate is the film rewind crank.  As was normal for the time, this is an annoyingly small folding crank.  In the early 1960s several manufacturers introduced a large rewind crank on the base plate and it is a pity this did not become the standard.

Pressing the shutter release, you experience a significant resistance and then there is a loud and tactile 'clunk'.  I had thought my Zenit E had a heavy action but this is much worse.  I am hoping that most of this is the mirror slapping up and not the shutter.

The supplied lens is a Meyer Optik Domiplan f2.8 50mm lens.  This is a triplet lens and a cheap option.  I have yet to see the results of this lens but I have a 50mm Domiplan on my Exa IIa and that lens is fine.  Available apertures are from f2.8 to f22 in 1/2 stop clicks.

Focussing is from 0.75m to infinity and the focussing scale is in feet as well as metres.  The action is fairly stiff and changing the focus from near to far will result in the lens unscrewing rather than focussing.  Hopefully, this is lack of use and will sort itself out with use rather than being down to physical damage.

30 April 2013:

I now have the results of my test film.  It is not good.  There is a large light leak from the hinge end of the back.   I have just removed the remains of the foam light seal and replaced it with a new piece of foam.  Two frames out of the thirty six on the roll came out with no light damage.  So, light damage apart, I am quite impressed - the Domiplan lens works fine even though it is only a triplet

Lincoln Cornhill


Waterside North, Lincoln
Triton Road, Lincoln

Wednesday, 15 August 2012

Light (or exposure) meters


Light meters (which are also called exposure meters) are a modern invention and early photographers had to guess their exposures and rely on experience to get it right.  An early system used to make guessing easier was to use the Sunny 16 rule which says:
  • "On a sunny day set aperture to f16 and shutter speed to the [reciprocal of the] ISO film speed [or ISO setting] for a subject in direct sunlight." 
 (from Bernhard J. Suess (2003). Mastering Black-and-White Photography, Allworth Communications. ISBN 1-58115-306-6)  So, if you are using Ilford FP4 film, which is ISO 125, on a sunny day you set the aperture to f16 and the shutter speed to 1/125 seconds.  This will generally give you a usable picture even if not a perfectly exposed one.  You do need to be aware that the amount of light on a sunny beach will be more than the amount of light in a sunny field - entirely due to the amount of reflected light.  You can easily adjust either the aperture or the shutter speed to compensate.  You also need to be aware that the amount of light present on a sunny day depends on how close to the equator you are.  A photographer in Norway using the Sunny 16 rule will get a very different result than a photographer in Nigeria would.  I have been trying this Sunny 16 rule out in Lincoln this week and in the middle of the day it produced the same exposure as my Ikophot exposure meter suggested.  By four in the afternoon, the Sunny 16 rule was a whole stop out.

A better system was the extinction meter.  This used a piece of translucent celluloid that was painted black apart from a series of grey numbers.  Each number was printed in a darker shade of grey than the last number.  So, in my Braun Paxette, the number 1 is nearly white and the number 16 is nearly black.  In use, the user looks through the extinction meter and notes the darkest number that is visible.  This number is then looked up in an exposure table to get suitable aperture and shutter speeds.  This picture of my Braun Paxette show one of these tables.  It is set up for 50 ASA (ISO) film and tells you to halve the exposure for 100 ASA film and double it for 12 ASA film (films were much slower then than we are used to now).  This chart refers to 'diaphragm' rather than 'aperture' but it is the same thing.


Extinction meter table on my Braun Paxette

These, although simple and not able to go wrong, had their drawbacks.  They depended on the quality of the eye sight of the user and that is very variable.

The next development was the electronic light meter.  Initially, these had a cell made from selenium that produced a small electrical voltage on exposure to light.  This voltage was then used to move a needle across a scale.  This needle would then point to an arbitrary number that has to be set on a scale.  The scale then indicates a range of appropriate aperture and shutter speeds.  It is tempting to think of these as EV numbers but they are not - at least are not on the three light meters I own.  These worked very well in reasonable light but were poor performers in poor light.  These fell out of fashion and were replaced by CdS meters.  The advantage of selenium meters is that they do not need a battery to work.  A big disadvantage is that they lose sensitivity with time.  Towards the end of their useful life they give a low reading which will eventually cause over-exposed photographs.  For this reason, some people will not use old selenium meters but my old (fifty years old, plus) meters all agree with my modern light meters.

 I suspect that the rate of deterioration depends on how the meter has been stored over the years.  If the meter is in the dark inside a case apart from when actually taking a reading, the deterioration doesn't seem to matter over a period of sixty or so years.

The next development was the CdS meter (Cadmium Sulphide).  These do not produce a voltage on exposure to light but act as a resistor that changes its resistance to electricity on exposure to light.  These always need a battery to work to provide the voltage.  Most modern light meters work this way.  These work in much lower light levels and do not significantly deteriorate with time.  The draw back with these is that battery technology changes and it can be hard (or impossible) to find batteries for older CdS meters.  In particular, mercury batteries are no longer made and the modern equivalents produce a different voltage which alters the accuracy of the meters.

A lot of meters from the 1950s used what are called Exposure Values (EV).  The idea is that you set your shutter to the indicated EV and this sets a combination of shutter speed and aperture.  As you then alter the aperture, the shutter speed will alter in unison - and vice versa.  I like the system but many people do not.

Here is a table of EVs and their associated aperture/shutter speeds:
 
Table 1. Exposure times, in seconds or minutes (m), for various exposure values and f-numbers
EV f-number
1 1.4 2 2.8 4 5.6 8 11 16 22
−6 60 2 m 4 m 8 m 16 m 32 m 64 m 128 m 256 m 512 m
−5 30 60 2 m 4 m 8 m 16 m 32 m 64 m 128 m 256 m
−4 15 30 60 2 m 4 m 8 m 16 m 32 m 64 m 128 m
−3 8 15 30 60 2 m 4 m 8 m 16 m 32 m 64 m
−2 4 8 15 30 60 2 m 4 m 8 m 16 m 32 m
−1 2 4 8 15 30 60 2 m 4 m 8 m 16 m
0 1 2 4 8 15 30 60 2 m 4 m 8 m
1 1/2 1 2 4 8 15 30 60 2 m 4 m
2 1/4 1/2 1 2 4 8 15 30 60 2 m
3 1/8 1/4 1/2 1 2 4 8 15 30 60
4 1/15 1/8 1/4 1/2 1 2 4 8 15 30
5 1/30 1/15 1/8 1/4 1/2 1 2 4 8 15
6 1/60 1/30 1/15 1/8 1/4 1/2 1 2 4 8
7 1/125 1/60 1/30 1/15 1/8 1/4 1/2 1 2 4
8 1/250 1/125 1/60 1/30 1/15 1/8 1/4 1/2 1 2
9 1/500 1/250 1/125 1/60 1/30 1/15 1/8 1/4 1/2 1
10 1/1000 1/500 1/250 1/125 1/60 1/30 1/15 1/8 1/4 1/2
11 1/2000 1/1000 1/500 1/250 1/125 1/60 1/30 1/15 1/8 1/4
12 1/4000 1/2000 1/1000 1/500 1/250 1/125 1/60 1/30 1/15 1/8
13 1/8000 1/4000 1/2000 1/1000 1/500 1/250 1/125 1/60 1/30 1/15
14
1/8000 1/4000 1/2000 1/1000 1/500 1/250 1/125 1/60 1/30
15

1/8000 1/4000 1/2000 1/1000 1/500 1/250 1/125 1/60
16


1/8000 1/4000 1/2000 1/1000 1/500 1/250 1/125
17


1/8000 1/4000 1/2000 1/1000 1/500 1/250
18


1/8000 1/4000 1/2000 1/1000 1/500
19


1/8000 1/4000 1/2000 1/1000
20


1/8000 1/4000 1/2000
21


1/8000 1/4000
EV 1 1.4 2 2.8 4 5.6 8 11 16 22
f-number

To my light meters:

I have four old meters, each of the selenium type.  They are a Weston Master III, a Leningrad 4, a Ikophot and a Bewi Automat.  The Weston does not work - I tried to adjust the zero setting and managed to wreck the meter.  The blame for this lies entirely with me, not Weston’s design or manufacturing standards.

First, the Weston.

This is a Weston Master III

Weston Master III
It is the most complicated meter of the three I have - presumably it will do more than the other two.  The draw backs for me is firstly there is no ASA or DIN setting, it uses instead Weston values which are their own proprietary system. As films do not come with a Weston speed marked on them, it makes it unnecessarily difficult to use.  Secondly, I find the plethora of black and white marking difficult to distinguish.  As I mentioned earlier, I managed to break this meter, so my complaints about it are moot.

Secondly, Leningrad 4:
Leningrad 4
This is much simpler in layout than the Weston and much easier to use.  The needle points at red numbers, these red numbers are then set against a large pointer on the other end of the meter and the aperture/shutter speed combination are read off a black and white scale.  The film speed can be set in either ASA or DIN and will work with modern films with ISO speeds as they are the same as ASA.  A note of caution:  these red numbers are NOT Exposure Values - they seem to be arbitrary numbers and are different to the equivalent numbers on the Ikophot meter.

Thirdly, Zeiss Ikon Ikophot:
Zeiss Ikon Ikophot
This mirrors the Leningrad in as much as the meter needle points to red numbers and the red numbers are then aligned against a red pointer.  The aperture/shutter speed combination is then read off the scale - aperture in black and shutter speed in white on red.  Again, film speed can be set in either ASA or DIN.  A note of caution:  these red numbers are Exposure Values but only for 50 ASA/18 DIN film (I expect 50 ASA/18 DIN was seen as standard by Zeiss Ikon).  It is possible to use them directly on cameras with a EV scale on the shutter, but you will need to adjust for the speed of the film you are using.  This is simple enough - for 100 ASA, 21 DIN film, subtract 1 from the EV; for 200 ASA, 24 DIN film subtract 2 from the EV and for 400 ASA, 27 DIN film, subtract 3 from the EV.

The DIN/ASA scales on this meter are a bit unique.  DIN 21 SHOULD be ASA 100, but it is ASA 80.   I use the DIN exclusively and that works just fine.  I suspect using the ASA scale would also be fine as the difference between 80 and 100 is fairly small (1/3 of a stop).  As DIN is a German standard and Zeiss Ikon are a German firm, I would expect them to get DIN right.

Not cheap - it cost £10/13/5 in 1957 - which was just over an average man's weekly wage (so about £500 in 2013 values).

This is the meter I most often use as it is nicely made, feels good in the hand and produces satisfactory results.  A scanned copy of the Ikophot manual is available for download as is a scanned copy of Zeiss Ikon's 1930s exposure guide.

Lastly, my Bertram Bewi Automat.

Bertram Bewi Automat
This is a German meter (made in West Germany).  Bertram have been making light meters since 1928 . This meter works differently from the meters above.  For one thing, it has a digital read-out rather than an analogue needle pointing to a scale. 

The meter is rather larger than is usual for analogue meter - it measures 90 x 65 x 25 mm not including the activating button.  It is encased in ivory plastic.

 The only control is a ring to set the film speed.  This is calibrated in ranges. For instance, the DIN setting is a range of three numbers - 11-13, 14-16, 17-19, 20-22, 23-25.  That is one stop difference between each range.  Given the exposure latitude of film that is plenty accurate enough.  There are also ranges for ASA and Weston (ASA is the same as ISO and Weston is a defunct film speed system devised by the makers of the Weston series of exposure meters.

Using the meter is also different to analogue meters.  If you point this meter at the scene you intend to photograph, nothing happens.  You need to point the meter, depress the activating button for about three seconds and release.  Once you have done this, the shutter speed scale lines itself up with the aperture scale and you can read off suitable combinations of aperture and shutter speed.

The read out also has exposure values indicated - under L on the aperture scale.  These are adjusted for film speed and can be set directly on an EV enabled shutter.