Thursday, 5 September 2013

Contina IIa

Zeiss Ikon's Contina camera was a long lived and varied series of cameras.  The series started as the Ikonta 35 which was a post-war version of the 120 format Ikonta adapted to take 35 mm film.  This camera became two series of cameras - the Contessa and the Contina; the first Contessas and Continas were folding cameras. The Contessa version was more up-market than the Contina version. I have already written about one of the Contessa line - the Contessa LKE. The Contessa line have better lenses (Tessars) and coupled light meters and rangefinders. The Contina range have cheaper lenses (Novar, Novicar and Pantar) and the light meters, where present, are uncoupled. I have also written about the Contina line elsewhere - the Contina Ic.

lens: Novicar
focal length:  45mm
apertures: f2.8 to f22
focus range: 1m to infinity
lens fitting: fixed
shutter: Prontor-SVS
speeds: 1 second to 1/300 seconds
flash: PC connector
film size: 35mm

Contina IIa - front view, meter window closed
To make identifying and placing Contina cameras as difficult as possible, the Contina series split into two lines of cameras simultaneously.  The original Contina folding camera  became the Contina II folding camera with a light meter and then a series of derivatives. That original Contina folding camera, at the same time, became the Contina I rigid camera - no light meter or rangefinder - and then a series of derivatives.
Front view - meter window open

So, at any one time after 1953 there were two different Continas available, both just designated Contina. I have been referring to Contina I, Contina II, Contina Ic, Contina IIa but I don't think those were names offered by Zeiss Ikon, rather us collectors use them to make sense of the mish-mash of models.

Daniel Jiménez has produced a 'family tree' of the Contina series which he has given me permission to use here:

Copyright Daniel Jiménez
Daniel has a useful camera blog which can be found in an English version here. He also has a much larger Spanish version here.

This camera - is a Contina IIa. It is derived from the Contina II which was a folding camera but this version does not fold - that is, it is rigid. It is a compact and solid camera measuring 120 x 65 x 85 mm and weighs 567g. It offers a built-in but uncoupled light meter and an EV enabled shutter. It was not a cheap camera - it cost £43/15/1 in 1957 (in old money, or £43.76 in new money) which, given the average male wage in 1957 was £9.00 means this camera cost the equivalent of £2,500 in 2013 values. The version with a Novar lens only cost £36/12/7.

The top plate of the camera has a number of  items on it. On the left is a small rewind knob. I prefer these to the small folding cranks that became ubiquitous in the 1960s. When you first turn the rewind knob, it raises itself by one cm. This is above the height of the centre of the top plate and makes it easier to hold and turn.

rear and top view
Next to the rewind knob is an accessory shoe. At the time that this camera was made (1956/58) this was more likely to be used for a separate rangefinder than a flashgun. There are no electrical contacts in the accessory shoe so it is a cold shoe.

Next to the accessory shoe is the light meter window and the light meter control knob. Visible in the window is a needle connected to the light meter. The brighter the light, the more this needle moves towards the rear of the camera. Also in this window is a white circle which moves in response to the user moving the control knob. When the white circle is over the needle, the correct exposure can be read off the scale around the control knob. This is mostly in EV values - more later. In the centre of the control knob is the setting for the film speed. This camera was made in 1956/8 and uses the film speed standards in place at that time. A few years later (1960), the American Standards Association (ASA) revisited their film speed standard to produce the later ASA standard now known as ISO. The German DIN system remained unchanged so on this camera 21 DIN = 40 ASA rather than the later standard of 21 DIN = 100 ASA (ISO) - I always use the DIN standard with old cameras to make sure I do not get it wrong.

On the far right of the top plate is the film advance lever. This moves through about 200 degrees to advance the film and cock the shutter. The lever is all metal and only curves a very slight amount which I find makes it uncomfortable to use. In the centre of the film advance lever should be the frame counter. I can make no comment about this as a prior owner has removed it. Looking at the state of the metal that is left, I suspect a very amateurish attempt at a repair.

The front of the camera has four items - meter window, viewfinder window, shutter housing and flash PC connector. The meter window contains a two cm by one cm lens covering a selenium photoelectric cell.  This does not need any batteries, which I always reckon to be a good thing.  Most camera electrics from the 1960s to 1980s use mercury cells which are now illegal in just about every country there is. This window has a hinged cover - to open it, you lightly press the right-hand end (as the camera is to your eye). Selenium meters get a poor press as the photoelectric cell will deteriorate with time. However, if the cell is kept in the dark it only deteriorates very slowly, so this cell being covered, it has not yet (in 57 years) deteriorated enough to worry about. This is a single scale meter - an earlier version of the Contina IIa had a dual scale meter with a small window in the hinged cover.

Next to the meter window is the viewfinder window. This has quite a small eyepiece and a plain view with no bright lines. I find I cannot use it while wearing my glasses.  The Contina Ic, which I also own, has a much larger eyepiece - this was made just a few years later in the early 1960s.

In the centre of the front is a square chrome bezel containing the shutter.  This is a Prontor-SVS from Gauthier. This works on the EV system.  The light meter gives you an EV value from between  three and eighteen and you transfer this number to the shutter - you have to press a small tab on the shutter housing to get the EV ring to turn. Each EV number gives you a small range of shutter speed and aperture settings.  If you turn the EV setting ring without pressing the small tab, different speed/aperture combinations will present themselves to the mark at the top of the housing. For very low light levels, the shutter speeds are in green - you cannot set these, but you can read them.  To use them, turn the control ring on the shutter housing to B and read off a speed next to the aperture you want to use.  You then need to time the exposure yourself - the speeds are from four seconds to sixty seconds and you can count this quite accurately without a watch.

The lens is a Novicar lens (a Novar lens was also available) which I have found to be excellent if stopped down to f5.6 or f8. It is threaded for 27mm filters.  Maximum aperture is f2.8 and its focal length is 45 mm. Focusing is from about three feet to infinity (one metre to infinity). The throw of the focusing is only about 120 degrees, so very accurate focusing is not possible, but with no rangefinder, this camera was always going to rely on depth of field.

On the lower right of the shutter bezel (looking at the camera) is the flash PC (Prontor-Compur) connector.  This is the only means of connecting a flashgun. On the side of the shutter housing there is a selector for M or X - Magnesium or Xenon  - flash. M is for flash bulbs and X for electronic flash. With M, the flash is fired slightly before the shutter opens to allow the burning of the flash bulb to reach its maximum while the shutter is fully open. With X, the flash is fired as the shutter blades are fully open as electronic flash does not require time to reach its maximum intensity. This selector also has a V setting. This means Vorlaufwerk and is German for self timer. Moving the selector to this position causes an eight second delay between pressing the shutter release and the shutter firing. It is never a good idea to try this facility on an old camera as it might well cause the shutter to stop working permanently.
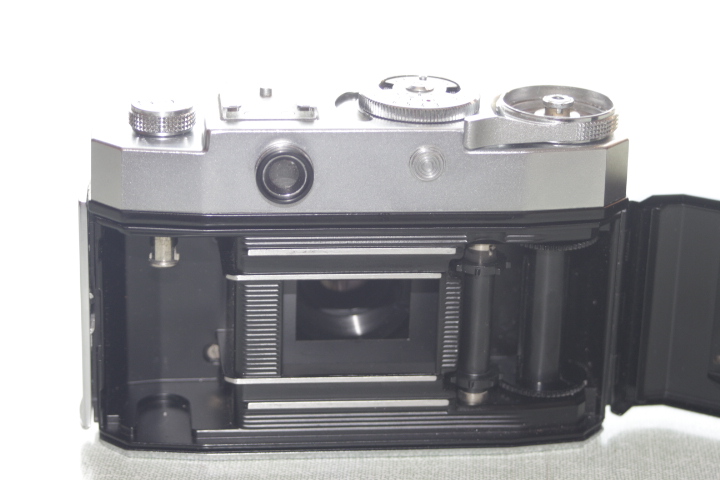
Rear/internal view

The back opens by pulling down a small catch on the lower right-hand edge. The back is hinged and there is a single light seal - a piece of velvet right by the hinge. The back itself has the pressure plate and a tensioning roller that goes by the take-up spool. Around the film mask are two machined film guides - showing as bright lines in the photograph above. The pawl for the rewind mechanism can be raised to enable fitting a film cassette and then lowered to secure the cassette.

24-December 2013


I have now finished my test roll of film - Agfa Vista+ 200 ISO from Poundland (yes, £1.00 per roll!). As expected, the camera works well. The only awkward thing was setting the EV values on the shutter as the mechanism is rather stiff.  I definitely would not want it too loose but it would be nice for it to be a bit easier to alter. The frame counter is missing on this camera - I assume due to a botched repair by the previous owner. It does not affect the camera's functionality at all and got me the camera at a bargain price. Below are a selection of pictures from the test film.

Pottergate Arch, Lincoln


Fountain in Lincoln Arboretum


Rockabilly Buskers, Lincoln


Lincoln Shoppers getting ready for Xmas


Foreign Buskers, Lincoln


Thursday, 29 August 2013

Adox Golf 63 S

At one time Adox were a major photographic force.  German in origin, they were bought by Dupont. The Dupont company was sold to Agfa (and so became German once again) and Agfa did not use the Adox brand name so their registration of the name lapsed.  Almost immediately, Canadian and German companies registered the name, neither of which have any connection with the original German company (although the modern German Adox make excellent films).  The Adox name is now used exclusively by Adox Fotowerke GmbH although two companies own the rights to the name in different countries.  The Adox that made this camera are the original Adox - the owners of the name being Dr C. Schleussner Fotowerke GmbH - and the camera was made between 1954 and 1959.  It is at the bottom of the range of Golf cameras.
Adox Golf S

lens: Adoxar (made by Will Wetzlar)
focal length:  75 mm
apertures: f6.3 - f22
focus range: 1m to infinity
lens fitting: fixed
shutter: Gauthier Pronto
speeds: b, 1/25, 1/50, 1/100, 1/200
flash: PC connector
film size: 120


The internal construction of the Golf resembles Agfa cameras of the period.  The visible parts of the body are made of pressed steel rather than the machined die-cast aluminium alloy used by the likes of Zeiss Ikon and Voigtlander.

The bottom and top plates are pressed aluminium which has not been anodised - it is very prone to corrosion. Again, this is very different to the practice of Zeiss Ikon and Voigtlander who used chrome plated brass.

That is the negative part over.  The design is good, even if basic. It is easier to load than my Zeiss Ikon medium format cameras of the period, with hinged spool holders (which is also reminiscent of Agfa).

The lens base board snaps fully open at the press of a button on the top plate and there is a double exposure interlock.

So, more specific details.  The outside of the camera first.  The size of the camera is basically dictated by the film size - 120 - and the frame size - 60 by 60 mm.  The camera measures 135 by 90 by 40 mm when closed and opens to 90 mm. It weighs 475 grams. This is very light compared to Zeiss Ikon and Voigtlander models and is down to the use of pressed steel instead of die-cast aluminium.
Adox Golf S - closed

The lens is an Adoxar 1:6.3 75 mm lens.  It seems to be have been quite the fashion to have a lens name end in 'ar'.  This lens was made for Adox by Will Wetzlar (now a part of Helmut Hund GmbH). The lens is housed in a Gauthier Pronto shutter (which earns the camera the designation 'S') rather than the usual Vario shutter. This is a good, well made shutter which is unlikely to give trouble even after sixty-odd years.  Gauthier shutters were designed to run dry - that is, with no lubricant. This means there is no oil to dry out and become sticky and there is nothing to trap dust and foul the movement. I have yet to come across a Gauthier shutter that did not work right, even after sitting untouched in a drawer for forty years.
Adox Golf S - side view

The top plate is uncluttered. The only controls here are the shutter release and film advance.  The shutter release is a simple aluminium button, threaded for a standard cable release. The film advance is a knurled knob. Between the shutter release and the film advance is an indicator window for the double exposure interlock. The shutter release will only work if this indicator is red. When you press the shutter release, the indicator changes to white and the shutter is now locked. When you advance the film, the indicator will change back from white to red and the shutter is unlocked. It takes about a half turn of the film advance knob to achieve this.

In the centre of the top plate is a simple accessory shoe. There are no electrical contacts here and flash is connected via a PC connector on the top of the shutter housing. Flash is synchronised for fast flash bulbs.  As this camera has a leaf shutter, shutter speed is not so important as with a focal plane shutter. The manual (which I have!) says the camera will work fine with electronic flash as well.

The bottom plate is plain apart from a linear machining and a centre tripod boss (1/4 inch Whitworth).

The back of the camera has no features apart from a red window. The position of this window is dictated by the negative size which is 6 by 6 cm. 120 film has three sets of numbers on the backing paper - one for full frame (6x9),one for half frame (6x4.5) and one for square (6x6). The set of numbers for 6x6 runs down the middle of the length of film, so needs a central window.
Adox Golf S - front

When winding on a 120 film, you have to look through the window at the numbers on the backing paper. The numbers are typically preceded by a row of circles of increasing size to show the number is getting closer.  For those only experienced in 35 mm film (or digital), when the film is finished, there is no need to rewind. You wind on until all trace of the backing paper has disappeared from the red window - then you open the camera, carefully take out the film and stick the self-adhesive tab around the film to prevent it from rewinding.

Under the window, the legend 'made in Germany' is embossed in the leatherette and beneath that is 'T-YD'

In use, the base board drops down vertically. This is how I prefer it to be as it leaves plenty of room on either side of the lens for my not so small hands. My Franka folder has the base board hinged on the side and this makes it hard to hold securely.

The viewfinder is very small and I find I need to put my eye very close to it to frame the picture. This means I have to take my glasses off and then I can no longer see the picture I am framing. The shutter release falls nicely to my finger.


Sample pictures.

I am quite impressed with these.  They all came out a bit on the dark side (Gimped to get brightness where it should be) but I am impressed with the quality.  Perhaps I should not be surprised.  The lens was made by Will Wetzlar who also made lenses for Leica.

Skidbrooke Church

Lincoln Stonebow

Jazz buskers, Lincoln

Tuesday, 27 August 2013

Pentax Spotmatic SP 1000

The Spotmatics were the first autoexposure SLR - or, at least, the first successful autoexposure SLR. They built on Pentax's earlier success with the manual SLRs. Despite the name, the exposure system was not a spot system but was a centre weighted system. 


Asahi Pentax SP1000
lens: none supplied
focal length:  n/a
apertures: n/a
focus range: n/a
lens fitting: M42 thread (AKA Pentax fit), automatic
shutter: horizontal cloth focal plane
speeds: 1/2 to 1/1000
flash: PC connector
film size: 35mm

The SP1000 (and SP500, which was introduced at the same time) built on the design of the original Spotmatic. For anyone who is used to SLR cameras from the 1960s and 70s there are no surprises here, partly because this camera helped to define the genre. They were made between 1973 and 1976.

So - a general description. The camera measures 143 by 92 by 88 mm and weighs 610 g (body alone). This is heavy by modern standards - particularly compared to Pentax's later K-mount ME series. I have no objection to weight in a camera if only because weight helps with stability and results in less camera shake.

The layout of the camera is pretty much standard. On the left is a fold-away rewind crank. Around this is an aide memoire for the type of film in use. This gives the options of Empty, Panchro(matic), daylight colour and tungsten colour. The Empty setting is particularly useful as I often have more than one film camera on the go and on occasion open a camera only to find a part-used film inside.  Panchro refers to black-and-white film (which is usually panchromatic). The two colour options are for outside and inside use respectively and refer to the white balance of the film.
Pentax SP1000 - top plate

In the centre of the top plate is the lump of the pentaprism with the viewfinder behind. Traditionally, this is where the accessory shoe is put but the SP1000 has no accessory shoe as standard. Those who needed one could buy one as an optional extra which fitted into a groove around the viewfinder surround.

To the right of the pentaprism is the speed selector. For shutter speeds this simply turns to click-stops and it is quite possible to move directly from 1/1000 to B. 1/60 is marked with a red X to indicate that this is the electronic flash synch speed. The shutter speed dial also doubles as the film speed dial. To alter the film speed, it is necessary to lift the dial and turn. Film speeds are from 20 ASA to 1600 ASA. No DIN scale is available but the selector moves in 1/3 stop click-stops each of which is equal to one degree DIN. (For my younger readers, ASA = ISO [very nearly!])

To the right of the selector dial is the film advance lever. This is metal and is slightly curved to allow the user's thumb to access it. I prefer this to Pentax's later style of a plastic tipped lever that stands proud of the body.

The centre of the film advance contains the frame counter. This automatically resets to -2 when the back is opened. When you advance the new film to get rid of the fogged portion on loading, the counter will point to zero.

Between the selector dial and film advance and slightly forward of them is the shutter release button. This is threaded for a standard cable release.
Pentax SP1000 - inside view

The front of the camera has three items (the back is entirely clean). These are the meter switch and two PC (Prontor-Compur) flash connectors. The meter switch switches on the TTL (Through The Lens) meter and stops down the diaphragm. This is basically a shutter priority system.  The user sets the required shutter speed and then turns the aperture ring until the needle in the viewfinder is centred. When you switch off the meter (and you need to remember to or you will rapidly flatten the battery) the diaphragm should then open again to allow you to finesse the composition. On my specimen, this did not happen initially, I assume from the lack of use as it will eventually open itself. I have soaked the linkage with naptha and worked the switch repeatedly and it now works.  The diaphragm stop-down system operated by the shutter release works fine as this is a completely separate system.

The two PC flash connectors are marked for FP and X. FP is for fast flash bulbs and will synch at any shutter speed. X is for electronic flash and will only synch at 1/60 or slower.

This is an old-fashioned camera and it is fairly heavy (610g) - much more so than a Pentax ME Super (445g) or OM10 (450g). Weight is not necessarily a bad thing as it enhances stability. It is much easier to hold a heavy camera steady than it is a very light one. The down side is when you are carrying the camera all day especially when hung around your neck.

The focusing screen is a Fresnel screen with a microprism ring in the centre.  The microprisms break-up the image when it is out of focus. Best focus is achieved when the microprisms disappear. There is no split-image centre here as many SLRs have but the camera is easy to focus without it.

When you press the shutter release, the action is quite light - no heavy 'clunk' as with my Zenit or Praktica cameras, although it is still noisy compared to my leaf shuttered rangefinders.

Sample pictures.

Very impressed - both with the camera and with the Helios-44M lens.  I had no battery for this test, so exposures were manually sorted with my Ikophot meter.

Thimbleby, Lincolnshire

Choir screen, Lincoln cathedral

New carving, Lincoln cathedral

Lincolnshire wolds

Sunday, 25 August 2013

Pentax ME Super

This is a very compact SLR from Pentax, Japan.  By the time of the K-mount cameras, the company had changed its name from Asahi to Pentax.  Originally, the Pentax name belonged to the East German Zeiss Ikon as a contraction of PENtaprism conTAX.  This camera is a development of the Spotmatic series.

lens: Sirius automatic
focal length: 28mm
apertures:  n/a
focus range:  0.2m to infinity
lens fitting:  K mount bayonet
shutter:  vertical metal focal plane
speeds: 4 seconds to 1/1000 seconds
flash:  hot shoe plus PC connector
film size:  35mm

The camera has an automatic exposure system that has aperture priority, the user setting the the required aperture and the camera selecting the shutter speed.  There is also a fully manual setting, the shutter speed being set by + and - buttons.

Pentax ME Super front view showing K-mount bayonet

The top plate is rather cluttered.  Starting on the left there is a combined rewind crank, film rewind crank, film speed setting (marked ASA) and exposure compensation.  The rewind crank is standard for the age of camera.  It folds out and is nearly too small for large hands.  Around this is a slightly knurled ring to set exposure compensation in one stop steps: +2 stops to -2 stops. Lifting the slightly knurled ring allows you to set the speed of the film for the light meter.  This runs from 12 ASA to 1600 ASA. That range is pretty much standard for automatic exposure cameras.  This is adjustable in one third stops which equates to a single degree DIN - there is no DIN scale available: even the Germans had gone over to ASA only by this time, at least on export models.

Pentax ME Super - top plate
In the centre of the top plate, on top of the pentaprism, is an accessory shoe with contacts for flash. This has the central contact that has become standard, and a smaller offset contact that is specific to Pentax flashguns.  This second contract allows elementary communication between camera and flashgun and lets the flashgun set the shutter speed to 1/125 seconds (the synchronisation speed) without the user doing anything.  With other flashguns it is necessary to set the shutter speed to 1/125 manually. There is a red cross embossed in the base of the accessory shoe to indicate that it is suitable for electronic flash.

In addition to the hot shoe connections there is also a PC (Prontor-Compur) socket.  This has two uses. First, it allows you to use a simple flashgun with no hot-shoe connection.  The second use is to allow the photographer to use off-camera flashguns.  This is of particular use in a studio where the photographer might have two or three flashguns all triggered from the camera.

Next to the accessory shoe on the right are a couple of buttons.  These are not marked - the markings by them refer to the mode dial.  These two buttons are used to set the shutter speed in manual mode - one button increases shutter speed, the other decreases it.

Beside the buttons is the mode dial.  This has five settings - Lock, Auto, Manual, 1/125x and B.  To turn this mode dial, you need to press down a very small white button on the dial pointer.  This is not impossible but I find it very hard to do.

The Lock position locks the shutter release button.  There are two reasons why using this is important. First, it prevents you taking accidental photographs while handling the camera.  The second reason is that partially pressing the shutter release activates the metering system and slight accidental pressure will run the batteries down.

Auto is the expected way of using this camera.  In this mode, the user sets the required aperture on the lens and the camera will decide on the shutter speed.  Cameras of this age do not have any electronic connection between the body and lens, communication being by two small levers.  In Auto mode, the camera selects the exact shutter speed needed for a good exposure, not just they nearest standard speed. The shutter speed selected is indicated by a LED on the left side of the viewfinder.  The speed indicated will be the nearest standard speed even if the actual speed is slightly more or less.  These indicator LEDs are in different colours.  Green means OK, yellow means a slow speed and a tripod is advised and red means no good.


Manual mode allows for manual operation of the camera (a bit of a give away in the name there!). Here, the user must select both aperture and shutter speed.  Shutter speeds are restricted to the standard speeds in one stop steps.

1/125x is for using non-Pentax flash guns.  Shutter speed is 1/125 and the user must calculate the aperture from the flashgun's guide number and the distance to the subject.  The reason electronic flashguns need a specific synch. speed with focal plane shutters is that the shutter exposes the film by a moving slit.  Shutter speed is determined by the width of the slit.  The flash from an electronic flash is very brief (1/10 000 seconds or so compared to 1/10 seconds for a flash bulb) and the width of the slit needs to be the width of the negative.  If you use electronic flash at a higher shutter speed, only a narrow portion of the negative will be exposed.

The last mode, B, is an extension on manual mode where the photographer must time the shutter himself - the automatic system only going as long as four seconds.

In the centre of the the mode dial is the shutter release button.  This is threaded for a standard cable release.  As already mentioned, partially pressing this button will activate the metering system.

To the far right of the top plate is the film advance lever.  This has a closed position with the lever parked over the top plate and a rest position where the lever sticks out at about thirty degrees.  The lever moves through about 130 degrees to advance the film one frame.  By the tip of this lever when in the parked position, there is a small window.  When you take a picture this turns to black.  When you wind on the film, this changes to red.  This is supposed to tell you if the camera is ready to use or no.  I find it easier to gently turn the film advance.  If it will not move, the camera is ready.  In front of the film advance is the frame counter.  Opening the camera resets this to -2 (indicated by a red dot).  On loading a film, you need to wind on the fogged start of the film which is two frames. Once you have done this, the counter will be at zero.

On the front right of the camera is a delayed action lever.  To use this, you turn it through 90 degrees to set it and then to activate it you nudge it upwards.  You then have ten seconds to get yourself in the frame.

On the bottom plate are a number of items.  In line with the lens is a tripod boss.  This is the standard 1/4 inch Whitworth.  Next to this is a battery cover.  this takes two button batteries of 400 size.  The meter electronics have a bridge circuit which means the exact voltage from the batteries is not important so when using alkaline batteries you can continue to use them safely until they are entirely flat.

At the opposite end of the base plate is what looks like another battery cover.  Under this is a mechanical connector for a motor-wind unit.  There are also three electrical contacts in a line which I assume are also for the motor-wind unit.

On the back is one of the most useful innovations in photography - a holder for the end-flap of the film carton.  Using this, you always have a reminder of the type of film in the camera.

Also on the back is a strange indicator.  This consists of a small window with black and red stripes in it. When the film moves - either advancing or rewinding - these stripes wobble.  The benefit is twofold - it tells you the film is inserted correctly and is advancing and it also tells you the film is rewinding.  When rewinding film, when these stripes stop wobbling you cans top rewinding.

Pentax ME Super back view
The lenses I am using with this camera are a Sirius 28mm macro lens and a Rokoh Riconar 55mm lens. Although Sirius lens is called a macro lens it is not really as the best reproduction ratio is 1:4 - macro is usually taken as being 1:1.

The Sirius lens focusses down to 0.2m (8 inches for my older readers) which is why Sirius call it a macro lens.  Looking on the Interweb, this lens does not have a good reputation but I shall make up my own mind when the test film is finished.  The claimed fault is that the lens is very soft.

Any softness apart, this lens is a delight to use.  Both the aperture ring and focusing ring are easy to find by feel - the aperture ring has wide ribs and the focussing ring has a coarse rubber knurling.

Focussing is through very nearly a complete circle giving very precise control over focussing.  This compares well with my modern Canon EOS lenses that only move through 80 to 90 degrees.

This lens is a prime lens and is multicoated.  The focussing scale is in both metres and feet which will benefit some although I am entirely metric.  The lens is made for a more modern K-mount standard than the camera.  The lens contains electronics (I can clearly see a resistor through the mount end) and has two electrical contacts in the bayonet.  It also has an aperture setting marked (A)P which I assume is to do with the electronics. The camera mount is plain machined, chrome-plated brass with no electrical contacts. However, this lens fits well and works well with this camera - the more modern K-mount is clearly backwards compatible with the original K-mount.

The Riconar lens is to the older standard - it has no visible electronics inside the lens and no contacts on the bayonet mount. This lens focuses down to 0.8 metres which is just under three feet.  Its aperture range is less than the Sirius lens - f2.2 to f16.  I am now using this lens with a roll of film and will post the results when I have finished the roll (the results below are for the Sirius lens only).

This camera is very small and light - it measures 130 x 45 x 85 mm - compared to most SLR cameras. It is certainly much smaller and lighter than the Spotmatic. The body of a focal plane shutter camera is always going to be longer than the body of a leaf shutter camera as the mechanism for the shutter plus the rolled shutter blinds must fit in there somewhere. Lighter will go with smaller.

Having made the camera smaller, Pentax have left enough room for my not-too-small hands to hold this camera securely. The final weight of the camera will depend on the lens attached but with no lens attached it weighs 445g. My two lenses are small prime lenses which reduces the total weight compared to using a zoom lens. On the other hand, these two lenses have metal barrels which will add weight compared to a modern polycarbonate lens. Any road, the lens/camera combination is one of the lightest of my collection.

I have created a small problem with this camera in that I have bought two lenses which focus in opposite directions. This is a camera I really like and I intend to use it as one of my go-to cameras. I am helped by the fact that I frequently change from SLR to rangefinder to viewfinder cameras and from German to Japanese so I have no instinctive expectations as to camera controls.

The only controls on the body that you use frame-to-frame is the on/off control and the shutter button. I find the on/off control hard to use as you need to press a very small white interlock while turning the knob. I am unable to do this with one hand and switching the camera on or off is a two handed affair.

The film advance lever, while the camera is not in use, sits very close to the body which is slightly awkward to use, but after the first shot it sits slightly proud which makes it much easier to use.

Walking around with this camera slung around your neck is much nicer than with most of my other SLRs - my OM10 being the exception. Both the ME Super and the OM10 are similar in size and weight. It is no hardship to use either of these two cameras on a long day out which is more than I can say for any of my German SLRs or my modern digital SLR.

Sad note: I picked up this camera today after cleaning it and the back swung open and my thumb went through the shutter - it is well passed repair.  But they are common enough so I don't expect it to take too long to find another one in good condition.

Sample pictures.  

These are taken on Agfa Vista + colour film, 200 ISO (actually made by Fuji) and the Sirius 28mm lens.  With the third picture, I have taken a detail from the centre to see how the lens performed as I have been told this Sirius lens is 'soft'.  My test reveals very little as the scan the lab did was only a medium resolution scan but this lens does not seem to be unduly soft to me.

Cannon Street, Lincoln

Wheat Harvest, Lincolnshire
Broadgate, Lincoln

Detail from above


Monday, 12 August 2013

Praktica MTL5B

This is my second Praktica (the other one being a Praktica TL3).  It is in good condition - including the battery compartment - and came with a number of extras.  These were a Vivitar 2x teleconverter (M42 thread so usable with my other M42 thread cameras), a Praktica flash, a Leningrad light meter and a cheap but quite good carry bag.

Praktica MTL 5B


lens:  Helios-44M
focal length:   58 mm
apertures:  2 - 16
focus range:  0.55m to infinity
lens fitting:  M42 thread
shutter:  metal focal plane
speeds:  1, 1/2, 1/4, 1/8, 1/16, 1/30, 1/60, 1/125, 1/250, 1/500, 1/1000
flash:  Hot shoe, no PC connector
film size: 35 mm

This is a fairly standard late 70s to mid-80s SLR camera. My first Praktica - I also have a TL3. It is squarish and heavy with minimal use of plastics.  It is 150mm by 95mm by 55mm, not counting the lens.  The controls are standard for the time and where you would expect to find them.  The film advance is on the top right of the camera and is a lever which moves about a quarter of a turn.  At this late date, advancing the film also cocks the shutter.  Next to the film advance is the combined shutter speed selector and film speed setting control.  Shutter speeds are noted above and are all any photographer could realistically want.  Film speed can be set from 12 DIN/12 ASA to 33 DIN/1600 ASA.  The setting can be changed in one DIN increments (one third of a stop).

The camera came with a Soviet Helios-44M lens which is not original.  The Helios-44 lenses have a very good reputation - they are good copies of the Carl Zeiss Biotar lens - and this one is in very good, clean condition.  It is an automatic version of the lens - I also have a manual Helios-44 lens which came with my Zenit E - with a switch  to change between manual diaphragm and automatic diaphragm.  The aperture can be changed in half stops which is an improvement on my other Helios-44 lens.

The shutter release is an angled button on the right face of the camera.  My finger falls fairly naturally on this and it is comfortable to use.  Right by this button is a plastic lever which actuates the TTL metering system.  In use, you put your finger on the shutter release and instead of pushing down, you push towards yourself.  The diaphragm closes and the needle in the right side of the viewfinder moves.  You then adjust either the shutter speed or aperture to get the needle lined up with the notch in the middle (this is basically a match-needle type of meter).  It is designed as a shutter priority system, the idea being that you set the shutter speed with the camera away from your eye and then move the camera to eye level and adjust the aperture ring with your left hand while pressing the meter lever with your right hand.  Used this way, it is fairly easy to use.

If, like me, you prefer aperture priority metering, you need to set the aperture first and then adjust the shutter speed while looking through the viewfinder.  It is just about possible to do this but it is very awkward to do.  I am finding myself moving the camera down to adjust the shutter speed which makes the whole operation slower and less fluid.  The meter is powered by a 1.33V button battery.  Originally, this would have been a mercury cell which is now not available.  I am using a same sized silver button of 1.5V which will cause a slight mis-reading of the meter but of less than a stop so this will not be a problem with negative film.  With reversal (slide) film this might be a problem.

Focusing this camera is a delight.  The focusing screen carries the usual plain ground glass screen with a micro-prism circle and a split-image centre.  However, the split-image part on this camera is diagonal. With a standard horizontal split-image centre, it is necessary to find a strong vertical to focus on.  With this camera either a strong vertical or a strong horizontal will work as will a strong diagonal.  When I was using this camera to photograph a bush earlier today, there were no verticals, horizontals or diagonals I could focus on. I used the micro-prism circle which also worked well.  For those who have never used a micro-prism focusing screen, what you do is focus until the micro-prisms disappear.  The further from focus you are, the more prominent the micro-prisms are.  Once you can not make out the micro-prisms (or until they are as indistinct as you can make them) the image is in focus.

Below the shutter release there is a self-timer (Vorlaufwerk in German) which works by turning the small lever through 180 degrees and then pressing the centre button to actuate the shutter instead on using the shutter release button.  This does work on my camera but not well.  It is very hesitant and stops for significant times but the mechanism is clockwork and has probably not been used for the thirty years since the camera was new.

The left side of the camera is bare apart from the rewind crank.  This is the normal small folding crank  that became usual during the 1960s.  It is released by pressing a button on the base of the camera.

The other external features are a frame counter beside the film advance lever which is reset by opening the back of the camera.  This counts up from one.  I prefer the Voigtlander system from the 1950s where the frame counter counted down to tell you how many frames are left but this did not become the industry standard.  There is also an accessory shoe which is a hot shoe in flash terms.  There is no PC connector (these had become passé by the time this camera was made) so flash must by on-camera flash or the photographer must buy a third-party flash attachment to allow studio flash.  The tripod boss is not on the base plate but moved forward onto the underneath of the lens mount.  This will give better balance when using longer lenses and is something I have not seen on more upmarket cameras although it makes a lot of sense.

The outside of the camera is 'silver' plastic top and bottom plate and a padded leatherette which is very nice to hold.  This is a big improvement on the standard leatherette on my Praktica TL3.

Inside is mostly standard film SLR layout.  The shutter is a metal vertical focal plane shutter.  Superficially, this is the same as on my Canon SLRs with several horizontal metal strips.  However, the fixing does not look as sophisticated as the Canon's shutter.  It does, however, work well and offers shutter speeds up to 1/1000 and flash synchronisation at 1/125.

This camera has automatic film loading.  You pull the film leader out to the green mark on the right and wind on.  One of two metal loops will then pull the film onto the sprockets and around the spool.  This works very well although the manual mentions that with particularly curly film it might be necessary to manually move the metal loop over the film.

Light seals are foam by the hinge of the back and black 'string' along the top and bottom of the recess the back fits into.  These pieces of string look rather amateurish but have the advantage that they will not deteriorate like foam always does.  On this camera the string light seals as as good as new while the foam light seal by the hinge is reduced to a sticky mess and needs to be replaced. (edit, 27-2-2017: I am advised by James Hays that the strings are not original items and have been added by an owner.)

Sample pictures.

These pictures are taken on Agfa Vista + colour film from Poundland (£1.00 per cassette!) and developed and scanned by Snappy Snaps in Lincoln.  I am quite pleased with these.  I have also tried out the Vivitar 2x teleconverter to see how it performs.  I quite pleased with the results - a teleconverter is never going to be as good as using a designed lens - and I think the teleconverter is usable for non-critical work.

carving on Lincoln's Stonebow - 50 mm lens

carving on Lincoln's Stonebow - 50 mm + 2x teleconverter

Piano busker, Lincoln

Lincolnshire Wolds

Thimbleby main street, Lincolnshire

Friday, 26 July 2013

Emi K 35

Emi K 35


The Emi K 35 was made by the Oshiro Optical Works in Japan in 1956.  It is quite an attractive and well made little camera but basic in the facilities it offers.

lens:  Fujiyama Eminent Color
focal length:  50 mm
apertures: 2.8 to 16
focus range: 3 feet to infinity
lens fitting: fixed
shutter:  own make
speeds: 1/25, 1/50, 1/100, 1/300
flash: PC connector, X synch
film size: 35 mm

The camera is heavy, being made from die cast metal (presumably aluminium alloy) including the hinged back.  It measures 125 mm by 70 mm by 80 mm tall.  The main body is covered in black leatherette and the top and bottom plates are satin stainless steel.

The shutter release button is next to a raised part of the top plate and with my large hands it is a bit awkward to get my finger on it.  Film advance is by a lever.  In my camera, the spring that returns the film advance lever to its rest position is broken so it is necessary to put it back in place manually. However, the lever still advances the film and cocks the shutter, so this camera is quite usable.  

The viewfinder is small, but no smaller than Voigtlander were offering at the same time.  There are no frame lines in the viewfinder, so I assume the total image is what will be recorded on the film. On taking the camera apart to look at the broken film advance spring, I saw a square cut-out in the front of the top plate that is normally masked by the 'Emi K' logo on the front of the camera.  This suggests that a rangefinder was considered at some point in the design - either to be offered on another model or abandoned for this model.

One the left of the top plate is the film rewind which is a small crank (very small!) which is fairly difficult to use.  This crank pulls up to release the cassette for removal.  The only other thing on the top plate is an accessory shoe - a 'cold' shoe in flash terms.  For flash, there is a PC connector at the bottom of the shutter housing.

The lens is a Fujiyama Eminent Color lens.  There is a red 'C' on the lens bezel which I am sure indicates that the lens is coated (just about normal for 1956).  The whole shutter housing/lens assembly seems to be well designed and well made but feels a bit plasticky compared to Prontor shutters. Actually, the shutter housing is plastic which is not actually a bad thing so long as it is used thoughtfully.

The inside is as you would expect - a recess for the film cassette, machined guides for the film, a sprocket wheel to advance the film and a fixed take-up spool.  I am very much in favour of fixed take-up spools.  Zeiss Ikon and Ihagee both used removable spools and I spend too much of my time on my hands and knees retrieving the spool when using those cameras.  The camera back has the expected pressure plate (generously sized) and 'Zeiss bumps' in the leatherette.  'Zeiss bumps' are formed when the rivets holding components together react chemically with the metals used.  The back is aluminium alloy and I suspect the rWhitworthñ steel.

The base of the camera has a central tripod boss - 1/4 inch Whitworth.  There are no strap lugs on this camera - the manufacturers will have expected the user to use the 'ever-ready' case that will have been supplied with the camera.

Test photos


I was aware when I started that the return spring in the film advance lever was broken, but the mechanism itself seemed to work OK. As I used the camera it became apparent that the lever was not engaging with the internal mechanism properly and sometimes it took several sweeps to advance one frame.

Using this camera reminded me very much of using my Zeiss Ikon Contina Ic. They have a very similar size, shape and weight - I suspect Emi had the Contina in mind when designing the Emi K. Controls are minimal and are placed on the lens/shutter barrel. The viewfinder is nice and large and centrally placed. However, there are no bright lines for accurate composition.

The only problem I have had using this camera stems from the fact that the return spring  in the film advance lever is broken (as mentioned above). I initially thought that this would mean that I would have to return the lever by hand after winding on the film and otherwise all would be well. in fact, the film advance lever interacts with two sub-systems in the camera - the double exposure prevention mechanism and the missed frame prevention mechanism. Sometimes I would turn the film advance lever and nothing would happen, sometimes I could not turn it at all without pressing the shutter release a second time - this did not fire the shutter, it just freed the mechanism. I was never confident that the film was advancing properly. Although the rewind knob turned as I advanced the film - a sign that the film is moving - it did not turn smoothly. Looking at the prints, it is apparent that the film was not entirely moving as it should - there is slight overlap of frames - but the problem is not severe, just annoying.

Exposure of the film is fine, indicating that the shutter speeds are, at the least, close to the supposed values. I only actually used the faster speeds so I cannot vouch for the slower speeds - it is usually the slower speeds that play up first with old cameras.

Framing not quite right


Double exposure

This one is OK

Slight frame overlap