
I am a bit of a tight-wad. I very rarely pay as much as £20 for a camera. While this makes for a fairly cheap hobby, it does preclude me from buying many models. For many years, I have been looking wistfully at medium format SLRs - such as Hasselblads, Mamiyas and Bronicas. Unfortunately, you just cannot buy these for under £20.

I have recently retired and this excellent arrangement has bought with it a modest lump sum which has been burning a hole in my bank account. So, one Bronica ETRS has been purchased - at 10x my self-imposed limit (actual cost was £189). This has proved to be a confusing camera to buy. These medium format SLRs are very modular and, looking at Ebay, it is usual to sell each module separately. My problem was that, never having handled one of these before, I was not clear as to exactly which modules were essential and which were optional. I got around this by going to a shop (ffordes in Inverness) and buying a complete system from them with a reassurance that I was buying a complete camera. probably cost me a bit more this way but I also got a six month guarantee as well as peace of mind.


There are several options for the viewfinder of which the most common are the waist-level finder and the prism finder. I have the prism finder which is essentially what all 35 mm SLRs have. I may avail myself of a waist-level finder in due course.
There are many other options options available, none of which is essential. The only module I need that was not supplied is a neck strap. A lot of people do not use straps - even on very expensive cameras - but dropping things is far too easy not to use a strap. I have fitted a cheap and cheerful Chinese strap.
Description.
I am going to describe each of the four modules in turn and then describe the complete camera.
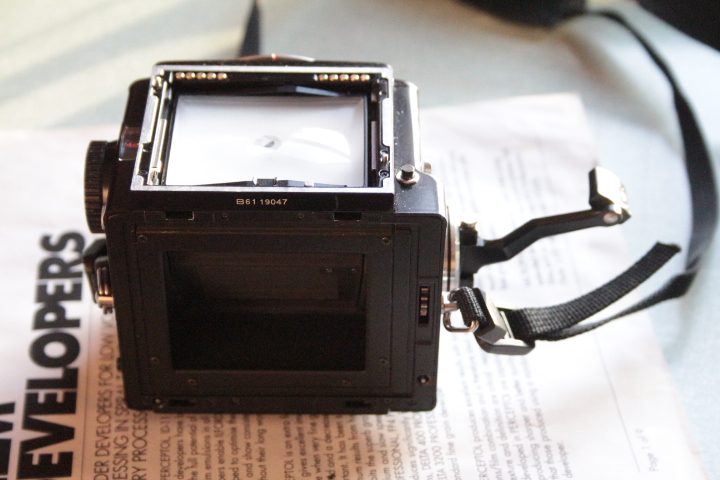
First, the body. With the other modules detached, the body does not look like very much. It does, however, contain all the electronic controls.
It is a cube - it measures 90 x 70 x 85 mm (OK, not exactly a cube, but near enough) and weighs xxxg.

The focussing screen is removable - several options are available - but this one has a plain field with a split-image centre surrounded by a circle of micro-prisms.
In front of the focussing screen is a row of ten electrical contacts. These are there to allow for the use of a metering viewfinder - by default, no metering is provided meaning I need to use a hand-held light meter which is my default method of working regardless.
Also on the top are the displays for shutter speed and frame counter both in windows on the sides and also a release button for the viewfinder.
The left-hand face of the body has the shutter speed selector. This is a knob and ranges from eight seconds to 1/500 seconds. Whole seconds are displayed in red, fractions in white.. This might seem a b it meagre by modern standards but is more than adequate with careful selection of film speed.
On the top corner of the left-hand face is a battery check button Pressing this lights a red LED in the corner of the focussing screen. half-way down the right-hand edge is a strap lug. below this is a button to release the film back. last item on this side of the body is a cable release socket threaded for a standard release cable.

The right-hand face of the body is dominated by the film advance. This is a large crank handle that you turn one complete revolution to advance the film one frame, lower the mirror and cock the leaf shutter in the lens. Above this is a small lever. This turns through 90 degrees to allow for multiple exposures on one frame of film. Behind the film advance crank is the second strap lug.
The bottom face of the body has the battery compartment which takes a single 6v battery. In front of this is the 1/4 inch UNC tripod boss.
The rear face of the body cube has fitting s for the film back and an exposed cog for the film advance. In the centre is a large hole which is blanked off by a hinged plate - more of this later.
Below the mount are two chrome buttons. On the right (when holding the camera) is the shutter release button. This ass a knurled collar around it which can be turned to lock the shutter release. Turned fully anti-clockwise, it frees both the release button and the cable release. Turned 45 degrees clockwise, it locks the release button but still allows the cable release to fire the shutter. Turned 90 degrees clockwise, both the release button and the cable release are locked.
In the top corner is a PC socket for flash. No accessory shoe is provided as standard so any flash gun must be fitted to the tripod boss - or you can buy the accessory grip which has a hot shoe on it.
In the top corner is a PC socket for flash. No accessory shoe is provided as standard so any flash gun must be fitted to the tripod boss - or you can buy the accessory grip which has a hot shoe on it.
On the left is the lens release button. This needs to be turned and then depressed. While depressed, the lens can be turned clockwise for removal.
in order to have a functioning camera, three things need to be fitted to the camera body: viewfinder, film back and lens. Other options are available but these three are essential.
I am going to start with the viewfinder as this is the simplest. There are choices here - none is provided as standard - and I have the prism finder. This is the same as the viewfinder on a 35 mm SLR film camera or on a DSLR digital camera. It means I can see the image the right way up and the right way around.


The third option is that of a metering finder. this is essentially a prism finder with a built-in light meter to give TTL (Through The Lens) light readings. I am happy with my hand-held meter.
The film back has four versions. I have the 120 back - it takes 120 size film, believe it or not. Also available are 220 backs, Polaroid backs and 70 mm backs but film is not available for any of these.


In use.
In use, this camera is an anachronism. The shutter system is that used by Zeiss Ikon in their Contaflex cameras in the 1950s. There are actually two shutters in use. Between exposures, the leaf shutter is open, allowing the user to view the image through the lens. To prevent the film being fogged, there is a secondary shutter in the camera body behind the mirror - the hinged plate mentioned earlier. This secondary shutter is crude - it cannot be used for timed exposures.
When you fire the shutter there is a complex sequence of events.:
1) the leaf shutter closes
2) the mirror lifts out of the way
3) the secondary shutter lifts out of the way
4) the leaf shutter opens for a timed exposure
5) the leaf shutter closes again.
When you advance the film, most of the opposite happens:
6) the secondary shutter closes
7) the mirror comes back down
8) the leaf shutter opens for viewing.
All this makes for quite a resounding clunk - compared to my 120 Ikoflex which only has the leaf shutter to move and is nearly silent and vibration free.
Test film.
This is encouraging. The shutter works fine, there are no light leaks, aperture and shutter speed are at least in the right ball park, film advance is correctly spaced. What is not evident on these small scans is the image quality - it is superb.


No comments:
Post a Comment