Saturday, 7 March 2015

Fed 2 (B4) (ФЭД)


I wanted a Fed camera since I first saw one many years ago. The external design is very much "form follows function" (and I suspect the internals is as well). When I finally bought a Fed, it was a Model 5B which was box-like and anodyne - it also leaked light and I got rid of it after my test film.  This Fed 2 is much better. 

Fed-2 (C) John Margetts

A brief history: the Fed was originally conceived as a training project for boys in a Ukrainian children's home. The idea was to teach the boys basic engineering by making quality cameras - the model selected being the German Leica II. They are often decried as being poor copies of the Leica but I don't think they are either poor or copies. The Fed 1 was essentially a copy of the Leica II redesigned to allow it to be made on less sophisticated machine tools by trainee engineers. The Fed 2 (the camera this blog article is about) is a complete redesign so it is more accurate and meaningful to say that it is inspired by the Leica II rather than a copy of it.

After the Germans destroyed the Fed factory in Kharkov, Ukraine during World War II, production was transferred to the KMZ factory near to Moscow - this resulted in the Zorki-Fed and, ultimately, the Zorki line of cameras. I bought one of these  - a Zorki 4 - and I am very pleased with it. The joint lineage of these two cameras is clear but they are very different.

So - both the Zorki and fed line of cameras are based on the German Leica II. The Fed 2 was made between 1955 and 1970. The Ukrainian seller tells me mine is a Model 2, Type B4 so it was made between 1956 and 1958. The quality of the Soviet engineering is shown by the fact that the camera is working well after 60-odd years.

This camera is a 35mm rangefinder camera. the top plate measures 140 mm by 32 mm. There is a raised "L" shaped hump in the middle of the plate. This houses the rangefinder mechanism. In the front of this are two windows - the viewfinder window and the rangefinder window. They are 67 mm apart which means that the rangefinder will be very accurate - this aspect of the Fed 2 was taken from the Zeiss Ikon Contax camera. The windows on the Leica II are much closer together.

Fed-2 top plate
On the left end of the top plate is the rewind knob. this pulls out to make rewinding the film easier. At the base of the rewind knob is a lever to adjust the dioptre level of the viewfinder. This excellent device means I can use the camera without wearing my glasses.

On the left end of the top plate is the film advance knob. This turns clockwise which I find to be non-intuitive but it works well enough. Beneath the film advance knob is the frame counter. This counts up from zero to a maximum of 36. Beside the film advance is the shutter release. This is towards the back of the top plate which I find to be a less than natural position but, again, it works well enough. The shutter release is threaded for a standard cable release. Around the shutter release is a milled collar. This is the rewind clutch - you press it down and turn it clockwise where it will lock in position while you rewind the film. Once the film is rewound, you must turn the collar anti-clockwise before loading a new film.

-------------------------------------------------------------------------------------------------------------------------
Blog (C) John Margetts, 2015
-------------------------------------------------------------------------------------------------------------------------

Next along is the speed selector dial. This is set by lifting the dial and rotating to the required speed. There is a central post with an engraved dot to mark the selected speed. This is a big improvement over the usual Soviet system as the shutter on this camera can be set either before or after the film is advanced. The usual advice for Soviet cameras is to only change the shutter speed after winding on the film. Actually, as far as I am concerned, I always advance the film immediately after taking a picture - I do this so that the camera is always ready - so I am always going to set the shutter speed after advancing the film.

Also on the top -plate, in line with the lens, is an accessory shoe. There are no flash contacts here - 1956/8 is much too early - so a 'cold' shoe in flash terms.

The rear of the top plate has the camera serial number. This does not match then usual Soviet system of starting the serial number with the year of manufacture so dating the camera by this number is not straight forward. The front of the top plate is engraved with the model name in Cyrillic - ФЭД-2 or FED-2 in Latin script - and ФЭД is repeated on the top near the rewind knob.
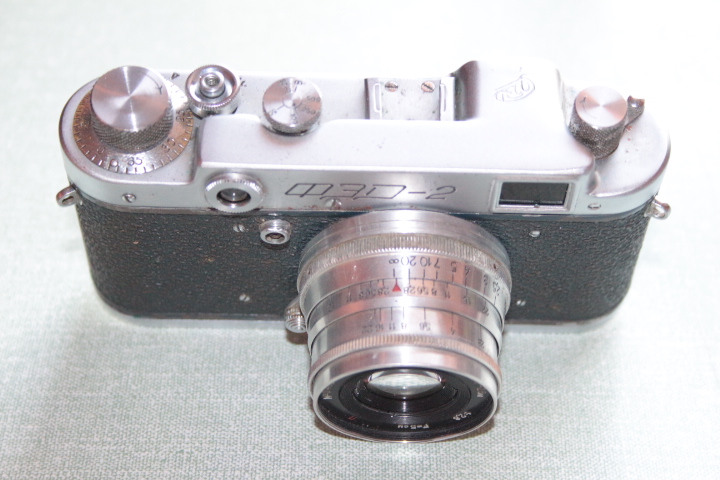
Fed-2
The front of the camera is simple. There is the M39 (also called LTM) lens mount offset to the left of centre. At the top of the mount, the rangefinder cam slightly protrudes. In fact, this is in then way of screwing in the lens and it is essential to set the focus on the lens to its nearest point (1 metre in this case) to make fitting the lens practicable.

To the right of the lens mount is the flash PC socket. In later versions of the Fed -2 this PC socket gets moved onto the top plate - this is one of the ways of determining the type of Fed-2 you have. This camera has no shutter delay lever - again, added to later versions of the Fed-2. What I do appreciate is the presence of a strap lug at either end of the camera.

The base of the camera has a fixing cam at either end. turning both half a turn allows the back/base to be removed to allow fitting and removing of the film. The base also has a tripod bush (the old standard of 3/8 inches Whitworth so none of my tripods will fit unless I 'borrow' a 1/4 inch slug from one of my Zeiss Ikon cameras to fit into the 3/8 inch thread).
Fed -2

The lens that came with this camera is an Industar-26M which is a 50 mm, f/2.8 Tessar type lens. I suspect this is the original lens for the camera - it is certainly of the correct type and date. The lens focusses from 1 m to infinity and has apertures available from f/2.8 to f/22. There is also a depth of field scale which is invaluable if, like me, you use hyperfocal focusing (at f/22, everything from 1.5 m too infinity will be in focus if you set the focus at 3 m). The lens is coated - as is to be expected in the late 1950s - signified by a red п - on the lens bezel.

In use, this is a capable and pleasant camera. The shutter is as quiet and vibration free as a cloth focal plane shutter is going to be and much more gentle than either my Zenit E or Zorki 4. The viewfinder eye-piece is rather small and is surrounded by a milled steel ring which is bad news for modern plastic spectacles. On the plus side, there is a dioptre adjustment for the viewfinder so I can use this camera without wearing my glasses. Also, the viewfinder is not as bright as it could be. It is tinted green/blue to give maximum contrast with the yellow rangefinder spot which is really clear and makes the rangefinder easy to use.

On the negative side, I have had a serious problem with loading the film. On the face of it, loading is really easy - you insert the end of the film beneath a brass strap on the (brass) take-up spool and then wind-on. Unfortunately, my first film slipped out of place after I had replaced the back. When I thought I was advancing the film, the film was winding around the sprocket shaft rather than around the take-up spool Once there was five or six frames around this shaft the camera completely jammed. This was quite easy to sort out but involved opening the back of the camera with the film in place and cost me half a roll of film.

Despite the seller assuring me that the rangefinder had been correctly adjusted prior to sale, it is clearly not. When the lens is focussed at infinity, the rangefinder split image will not coincide.  As adjusting this is fairly simple, I might have a go myself, but I am not really bothered as I usually use hyperfocal focusing rather than precise focusing. On the other hand, it would be nice to have the camera as it should be.

Examples from the test film to follow.

3 April 2015

Test film was a disaster!  One picture from a 24 exposure cassette.  I am hoping that this is me leaving the lens cap on (I certainly did that few some shots) and I am trying a second film with the lens cap left at home.

Fed 2 test film


Apart from the appalling light differences from left to right (entirely down to me) this shot is quite good. Focus is good, contrast is good, exposure is good.  With an older focal plane shutter there is a likelihood of the two shutter curtains not moving smoothly together leaving differently exposed strips.  Hopefully with the second film I will be able to report more thoroughly on this camera.

Second film

This is no better. I am certain the lens cap was not left on as it was left at home.  Three images from 24 frames - not very good and shows that the shutter is not opening most of the time. This is strange, as with no film loaded, and the back removed, the shutter definitely opens every time. My best guess is that the back is either fouling something or is distorting the body.  In addition to the shutter not opening, there are very clear pin-holes in the shutter curtain. This shows up in the black frames below are three bright spots. These are also visible on the three images I got. The camera is useless.


Fed 2 - with three very clear pin-holes


Fed 2 - pin-holes not so clear but still there

Fed 2 - clear pin-holes
Fed 2 - pin-holes with the film not wound on for some time
Fed 2 - pin holes with the film wound on fairly quickly - so smaller spots.

Sunday, 1 March 2015

Kodak Retinette (type 017)

Visually, this is very like an early Retina - see my description of my Retina I type 119 - I gather the Retinette line was introduced for the folding 35 mm cameras with no rangefinder.

Before I go on to describe this camera I want to repeat the standard advice regarding using the V or self-timer setting on old cameras. The advice is not to touch this setting as the mechanism is likely to break rendering the camera useless. The man who sold me this camera was honest enough to tell me the shutter was jammed. I bought the camera on the basis that I have never had a serious problem with a Prontor shutter and did not doubt that this one would prove to be alright.

The problem was indeed that someone had tried the self-timer and the shutter had jammed. It took me nearly ten minutes of jiggling the various levers on the shutter to free the mechanism. The shutter is still not as free as it should be but an hour or so of repeatedly dry-firing the shutter will usually free the mechanism admirably.

Retinette type 017
This camera is a folder. The model name is a Retinette and it was made by Kodak's German factory. There were later models I, Ia, II etc. As well as model numbers, Kodak also produced types. This is a type 017 and was made between 1952 and 1954. The lens serial number tells me it was made in 1952. According to Dave Jentz of the Historical Society for Retina Cameras the lens was engraved with a serial number on 3 November 1952. It would have been three to six months before the new lens was fitted to a camera body by Kodak. The body also has a serial number - 928380 - but I have been unable to find any information relating to serial numbers to dates.

There is a button on the sole plate to release the front door. This does not spring open as some folders do, but the instruction book specifically says you need to pull the door open so this must be how it is intended to work. The action here is smooth enough so I am not going to lubricate the many joints in the struts - usually this is necessary on old folders but not here.

In common with the Retina series, there is a metal plate between the bellows and the shutter housing. This is purely decorative - it is missing on the Voigtlander equivalent (Vito and Vito II) - but is very effective visually. To close the camera, there is a small stud both top and bottom of this decorative plate that must be depressed to unlock the folding mechanism.

The shutter is a Prontor SV shutter - the letters SV tells us the shutter is synchronised for flash ("S") and has a self timer ("V" = Vorlaufwerk). In common with other early fifties shutters, there is a cocking lever and a release lever. The release lever is connected via a spring steel strap to a release button on the camera's top plate - and via this to a double exposure prevention mechanism. The fast shutter speeds work well - the test film will show me how well - but the slower speeds (1/10, 1/5, 1/2 & 1 seconds) are very slow - the one second setting is about 1 1/2 seconds. that is about 1/2 a stop out which is within the exposure latitude of film. This means the shutter should be usable at all marked speeds - I am not someone who gets hung up about precision, I am more concerned about usability.

The shutter has three Happy Snapper settings. There is a red dot on the aperture scale at just smaller than f/5.6 (I would guess f/6) and f/11 is also in red. These are used in conjunction with two small circles on the focus scale. In the manual, Kodak has these for use with different films.

For Kodachrome film (colour slide film, no longer in production) you should set the shutter speed to 1/50 (marked in red), the aperture to the red dot and the focus to the small circle on the focus scale near to the ten foot mark. This gives you a focus range of seven feet to fifteen feet - intended for portraits. For landscapes you should use the second small dot near the twenty five foot mark. This last is the hyperfocal distance for this lens at f/6 - everything from thirteen feet to infinity will be in focus.  These settings assume bright sunshine.

For Kodak Plus X (monochrome film, no longer in production) you should set the shutter speed to 1/50 (marked in red), aperture to f/11 (marked in red) and the focus to one of the small circles. The first small circle (near to ten feet) gives a focus range of six to twenty five feet and the second small circle (near to twenty five feet) gives a focus range of ten feet to infinity. This last is not quite the hyperfocal distance - to get this you need to set the focus to fifteen feet giving a range from seven feet to infinity.

The shutter comes with two flash synchronising settings - M and X.  For F class flash bulbs and electronic flash, you use the X position and can use shutter speeds up to 1/100 seconds.  For M class flash bulbs the process is more complicated.  For these bulbs there needs to be a slight delay between firing the flash and opening the shutter.  This is to give the flash bulb a chance to burn to its maximum brightness before the shutter opens. For these M class bulbs, you set the synchronising lever to M and then set the delay timer (there is a second yellow M by the delay timer lever to remind you to do this).  The delay system does not come into effect other than to give a fraction of a second delay as just mentioned.  In order to actually use the delay timer for taking a picture, it is necessary to set the flash synch to X first.

The top of the camera is as we might expect of a 35 mm camera.  On the right is the film advance knob (we are still a few years away from having a film advance lever) and on the other end is a film rewind knob. This is activated by a small lever beneath the film advance knob marked R and A. The centre of the top plate has the small viewfinder. It was usual at this time (late 50s) to have very small viewfinders and this one is impossible to use while wearing glasses. On the left of the viewfinder is the accessory shoe - at this time it was as likely to house a rangefinder as a flash so I am still not calling it a flash shoe. On the right of the viewfinder is the frame counter - this one counts down so shows the frames left to use. it is easily set to the film length by rotating it using the two small studs on the disc. Between the frame counter and the film advance is the body shutter release. You can only depress this once the film has been advanced. As the interlock is freed by the film physically moving over the sprocket wheel, there has to be a film in the camera before the shutter will fire (you can 'cheat' and fire the shutter at the shutter housing, if you want to).

The base of the camera is plain apart from the tripod boss - the standard 1/4 Whitworth thread.

My test film is still waiting to be developed - later this week, I hope - and I will post the test pictures when they are ready.

Tuesday, 27 January 2015

Balda Super Baldina


This is my second Balda Baldina. The first is a folding Baldina from the 1930s. The Super in the name indicates that it has a coupled rangefinder. This new Baldina is from the 1950s and is not a folder but nods in that direction with a collapsible lens. This is fairly effective - it reduces the thickness of the camera by two cm which means it easily fits in a jacket pocket. The camera leatherette is stamped "Made in Germany" and the focus scale is in feet, indicating that this is an official import into the UK.

Balda Super Baldina (C) John Margetts
The top plate is as you might expect from a mid-1950s German camera. In the middle is a large hump containing the viewfinder and rangefinder. This has both the viewfinder and rangefinder eyepieces in one - my Franka Solida of the same period has separate viewfinder and rangefinder eyepieces which makes using the camera awkward. On the top of the viewfinder/rangefinder hump is an accessory shoe - no electrical contacts at this date, so a cold shoe.

Balda Super Baldina top plate.
On the left of this hump is the rewind knob. This is surrounded by a film type reminder. There are four options for this - film speed in DIN, film speed in ASA, colour positive or colour negative.  To the right of the hump is the film advance. This is a lever with a large, coarsely milled thumb post.This moves through 180 degrees to advance one frame which is easily done in one throw of the thumb. At the base of this is the frame counter. This counts up from one to thirty six. In front of the film advance is the shutter release. This is a fair-sized button, threaded for a standard cable release. I have a slight niggle here as the shutter release button is slightly below the level of the film advance level which makes finding the release button by feel less obvious than it could be.

On either end of the top plate is a lug for attaching a strap - this is far more important than camera manufacturers seem to understand.

With lens collapsed.
With lens extended.
The front of the camera is dominated by the collapsible shutter/lens housing. This is quite well organised with the parts easy to get at. The shutter/lens housing is mounted on a square stainless steel bezel. On the top right of this bezel is a button to release the collapsible housing. When pressed, the shutter/lens housing pops out with a satisfying clunk.

Around the base of the housing is the focusing ring. This has a large knob on it below the lens which makes focusing at eye-level with the rangefinder very easy. Between the focusing ring and the lens release button is a depth of field scale - something regrettably missing from more modern cameras.

The next control on this housing is the aperture selector. This varies between f/3.5 and f/16. There are no click-stops so intermediate positions can be selected. Outside of this is the shutter speed selector - this is a conventional ring. The shutter is a Prontor SVS (a Compur Rapid was also available) so shutter speeds are from one second to 1/300 seconds.  The 'S' in the shutter name tells us it is synchronised for flash - two 'S's tells us it can be synchronised for M (bulbs) or X (electronic) flash guns. The V stands for Vorlaufwerk which indicates a self-timer is available.  There is a PC (Prontor Compur) socket set into this housing for attaching a flash gun.

Balda Super Baldina rear/internal view.
The shutter controls have Happy Snapper settings - f/8 is in red and there is a red dot at nine feet and a green dot at around thirty feet. The red dot is intended for portraits and will give you a focus range of six feet to twelve feet - suitable for a head-and-shoulders shot or a small group. The green dot is for landscaped and is the hyperfocal distance at an aperture of f/8 - it gives a focal range of 12/13 feet to infinity.

The focusing knob moves the whole shutter/lens assembly. this means that the whole lens moves to focus rather than just the front element. This means that the lens always performs at its optimum - whatever that optimum might be. The lens is a Baldinar which is made for Balda rather than by them. There were a host of lens-makers in Germany making lenses for camera manufacturers and this could have come from any of them or, indeed, several of them. The lens is a triplet (three pieces of glass) which is unlikely to perform well with a wide aperture. my experience of German triplets is that they perform very well once stopped down to f/8 or smaller. At the date this camera was made, the lens will be coated - and there is the tell-tale blue sheen to the lens to confirm this.

The inside of the lens front is threaded for filters. I make it to be 35mm diameter but that could be plus or minus a millimetre or so.

On the rear of the top plate, to the left of the viewfinder eyepiece, is a large screw. I suspect this is to adjust the rangefinder but as the rangefinder is working fine I am not going to fiddle with it to find out for sure. The rangefinder works as they usually do. There is a central spot that needs to be aligned to the main image by moving the focusing knob on the front of the camera. This spot is clear, even in poor light, which makes the rangefinder useful in practice - not something I find you can safely assume. One quirk here is that the rangefinder spot is pale blue in colour rather than the more usual yellow but that does not affect its usefulness.

Wednesday, 17 December 2014

Glossary of film photography terms

Glossary
120 size film
Roll film that measures 60 mm across and is long enough for 8 off 6x9, 12 off 6x6 or 16 off 6x4.5 negatives. Still available.
127 film
Roll film that measures 46 mm across and is long enough for 8 off 4x6, 12 off 4x4 or 16 off 4x3 negatives. Now obsolete.
35 mm film
Small film format based on cine film provided in a light proof cassette to allow daylight loading of the camera. Has two rows of perforations used to both locate and to move the film. Image size is usually 24mm by 36mm. Still available.
aperture
The hole through which light passes to get into the camera. In many cameras, this is adjustable.
aperture priority 
An automatic exposure system that allows the user to set the aperture and then calculates the required shutter speed.
automatic exposure
A system whereby the camera decides on what combination of aperture and shutter speed to use.
automatic focussing
A system where the camera focusses the lens on the subject behind one of several pre-set focus points.
baseboard
The hinged 'door' of a folding camera that holds the lens and shutter in place.
bayonet
a system of fitting a removable lens quickly. This only requires about 1/3 of a turn of the lens compared to several turns for a threaded lens.
bellows
a leather or fabric tunnel between the lens and the camera body that collapses when the camera is closed.
BII
The German name for 120 film.
Body release
a shutter release on the body of the camera rather than on the shutter housing. This became normal from the mid 1930s.
bokeh
A Japanese word used to describe the out-of-focus areas of an image. Currently very fashionable but unheard of a few years ago.
brilliant finder
A small viewfinder viewed from above and gives an image that is reversed left to right.
bulb release
similar to a cable release but is a hollow tube with a pneumatic bulb on the end. The shutter is tripped by squeezing the bulb.
cable release
a flexible cable to allow tripping the shutter without touching the camera – this avoids camera shake with slow exposures. The cable is usually wire in a wound metal sleeve.
cartridge
a disposable light-proof container for film. The most common are 126 and 110. Both are disposable.
cassette
A holder for film. Usually the Kodak designed cassette still in use but Leica, Zeiss Ikon and Agfa all produced their own designs at one time.
Chrome
a slang word for colour slide/reversal film
contact print
A print of a photograph on paper the same size as the negative.
depth of field
the spread of distances in the subject that are in focus on the negative
dial-set shutter
On older manual cameras, a separate dial, usually above the shutter that is used to set the shutter speed. Phased out around 1930. cf rim-set shutter.
diaphragm
A series of interlocking blades that can be moved to make differing sizes of holes to adjust the lens aperture. Often referred to as an iris diaphragm.
disc film
A short-lived type of film with small negatives arrayed around a card disc.
double exposure lock
Once the shutter has been tripped, the shutter is locked until the film has been wound one.
Double-extension bellows
These allow the lens to be moved much further away from the plate/film and so allow the camera to be focussed much closer to the object being photographed. They are an early macro device.
emulsion
the light sensitive coating on film
EV settings
a system common in the 1950s and 60s where the shutter speed and aperture were linked in the shutter housing. The user set a EV value on a ring on the shutter housing and could then adjust either speed or aperture and maintain the set exposure.
exposure compensation
A way of over-riding automatic exposure systems where the user can decide to over or under expose the picture by a set amount.
exposure lock
Allows the camera the set the exposure while pointing away from the subject – for instance to avoid under-exposure if there is a lot of sky in the picture.
exposure meter
a device to measure the amount of light so a good exposure can be calculated – most include a calculator. See light meter
fascia
A decorative covering over the front of the camera.
film advance
The means of winding the film on – usually a knob until the mid-1950s and then a lever until the late 1970s when it became an electric motor.
film advance lever
A lever used to advance the film one frame.
film gate
the rectangular opening inside the camera against which the film sits. It provides the sharp edges to the image.
film speed
A measure of the sensitivity of film to light. Measured in DIN, ASA or ISO
film winder
An automatic device to wind the film on once a exposure has been made,
focal plane shutter
a shutter consisting of either two cloth blinds or metal slats that sit just in front of the film and move to allow light to reach the film.
focussing screen
This is usually ground glass. In a plate camera, the glass is placed where the sensitive plate will later be and is used to display they image – upside down and reversed left to right. In a SLR camera, the focussing screen is immediately below the pentaprism and is viewed through the pentaprism with the image the correct way round. Focussing screens frequently include focus aids such as micro-prisms and split-image discs.
frame counter
Either counts how many pictures have been taken or counts how many are left on the roll.
Fresnel screen
this is a type of lens designed by the Frenchman Augustin-Jean Fresnel (pronounced Fray-nl). It is basically a normal lens cut into small sections to allow it to be made much thinner. It is used in focussing screens as a Fresnel screen will be as bright at the edges as it is in the centre.
Front-cell focussing
Ideally, a lens should be focussed by moving the whole lens towards or away from the negative. When there is a shutter in-between the glass elements of the lens, this is mechanically difficult and expensive to make. Cheaper cameras just move the front element of the lens which has much the same focussing effect but reduces the quality of the image formed for close-up shots.
helical focussing 
A focusing system where the lens is fitted in a screw thread and is focused by turning the lens.
hyperfocal distance
this is the maximum range of focus the lens is capable of. It is found by setting the infinity mark on the focusing scale against the set aperture on the depth of field scale.
image circle 
The circular image produced by a lens. It is always bigger than the negative or sensor.
Iris diaphragm
A series of interlocking blades that can be moved to make differing sizes of holes to adjust the lens aperture.
Karat cassette
Agfa's answer to Kodak's 135 film in the (now ubiquitous) cassette. Introduced in 1936, it was almost identical to the Agfa Rapid cassette.
leaf shutter
A shutter either between the glass elements of the lens, or just behind them that consists of a number of thin metal plates that move to allow light into the camera
lens coating
a very thin coating applied to the surface of lenses to increase contrast and reduce flare. On early lenses (from 1930) this was just on the front surface of the front element a but later was applied to all glass surfaces. This became normal from around 1950.
lens hood
a shade for the front of a lens to prevent oblique light from entering the lens. This is more important with older, uncoated lenses as they will produce flare if used pointing towards a light source.
lens node
the effective centre of a lens. For a 50 mm lens this will be 50 mm in front of the film. Sometimes the node is actually outside the physical lens
lens standard 
The board or frame that holds the lens in place.
light meter
a device to measure the amount of light so a good exposure can be calculated – most include a calculator. See exposure meter
M39
The standard thread for fitting a lens to a camera introduced by Leitz for their Leica cameras in they 1920s. Also used by many other manufacturers.
M42
A standard thread for fitting a lens to a camera introduced by East German Zeiss Ikon in the late 1940s. Used for most 35mm SLR cameras until the 1980s and became known as the Pentax thread.
macro
Strictly used to indicate that the image on the negative is life size but is used by lens manufacturers to indicate the lens can be used for close-ups.
manual focussing
Where the photographer must adjust the focus of the lens instead of relying on the camera to do so.
Match-needle
a system used in light (exposure) meters where the user turns a dial until the meter needle and the dial needle are in the same place. At this point, the required exposure can be read off a scale.
mercury cells
A form of battery now banned throughout the world. Usually a modern battery can be used it it place, but there will be a voltage difference to take into account.
Micro-prisms
a focussing aid that keeps the image out of focus until it is correctly focussed. Usually found in Japanese SLRs of the 1960s, 70s and 80s.
Monochrome
a picture in one colour – usually black and white but necessarily so.
motor-drive
A powered device to wind on the film and take the next picture.
negative
The picture formed in the camera on the piece of film. It is called a negative because the dark parts of the scene will be light and the light parts of the scene will be dark.
Newtonian finder
A crude viewfinder either with no lens of with a simple magnifying lens
orthochromatic
sensitive to blue and green light. The name means 'correct colour'. Orthochromatic film can be handled with a normal darkroom safe-light.
panchromatic
sensitive all colours – the usual film that is currently available. Must be handled in complete darkness.
PC socket
Prontor-Compur. Named after the two most prominent shutter manufacturers from the mid-20th century. It is the standard connector for flash guns found on most cameras until the Hot Shoe became normal.
pentamirror
a cheap alternative for a pentaprism. It does the same job for a much lower price but does not produce as bright an image. Found on more modern and cheaper SLR cameras.
pentaprism
a glass prism inside a reflex viewfinder that turns the image the right way around for viewing. It is found in most SLR cameras.
plate camera
a camera designed to use glass plates rather than film.
rapid cassette
An attempt by Agfa to compete with Kodak's 126 film cartridge. Film was held loosely in the cassette and needed to be wound into an empty Rapid cassette. Used between 1964 and the early 1990s.
Reverse Galilean viewfinder.
This is effectively a small telescope as designed by Galileo used backwards – it makes the view appear smaller so that a large scene can be fitted into a small viewfinder.
rewind knob
On 35 mm cameras, the means of winding the film back into the cassette.
rim-set shutter
On older manual cameras, the ring around the lens that is used to alter the shutter speed. Dates from around 1930. cf Dial set shutter.
rise and fall mechanism
A way of raising the lens so that a different part of the image circle is over the negative. It is used when photographing high objects to avoid tilting the camera.
Self-capping shutter
This is a type of focal plane shutter – the type used in all SLR cameras. In early focal plane shutters, the shutter would stay open when rewound meaning the film plate had to be removed first and it could not be used for film. A self-capping shutter will remain closed while being rewound so can be used with a plate in place and can be used for film.
self-erecting
A camera that unfolds with the lens in the correct position for picture taking at the touch of a button.
self-timer
A device in the shutter that delays the shutter opening for ten seconds or so
shutter 
The means of letting light into the camera in a controlled way. Either inside the lens (leaf shutter) or in front of the film (focal plane shutter).
shutter cocking lever 
On older shutters (pre-1955-ish) a lever used to set the shutter ready for use.
shutter release
The button or lever used to fire the shutter.
Signal
some camera provide a visual signal that the film has been would on and the camera is ready to take the next picture. Usually takes the form of a dot by the film advance that turns red when the camera is ready.
SLR
Single Lens Reflex – a type of camera where the user views the scene through the taking lens to give very accurate composition.
Split image disc
This is frequently found in the centre of a SLR focussing screen. It will split a vertical line (occasionally horizontal or diagonal line) while it is out of focus, the line joining itself at the point of focus.
spool
A wooden, metal or plastic holder for rolls of film.
spool carriers
The part of the camera that holds the spool of film either ready for use or once used.
sprocket hole
the row of hole along the edge of film to allow the camera to move it. In 35mm film there is a row on either edge. In 126 cartridges there is only one row of sprocket holes.
TLR
Twin lens Reflex – a type of camera that has two identical lenses, one above the other. Both are focused by the same mechanism at the same time allowing for accurate focusing but at the cost of some parallax error in near shots.
tripod boss
A threaded hole to allow the camera to be fitted to a tripod. On older cameras it will be either 3/8 inch or ¼ inch Whitworth thread and on more modern cameras 3/8 or ¼ UNC thread.
TTL
Through The Lens – a light metering system that measures the light that is coming in the lens. This gives more accurate exposures than using a hand-held light meter will.
V
Vorlaufwerk which is German for self-timer.
vignetting
A darkening at the edges of the picture caused by the image circle being too close in size to the negative – Common with cheaper lenses.
Waterhouse stops
a sequence of holes of varying sizes either in a line or around a disc that can be moved in front of the lens to control the amount of light entering the camera.
winder
a device to automatically wind on the film
Zeiss bumps
Bumps on the outside of Zeiss Ikon cameras caused by the rivets used to hold components together chemically reacting with the body of the camera. This causes visible bumps under the leatherette covering.
zoom
a lens that has an adjustable focal length